Introduzione
This manual provides detailed instructions for the installation, configuration, and maintenance of your Biostar TB85 Motherboard. The Biostar TB85 is designed to support Intel LGA 1150 processors and DDR3 memory, offering a stable and efficient platform for various computing needs. Please read this manual thoroughly before proceeding with installation to ensure proper setup and operation.
Istituisci
Proper installation is crucial for the stable operation of your motherboard. Follow these steps carefully.
1. Layout di a scheda madre
Familiarizatevi cù i diversi cumpunenti è connettori di a scheda madre.

Figure 1: Biostar TB85 Motherboard OverviewQuesta imagine mostra a vista da cima à fondu view of the motherboard, highlighting the LGA 1150 CPU socket, four DDR3 RAM slots, multiple PCI Express slots, SATA ports, and various headers for front panel connections and USB ports.
2. Installazione di a CPU (LGA 1150)
- Truvate u socket di a CPU LGA 1150 nantu à a scheda madre.
- Spinghje delicatamente a leva di carica è tiralla di latu per apre u coperchio di u socket di a CPU.
- Allineate cù cura a CPU cù u socket, assicurendu chì u triangulu d'oru nantu à a CPU currisponde à u triangulu nantu à u socket. Ùn furzate micca a CPU in u socket.
- Lower the CPU into the socket.
- Close the socket cover and push the load lever back into its locked position.
- Applicate a pasta termica à a CPU è installate u raffreddatore di a CPU secondu l'istruzzioni di u fabricatore.
3. Installazione di RAM (DDR3)
- Locate the DDR3 memory slots. The Biostar TB85 has four DDR3 DIMM slots.
- Aprite i clip à e duie estremità di u slot di memoria.
- Allineate u modulu di memoria cù u slot, assicurendu chì a tacca nantu à u modulu currisponde à a chjave in u slot.
- Appughjà fermamente nantu à e duie estremità di u modulu di memoria finu à chì i clips si scattanu in u so postu.
4. Muntatura di a scheda madre
- Install standoffs in your PC case that align with the screw holes on the ATX motherboard.
- Pone cù cura a scheda madre in u chassis, allineendu i fori di e viti cù i distanziatori.
- Secure the motherboard with screws. Do not overtighten.
5. Cunnessione di l'alimentazione elettrica
- Connect the 24-pin ATX power connector from your power supply to the corresponding port on the motherboard.
- Connect the 8-pin (or 4-pin) ATX 12V CPU power connector to the port near the CPU socket.
6. Archiviazione è Periferiche
- Connect SATA data cables from your storage devices (HDDs, SSDs) to the SATA 3 ports on the motherboard.
- Connect the front panel connectors (power button, reset button, HDD LED, power LED) to the appropriate headers on the motherboard. Refer to the motherboard diagram for exact pinouts.
- Connect USB 2.0 and USB 3.0 front panel headers if your case supports them.
- Install any PCI Express expansion cards (e.g., graphics card) into the available slots and secure them.
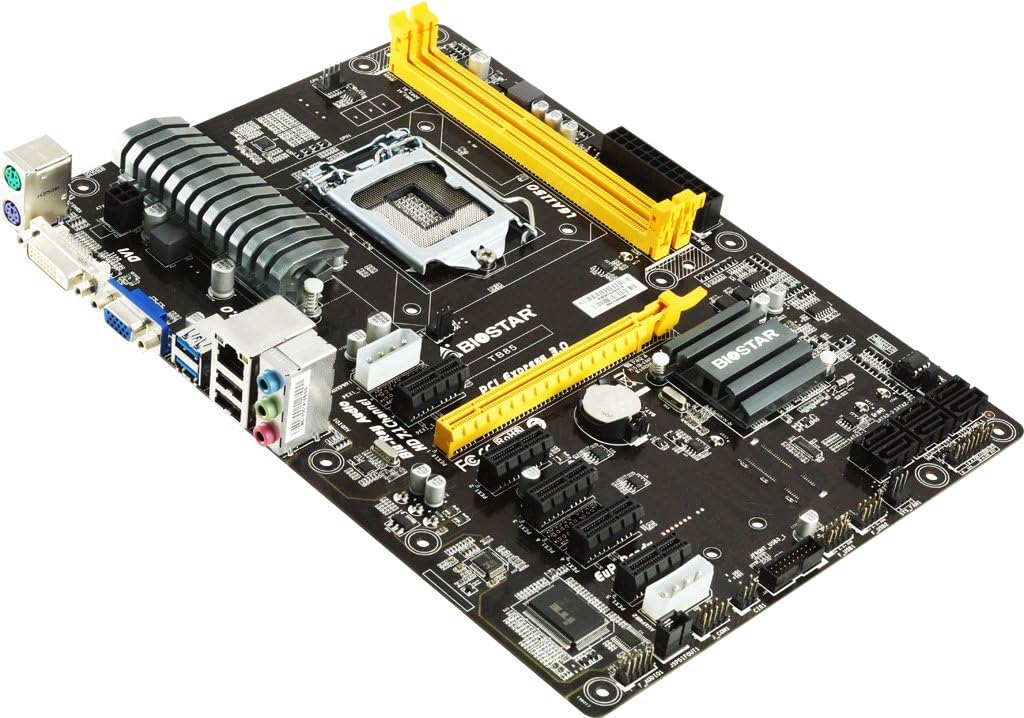
Figure 2: Biostar TB85 Motherboard Angled View. This image provides an angled perspective of the motherboard, showcasing the rear I/O panel with USB, audio, and video ports, as well as the CPU socket and the arrangement of PCI Express slots.
Operazione
Once all components are installed, you can proceed with initial power-on and operating system setup.
1. Prima Boot
- Assicuratevi chì tutte e cunnessione sò sicure.
- Cunnette u vostru monitor, a tastiera è u mouse.
- Power on your system. The system should perform a Power-On Self-Test (POST).
- If the system boots successfully, you will see the BIOS/UEFI splash screen or a prompt to enter setup.
2. Cunfigurazione di u BIOS/UEFI
Per accede à l'utilità di cunfigurazione BIOS/UEFI, appughjà u buttone DEL key during the POST process. In the BIOS/UEFI, you can configure various system settings, including boot order, CPU settings, memory timings, and peripheral options.
3. Installazione di u Sistema Operativu
Insert your operating system installation media (USB drive or DVD) and set the boot order in the BIOS/UEFI to prioritize the installation media. Follow the on-screen prompts to install your preferred operating system (e.g., Windows 7, Windows 8).
Mantenimentu
A manutenzione regulare aiuta à assicurà a longevità è e prestazioni ottimali di a vostra scheda madre.
1. Pulizia
- Pulite periodicamente a polvera da a scheda madre è da i cumpunenti cù aria compressa. Assicuratevi chì u sistema sia spento è scollegatu prima di pulisce.
- Evitate l'usu di detergenti liquidi direttamente nantu à i cumpunenti.
2. Aghjurnamenti di u BIOS
Check the Biostar official website for the latest BIOS updates. BIOS updates can improve system stability, add support for new hardware, or fix known issues. Follow the update instructions provided by Biostar carefully to avoid damaging the motherboard.
3. Verifiche di i cumpunenti
Occasionally inspect cables and connections to ensure they are secure. Check for any signs of physical damage or overheating on components.
Risoluzione di prublemi
Questa sezione furnisce suluzioni à i prublemi cumuni chì pudete scuntrà.
1. Nisuna Alimentazione / Nisun Avvio
- Verify that the power supply is connected correctly to the motherboard (24-pin ATX and 8-pin/4-pin CPU power).
- Ensure the power button cable from the case is correctly connected to the motherboard's front panel header.
- Pruvate l'alimentazione elettrica cù un altru sistema o un tester di alimentazione elettrica.
2. Nisuna uscita di visualizazione
- Ensure the monitor is connected to the correct video output (either integrated graphics or a dedicated graphics card).
- Rimette in piazza a carta grafica è i moduli di memoria.
- Pruvate à avvià cù una sola memoria RAM installata.
3. System Beep Codes
If your system emits a series of beeps during startup, these are POST (Power-On Self-Test) error codes. Consult the Biostar website or a general BIOS beep code reference for the specific meaning of the sequence. Common issues indicated by beep codes include memory errors, graphics card issues, or CPU problems.
4. Clearing CMOS
If you encounter boot issues or incorrect BIOS settings, you can clear the CMOS (Complementary Metal-Oxide-Semiconductor) to reset BIOS settings to default. To do this:
- Power off the system and unplug the power cord.
- Locate the CLR_CMOS jumper on the motherboard (refer to the motherboard diagram).
- Move the jumper from pins 1-2 to 2-3 for 5-10 seconds, then move it back to 1-2.
- Alternatively, remove the CMOS battery for 1-2 minutes and then reinsert it.
- Reconnect the power cord and power on the system.
Specificazioni
Key technical specifications for the Biostar TB85 Motherboard:
| Feature | Specificazione |
|---|---|
| Marca | Biostar |
| Numero di mudellu | TB85 |
| Socket CPU | LGA 1150 |
| Processori cumpatibili | Intel Core i7, i5, i3, Pentium (LGA 1150) |
| Tipu di chipset | Intel B85 |
| Tecnulugia di memoria RAM | DDR3 |
| Velocità di l'orologio di memoria | 1600 MHz / 1333 MHz / 1066 MHz |
| Slots di memoria dispunibuli | 4 |
| Interfaccia di a carta grafica | PCI Express |
| Standard di Bus di Sistema Supportatu | SATA 3 |
| Total Ports USB | 6 (including USB 2.0) |
| Piattaforma | Windows 7, Windows 8 |
Garanzia è Supportu
For warranty information and technical support, please refer to the official Biostar website or contact your local dealer. Keep your proof of purchase for warranty claims. The Biostar website typically provides drivers, BIOS updates, and additional support resources.
Official Biostar Websitu: www.biostar.com.tw