1. Introduzione
This manual provides detailed instructions for the installation, operation, and maintenance of your Biostar TB85 motherboard. The Biostar TB85 is an ATX form factor motherboard designed for Intel Socket 1150 processors, supporting DDR3 memory. It features an Intel B85 chipset, offering a reliable foundation for personal computer systems.

Figura 1: Overview of the Biostar TB85 Motherboard. This image displays the full layout of the motherboard, including the CPU socket, RAM slots, PCIe slots, and various connectors.
2. Setup è Installazione
Prima di principià l'installazione, assicuratevi chì u vostru sistema sia spento è scollegatu da a fonte di alimentazione. Maneghjate a scheda madre per i so bordi per evità scariche statiche.
2.1 Installazione di CPU
The Biostar TB85 motherboard uses an LGA 1150 socket.
- Localizà u socket CPU nantu à a scheda madre.
- Gently push down the load lever and pull it sideways to open the socket retention frame.
- Allineate a marca triangulare nantu à a CPU cù a marca currispundente nantu à u socket. Pone cù cura a CPU in u socket senza furzà la.
- Chiudete u quadru di ritenzione è fissatelu cù a leva di carica.
- Applicate a pasta termica à a CPU è installate u raffreddatore di a CPU secondu l'istruzzioni di u fabricatore.
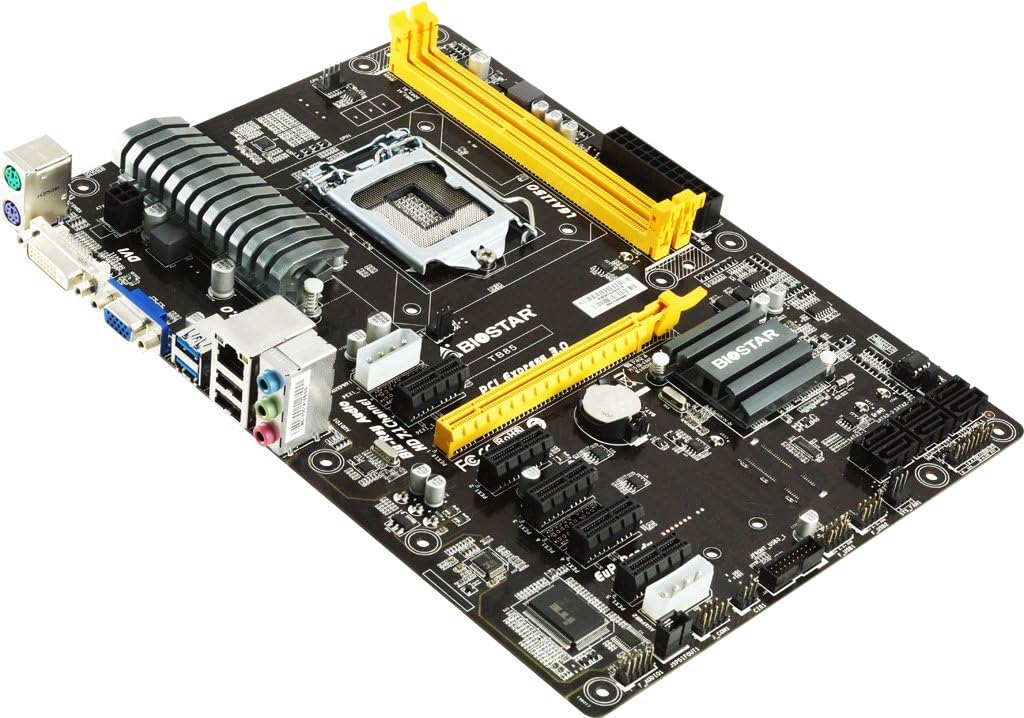
Figura 2: Detailed view of the LGA 1150 CPU socket and the two yellow DDR3 RAM slots on the Biostar TB85 motherboard.
2.2 Installazione di RAM
The motherboard supports DDR3 RAM modules. It has two DIMM slots, supporting up to 16 GB total memory.
- Aprite i clips à e duie estremità di u slot DIMM.
- Allineate a tacca di u modulu di memoria DDR3 cù a chjave in u slot DIMM.
- Inserite u modulu di memoria fermamente in u slot finu à chì i clips si scattanu in u so postu.
2.3 Storage Device Installation (SATA)
The Biostar TB85 includes SATA 3 ports for connecting storage devices such as HDDs and SSDs. While the specifications list 1 total SATA port, the motherboard visually features multiple SATA 3 ports for connectivity.
- Cunnette una estremità di un cavu di dati SATA à un portu SATA di a scheda madre.
- Cunnette l'altra estremità di u cavu di dati SATA à u vostru dispositivu di almacenamentu.
- Cunnette un cavu d'alimentazione SATA da u vostru alimentatore (PSU) à u dispusitivu di almacenamentu.
2.4 Installazione di a carta d'espansione (PCIe)
The motherboard features multiple PCIe slots for expansion cards like graphics cards, network cards, or sound cards. It has 4 total PCIe ports.
- Select an appropriate PCIe slot for your expansion card.
- Eliminate u coperchio di u supportu metallicu currispundente da u vostru chassis di PC.
- Align the expansion card with the slot and press it down firmly until it is fully seated.
- Fissate a carta cù una vite à u chassis di u PC.
2.5 Cunnessioni di putenza
Connect the main 24-pin ATX power connector and the 8-pin (or 4-pin) CPU power connector from your PSU to the corresponding sockets on the motherboard. Ensure all power cables are securely connected.
2.6 Cunnessione I/O di u pannellu frontale è posteriore
Connect your PC case's front panel connectors (power button, reset button, USB ports, audio jacks, indicator LEDs) to the appropriate headers on the motherboard. Refer to the motherboard's silkscreen labels for correct pin assignments.
The rear I/O panel includes ports for peripherals:
- PS/2 ports for keyboard/mouse
- VGA and DVI display outputs
- USB 3.0 and USB 2.0 ports (The specifications list 2 total USB ports, but the rear I/O panel typically offers more)
- Portu LAN
- Audio jacks (HD 7.1 Channel Blu-Ray Audio)
3. Operating Instructions
3.1 Avvio iniziale è cunfigurazione di u BIOS
Dopu avè assemblatu u vostru sistema, cunnette un monitor, una tastiera è un mouse. Accendete u sistema. Durante l'avviu, appughjà u tastu designatu (di solitu DEL or F2) per accede à l'utilità di cunfigurazione BIOS/UEFI.
- Verificate l'infurmazioni di u sistema: Verify that the CPU, RAM, and storage devices are correctly detected.
- Imposta l'ordine di avvio: Configure the boot order to prioritize your operating system installation media (USB drive or optical drive).
- Salvà è Esci: Salvate i vostri cambiamenti è surtite da u BIOS. U sistema si riavvierà.
3.2 Installazione di u Sistema Operativu è di i Driver
Install your preferred operating system (e.g., Windows, Linux) by following its installation prompts. After the OS is installed, install the necessary drivers for the motherboard components.
- Driver di chipset: Install the Intel B85 chipset drivers.
- Driver di grafica: Install drivers for integrated graphics (if used) or your dedicated graphics card.
- Drivers audio: Install HD Audio drivers for 7.1 channel support.
- Driver LAN: Install network drivers for internet connectivity.
- USB 3.0 Drivers: Ensure USB 3.0 functionality.
Drivers can typically be found on the Biostar official website or on the driver CD included with the motherboard (if applicable).
4. Mantenimentu
A manutenzione regulare aiuta à assicurà a longevità è u funziunamentu stabile di a vostra scheda madre è di u vostru sistema.
- Rimozione di polvere: Periodically clean dust from the motherboard, CPU cooler, and case fans using compressed air. Ensure the system is powered off and unplugged.
- Aghjurnamenti di u BIOS: Check the Biostar website for BIOS updates. BIOS updates can improve compatibility, stability, and performance. Follow Biostar's specific instructions for BIOS flashing carefully to avoid system damage.
- Actualizazioni di i driver: Mantene i vostri driver aggiornati per assicurà prestazioni ottimali è compatibilità cù novi software è hardware.
- Verifiche di i cumpunenti: Assicuratevi chì tutti i cavi sianu cunnessi currettamente è chì nisun cumpunente sia allentatu.
5. Risoluzione di prublemi
Sè avete prublemi, riferitevi à i seguenti passi cumuni di risoluzione di i prublemi.
- Nisun putere:
- Ensure the PSU is switched on and all power cables (24-pin ATX, 8-pin CPU) are firmly connected to the motherboard and PSU.
- Check the front panel power switch connection to the motherboard.
- No Display:
- Verify that the monitor is connected to the correct display output (VGA/DVI on motherboard or dedicated graphics card).
- Rimette in piazza i moduli RAM. Pruvate à avvià cù un solu modulu RAM installatu.
- Rimette in piazza a carta grafica (s'ellu hè applicabile).
- Instabilità/Crash di u sistema:
- Verificate e temperature di a CPU è di a GPU. Assicuratevi un raffreddamentu adeguatu.
- Eseguite strumenti di diagnostica di memoria per verificà a presenza di RAM difettosa.
- Assicuratevi chì tutti i driver sianu installati currettamente è aggiornati.
- Perifericu micca rilevatu:
- Pruvate à cunnette u perifericu à un portu diversu.
- Assicuratevi chì i driver di a periferica sò installati.
- Check BIOS settings for port enablement.
For more advanced troubleshooting or persistent issues, contact Biostar technical support.
6. Specificazioni
Below are the key technical specifications for the Biostar TB85 motherboard.
| Feature | Specificazione |
|---|---|
| Marca | Biostar |
| Nome di mudellu | TB85 |
| Socket CPU | LGA 1150 |
| Processori cumpatibili | Intel Core i3-4xxx, i5-4xxx, i7-4xxx, i3-5xxx, i5-5xxx, i7-5xxx |
| Tipu di chipset | Intel B85 |
| Tecnulugia di memoria RAM | DDR3 |
| Capacità di almacenamiento di memoria (Max) | 16 GB |
| Tipu di cunnessu di l'alimentazione principale | 24-Pin |
| Interfaccia di a carta grafica | Integrated (VGA, DVI outputs) |
| Total SATA Ports | 1 (SATA 3 supported) |
| Total Ports USB | 2 (as per spec, typically more via headers) |
| Total PCIe Ports | 4 |
| Audio | HD 7.1 Channel Blu-Ray Audio |
| Fattore di forma | ATX |
| Pesu di l'articulu | 2.05 liri |
7. Garanzia infurmazione
Biostar motherboards typically come with a manufacturer's limited warranty. The duration and terms of the warranty may vary by region and retailer.
- Periudu di garanzia: Refer to your purchase documentation or the official Biostar website for specific warranty periods applicable to your region.
- Prova di compra: Always retain your proof of purchase (invoice or receipt) as it is required for warranty claims.
- Esclusioni di garanzia: The warranty generally does not cover damage caused by improper installation, misuse, unauthorized modifications, accidents, or natural disasters.
For detailed warranty terms and conditions, please visit the official Biostar support websitu.
8. Supportu
For technical assistance, driver downloads, BIOS updates, or further information regarding your Biostar TB85 motherboard, please utilize the following resources:
- Official Biostar Websitu: www.biostar.com.tw (Check for support section, drivers, and FAQs)
- Pagina di Supportu di u Produttu: Look for a dedicated support page for the TB85 model on the Biostar websitu.
- Cuntattate l'assistenza: Information for contacting Biostar technical support via email or phone can usually be found on their websitu.
When contacting support, have your motherboard model (TB85) and a detailed description of your issue ready.