
1. Introduzione
This manual provides essential information for the safe and efficient operation of your Rigol DS1104Z-S Plus 100 MHz Digital Oscilloscope. Please read this manual thoroughly before using the instrument to ensure proper functionality and to prevent damage. The Rigol DS1104Z-S Plus is a 4-channel digital storage oscilloscope designed for precise signal analysis with a 100 MHz bandwidth and a 1 GSa/s real-time samplu rate.
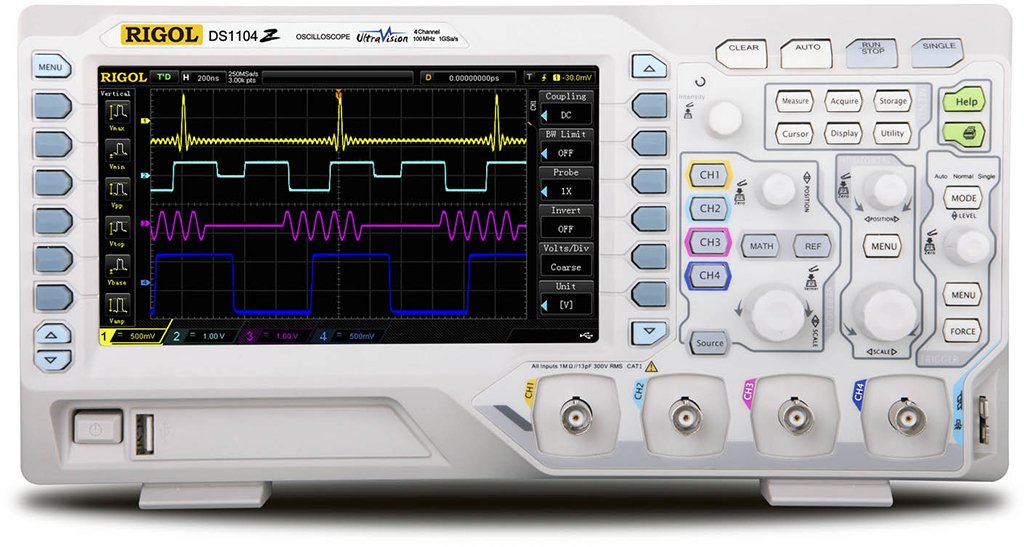
Figure 1: Rigol DS1104Z-S Plus Digital Oscilloscope. This image shows the front panel of the oscilloscope with its display, control knobs, and input channels.
2. Informazioni di sicurezza
Osservate sempre e seguenti precauzioni di sicurezza per prevene ferite è danni à u strumentu:
- Fonte di energia: Connect the instrument only to a power source with the specified voltage è frequenza.
- Messa a terra: Assicuratevi chì u strumentu sia currettamente messu à terra per impedisce scosse elettriche.
- Ventilazione: Ùn bluccate micca l'aperture di ventilazione. Assicuratevi un flussu d'aria adeguatu intornu à u strumentu.
- Ambiente: Aduprate l'oscilloscopiu in un locu seccu è ben ventilatu, luntanu da a luce diretta di u sole, da e temperature elevate è da a polvere eccessiva.
- Sonde: Use only probes designed for the specified voltage classificazioni di frequenza.
- Service : Cuntattate tutti i servizii di manutenzione di u persunale di serviziu qualificatu. Ùn pruvate micca di riparà u strumentu da per voi.
- Pulizia: Scollegate l'alimentazione prima di pulisce. Aduprate un panu dolce èamp tela. Ùn aduprate micca detergenti abrasivi o solventi.
3. Cuntenutu di u pacchettu
Verificate chì u vostru pacchettu cuntene i seguenti elementi:
- Rigol DS1104Z-S Plus Digital Oscilloscope
- Cordone d'alimentazione
- Passive Probes (4 units)
- Cavu USB
- Guida Rapida
- Resource CD (User Manual, Programming Manual, Software)
4. Produttu Finituview
The Rigol DS1104Z-S Plus features a user-friendly interface and robust design for various measurement applications.
4.1 Pannellu Frontale
The front panel includes the display, control knobs, function buttons, and input connectors for channels 1-4.
- Pantalla di visualizazione: Shows waveforms, measurement results, and menu options.
- Cuntrolli verticali: Ajuste voltage per division and position for each channel.
- Cuntrolli Orizzuntali: Adjust time per division and horizontal position.
- Cuntrolli di u grillettu: Set trigger level, mode, and type.
- Pulsanti di funzione: Access various menus such as Acquire, Measure, Storage, Utility, etc.
- Channel Inputs (CH1-CH4): BNC connectors for probe connection.
4.2 Panel posteriore
The rear panel provides power input, USB host/device ports, and LAN port for connectivity.
- Input AC Power: Per cunnette u cavu di alimentazione.
- Port USB Host: Per cunnette dispositivi di almacenamiento USB.
- Portu di u dispusitivu USB: For connecting to a PC.
- Portu LAN: For network connectivity and remote control.
5. Setup
5.1 Cunnessione di putenza
- Assicuratevi chì l'interruttore di alimentazione nantu à u pannellu posteriore sia in a pusizione OFF.
- Connect the provided power cord to the AC power input on the rear panel of the oscilloscope.
- Inserite l'altra estremità di u cavu di alimentazione in una presa di corrente CA cun messa à terra.
5.2 Cunnessione di a sonda
- Connect the BNC connector of a passive probe to one of the input channels (CH1, CH2, CH3, or CH4) on the front panel.
- Connect the probe's ground clip to the circuit's ground reference.
- Set the attenuation ratio on the probe to match the setting on the oscilloscope (e.g., 1X or 10X).
5.3 Accensione iniziale
- Press the power switch on the rear panel to the ON position.
- The oscilloscope will perform a self-test and display the Rigol logo.
- After startup, the default waveform display will appear.
6. Operating Instructions
This section covers basic operations for acquiring and analyzing waveforms.
6.1 Visualizzazione di forma d'onda di base
- Vertical Scale (VOLTS/DIV): Use the vertical scale knob for the active channel to adjust the voltage sensibilità.
- Posizione Verticale: Use the vertical position knob to move the waveform up or down on the screen.
- Horizontal Scale (SEC/DIV): Use the horizontal scale knob to adjust the time base.
- Posizione Orizzontale: Use the horizontal position knob to shift the waveform left or right.
6.2 Triggering
U trigger stabilizza e forme d'onda ripetitive è cattura eventi à colpu unicu.
- Livellu di trigger: Adjust the trigger level knob to set the voltage point at which the trigger occurs.
- Menu di scatenamentu: Press u Trigger Menu button to configure trigger type (Edge, Pulse, Video, etc.), source, and slope.
- Modu Trigger: Select between Auto, Normal, and Single modes.
6.3 Funzioni di misurazione
The oscilloscope offers various automatic measurement functions.
- Press u Misura button to display the measurement menu.
- Select desired measurements such as Vpp, Vmax, Vmin, Freq, Period, Rise Time, etc.
- The results will be displayed on the screen.
6.4 Salvà i dati
Waveforms and settings can be saved to internal memory or a USB storage device.
- Press u Storage buttone.
- Select the storage type (Waveform, Setup, Image) and destination (Internal, USB).
- Follow the on-screen prompts to save the data.
7. Mantenimentu
7.1 Pulizia
To maintain the instrument's appearance and performance:
- Scollegate u cordone di alimentazione prima di pulisce.
- Aduprate un pannu molle dampened with mild detergent and water to clean the exterior.
- Ùn aduprate micca detergenti abrasivi, solventi o prudutti chimichi aggressivi.
- Assicuratevi chì nisun liquidu ùn entre in u strumentu.
7.2 Calibrazione
The oscilloscope is factory calibrated. For optimal performance, periodic calibration by qualified service personnel is recommended, typically every 1-2 years, depending on usage.
7.3 Storage
When not in use for extended periods, store the oscilloscope in a dry, dust-free environment within the specified operating temperature range.
8. Risoluzione di prublemi
This section lists common problems and their solutions. If the problem persists, contact Rigol customer support.
| Prublemu | Causa Possibile | Soluzione |
|---|---|---|
| Nisun display dopu a putenza accesa | Power cord not connected; Power switch off; Faulty power outlet | Verificate a cunnessione di u cavu d'alimentazione; Assicuratevi chì l'interruttore di alimentazione sia ON; Pruvate a presa di corrente cù un altru dispositivu |
| Nisuna forma d'onda visualizata | Probe not connected; Incorrect channel settings; Trigger level incorrect; Input signal too small/large | Connect probe to active channel; Adjust vertical scale and position; Adjust trigger level; Check input signal source |
| Forma d'onda instabile | Incorrect trigger settings; Noisy signal | Adjust trigger level and mode; Check signal source for noise; Use averaging acquisition mode |
| Cannot save data to USB | USB drive not formatted correctly; USB drive full; USB drive faulty | Format USB drive to FAT32; Delete unnecessary files; Try a different USB drive |
9. Specificazioni
Key technical specifications for the Rigol DS1104Z-S Plus Digital Oscilloscope:
- larghezza di banda: 100 MHz
- Canali: 4 Canali Analogici
- In tempu reale Sample Tarif: Finu à 1 GSa/s
- Profundità di memoria: 12 Mpts (Standard), 24 Mpts (Optional)
- Frequenza di cattura di forma d'onda: Up to 30,000 wfms/s
- Display: LCD TFT di 7 pollici (risoluzione 800x480)
- Sensibilità verticale: 1 mV/div à 10 V/div
- Intervallu di basa di tempu: 2 ns/div to 50 s/div
- Trigger Types: Edge, Pulse, Video, Slope, Alternate, Runt, Window, Delay, Setup/Hold, Nth Edge
- Interfaccia: USB Host, USB Device, LAN, Pass/Fail, Trigger Out
- Fonte di energia: Corded Electric
- Pesu di l'articulu: 1 chilògrammi
- Conformità: CE
10. Garanzia è Support
Rigol Technologies provides a standard warranty for its products. For detailed warranty terms and conditions, please refer to the warranty card included with your product or visit the official Rigol website. For technical support, service, or inquiries, please contact your local Rigol distributor or Rigol customer service. Contact information can typically be found on the Rigol website or in the documentation provided with your oscilloscope.
Ufficiale Websitu: www.rigol.com