1. Introduzione
Thank you for choosing the Xega Solar Security Camera. This device is designed to provide reliable outdoor surveillance with the convenience of solar power and wireless connectivity. Featuring 2K resolution, Pan-Tilt-Zoom (PTZ) functionality, color night vision, and smart motion detection, it offers comprehensive monitoring for your property. This manual will guide you through the installation, operation, and maintenance of your camera system.

Image: The Xega Solar WiFi Camera mounted on a house, illustrating its wireless connectivity.
2. Ciò chì hè in a scatula
Verificate u cuntenutu di u pacchettu per assicurà chì tutti l'articuli sò presenti:
- WiFi Camera (4 units)
- Solar Panel (4 units)
- Solar Panel Bracket (4 units)
- 3-meter Connection Cable (4 units)
- Manuale d'usu
- Viti è Tappi di Muru
3. Produttu Finituview è Features
The Xega Solar Security Camera is equipped with advanced features for reliable outdoor surveillance:
- Solar-Powered & Easy Installation: Operates entirely on solar energy with a built-in 5200mAh rechargeable battery. No electrical wiring required, allowing flexible installation. The 3.5W angle-adjustable solar panel maximizes sunlight exposure.
- 2K Image & PTZ Technology: Delivers 2K HD clarity with a high-performance image sensor. Features 355° horizontal and 90° vertical rotation for wide area coverage.
- Visione notturna di culore: Provides vibrant full-color night vision up to 25 meters (82ft) in darkness.
- Smart Detection & Instant Alerts: Built-in PIR sensor with adjustable sensitivity supports human detection and customizable detection zones to minimize false alarms. Triggers bright floodlights and audible alarms upon detection. Real-time alerts are pushed to your phone via the Ubox app.
- Discussione bidirezionale: Built-in microphone and speaker enable real-time two-way communication.
- Optional Storage: Supports local storage via TF card (up to 128GB, not included) and cloud storage (30-day trial available).
- IP66 Resistente à l'intemperie: Designed to withstand various weather conditions, ensuring year-round security.
Funzioni visuali sopraview

Image: The camera and solar panel setup, emphasizing continuous solar power for 365 days.
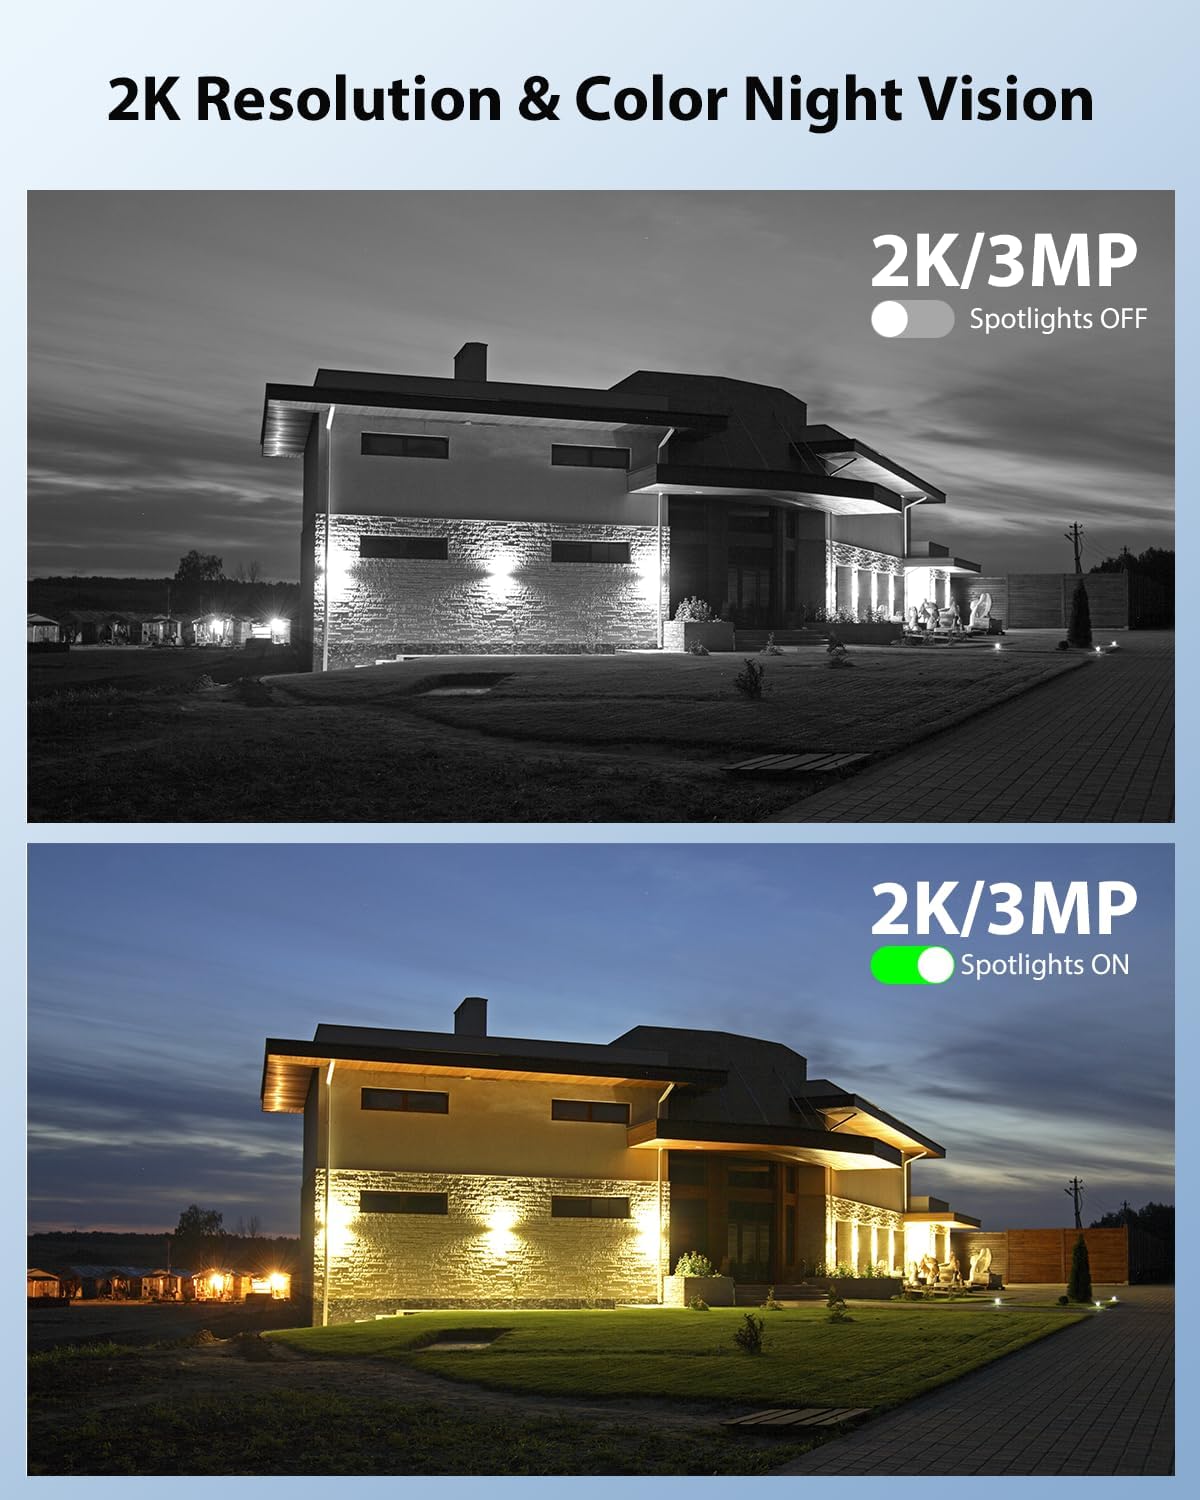
Image: Demonstrates 2K resolution and the difference between infrared and color night vision with spotlights.

Image: Illustrates the panoramic view and PTZ (Pan-Tilt-Zoom) capabilities controlled via a smartphone app.
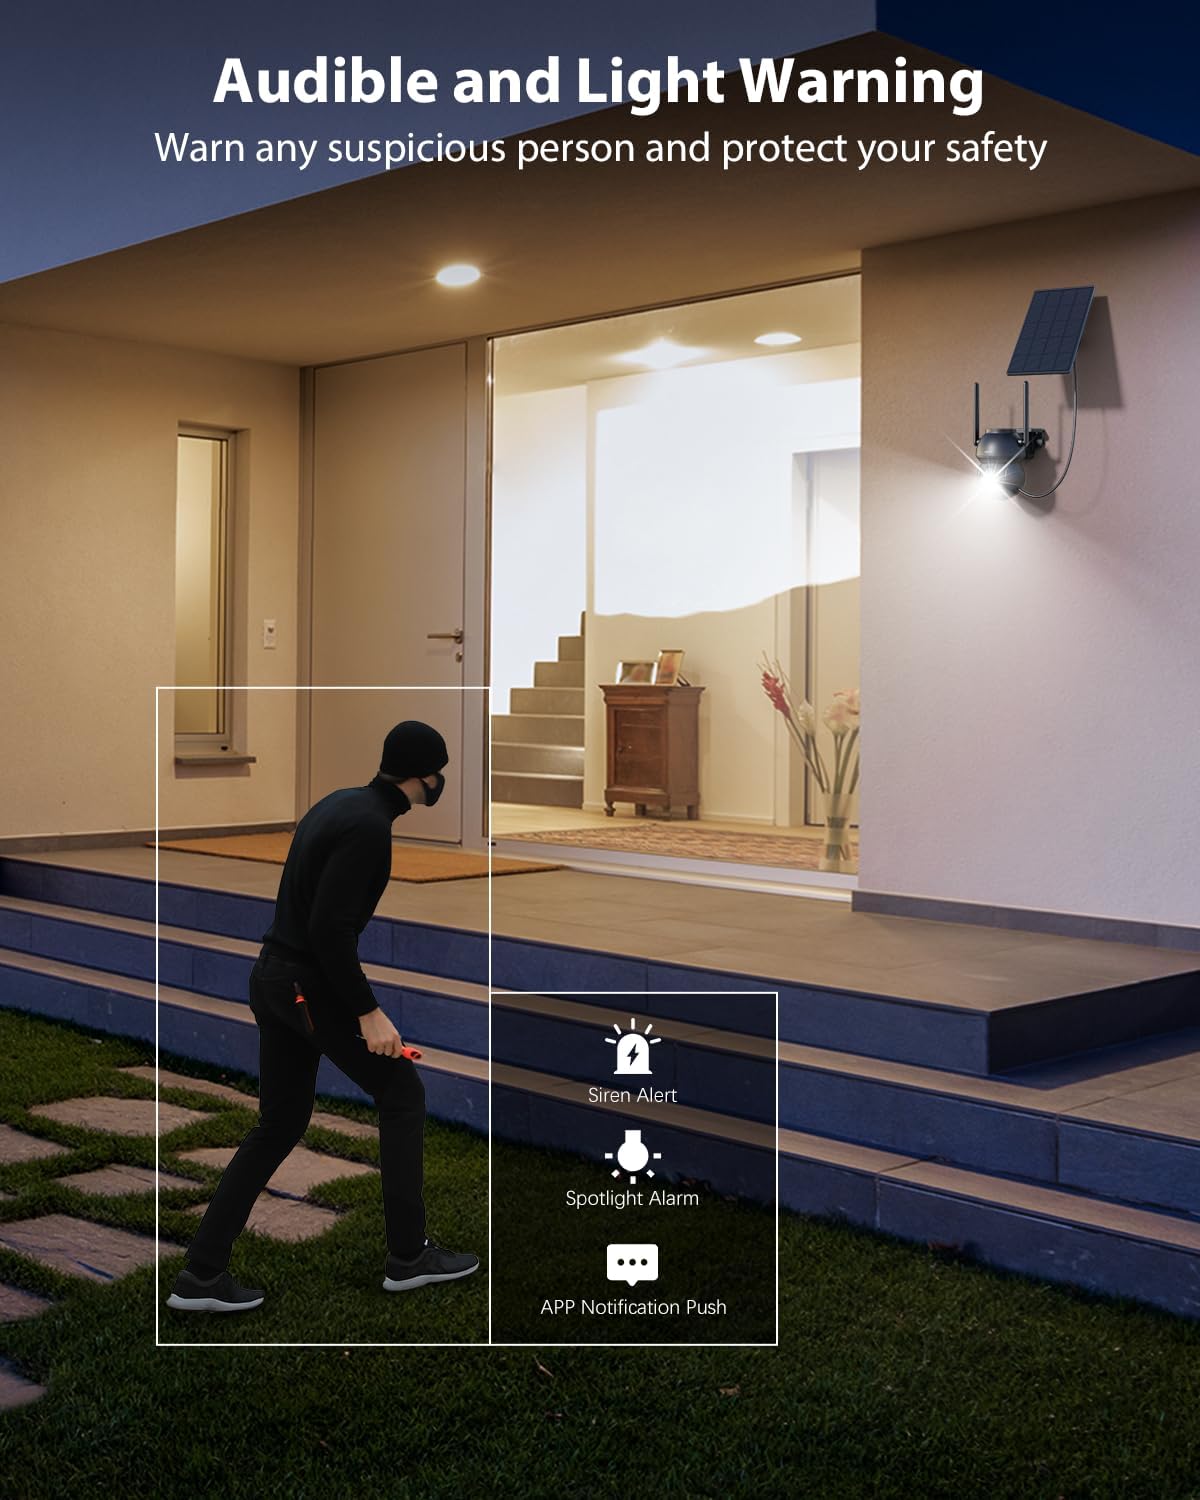
Image: Shows the camera's audible and light warning system deterring a suspicious person.

Image: Depicts the two-way audio function, allowing communication through the camera.

Image: Shows how to customize detection areas to focus monitoring on important zones and reduce false alarms.

Image: Highlights the IP66 weather-resistant design, showing the camera's durability in various weather conditions.
Video di u produttu
Video: Un overview of the Xega Solar WiFi Camera Outdoor Wireless, demonstrating its key features and ease of installation.
4. Setup Guide
4.1 Caricà a Batteria
Before initial use, fully charge the camera's built-in 5200mAh battery using the provided USB cable. Although solar-powered, a full initial charge ensures optimal performance from the start.
4.2 Installazione di l'applicazione è creazione di u contu
- Scaricate u Ubox l'app da l'app store di u vostru smartphone (iOS o Android).
- Aprite l'app è seguitate l'istruzzioni nantu à u screnu per creà un novu contu o cunnettassi se ne avete digià unu.
4.3 Camera Pairing with Wi-Fi
- Assicuratevi chì u vostru smartphone sia cunnessu à un Rete Wi-Fi à 2.4 GHz. The camera does not support 5GHz Wi-Fi.
- In the Ubox app, tap the "Add Device" or "+" icon.
- Power on the camera. It will enter pairing mode, indicated by a specific LED light pattern (refer to the camera's LED indicator guide in the app for details).
- Follow the app's instructions to connect the camera to your Wi-Fi network. This usually involves scanning a QR code displayed on your phone with the camera lens.
- Once connected, the camera will confirm successful pairing, and you can name your device.
4.4 Muntatura di a Camera è di u Pannellu Solare
The camera and solar panel are designed for wall mount installation.
- Scegli un locu: Select an outdoor location with good Wi-Fi signal strength and ample sunlight exposure for the solar panel. The camera should be mounted at a height that provides optimal viewing angles and detection range.
- Muntà a Camera: Use the provided screws and wall plugs to securely attach the camera bracket to a wall or suitable surface. Ensure the camera has a clear line of sight to the area you wish to monitor.
- Muntà u pannellu solare: Attach the solar panel bracket to a location where it receives direct sunlight for most of the day. Adjust the angle of the solar panel to maximize sunlight exposure.
- Connect Panel Solar: Use the 3-meter connection cable to link the solar panel to the camera.
5. Operating Instructions
5.1 Live View è cuntrollu PTZ
- Open the Ubox app and select your camera to access the live view.
- Use the on-screen joystick or swipe gestures to control the camera's 355° pan and 90° tilt movements.
- Pinch to zoom in or out (digital zoom).
5.2 Audio bidirezionale
- In u live view, toccate l'icona di u microfonu per parlà per l'altoparlante di a camera.
- Toccate l'icona di l'altoparlante per ascultà l'audio da l'intorni di a camera.
5.3 Rilevazione di muvimentu è avvisi
- Navigate to the camera settings in the Ubox app.
- Adjust PIR sensor sensitivity to optimize detection and minimize false alarms.
- Set up custom detection zones to monitor specific areas of interest.
- Enable or disable floodlight and siren alarms for motion events.
- Ensure push notifications are enabled in your phone settings and the Ubox app to receive instant alerts.
5.4 Modi di Visione Notturna
The camera offers different night vision modes:
- Visione notturna infrarossa: Provides clear black and white images in low light.
- Visione notturna di culore: Activates built-in spotlights to provide full-color images at night when motion is detected. This can be configured in the app settings.
5.5 Opzioni di almacenamentu
- Archiviazione di carte TF: Insert a TF (microSD) card (up to 128GB, not included) into the camera's designated slot for local recording.
- Storage Cloud: Subscribe to the optional cloud storage service via the Ubox app for secure, remote storage of your recordings. A 30-day trial may be available.
- Accessu arregistratu footage and playback options through the Ubox app.
6. Mantenimentu
- Pulizia di pannelli solari: Asciugate regularmente a superficia di u pannellu solare cù un pannu dolce èamp pannu per caccià a polvera, a terra o i detriti chì ponu riduce l'efficienza di carica.
- Pulizia di lenti di càmera: Pulite delicatamente l'obiettivo di a camera cù un pannu in microfibra per assicurà una qualità d'immagine chjara. Evitate i materiali abrasivi.
- Actualizazioni di firmware: Check the Ubox app periodically for firmware updates. Keeping your camera's firmware updated ensures optimal performance and access to new features.
- Salute di a batteria: While solar-powered, extreme weather or prolonged periods of low sunlight may affect battery levels. Ensure the solar panel is optimally positioned.
- Resistenza à u clima: The IP66 rating ensures protection against dust and strong jets of water. No special weather-proofing maintenance is typically required beyond ensuring secure mounting.
7. Risoluzione di prublemi
- Camera ùn hè micca cunnessu à u Wi-Fi:
- Assicuratevi chì a vostra rete Wi-Fi sia 2.4GHz.
- Verificate a forza di u signale Wi-Fi à u locu di a camera.
- Riavviate u vostru router è a camera.
- Verificate l'inserimentu currettu di a password Wi-Fi in l'app.
- Qualità di l'imaghjini scarsa:
- Pulite a lente di a camera.
- Ensure adequate lighting, especially for color night vision.
- Verificate a velocità di a vostra cunnessione internet.
- Avvisi di muvimentu falsi:
- Adjust PIR sensor sensitivity in the app.
- Define or refine custom detection zones to exclude irrelevant areas (e.g., public roads, swaying trees).
- Batteria micca carica:
- Ensure the solar panel is receiving direct sunlight for several hours daily.
- Pulite a superficia di u pannellu solare.
- Check the connection cable between the solar panel and the camera.
- Problemi audio bidirezionali:
- Ensure your phone's volume is up and the microphone is enabled for the Ubox app.
- Check the camera's speaker and microphone settings in the app.
8. Specificazioni
| Feature | Specificazione |
|---|---|
| Nome di mudellu | XG-22-WIFI-P4 |
| Usu Indoor / Outdoor | Outdoor |
| Fonte d'energia | Solar and Battery Powered (5200mAh Lithium Ion batteries included) |
| Tecnulugia di cunnessione | 2.4 Ghz WiFi |
| Risoluzione Video Capture | 2K (1296p) |
| PTZ (Pan/Tilt) | 355 ° Orizontale, 90 ° Verticale |
| Gamma di Visione Notturna | 25 metri (82 ft) |
| Tecnulugia Low Light | Visione notturna di culore |
| Rilevazione di muvimentu | PIR Sensor, Human Detection, Customizable Alarm Areas |
| Audio bidirezionale | Iè |
| Opzioni di almacenamiento | TF Card (Max. 128GB), Cloud Storage |
| Classificazione di Prutezzione Internaziunale | IP66 |
| Tipu di muntatura | Muntu à u muru |
| Materiale | Acrilonitrile Butadiene Stirene (ABS) |
| Dimensioni di u produttu | 5 x 5 x 5 inch |
| Pesu di l'articulu | 6.43 libbre (per un pacchettu di 4) |
9. Garanzia è Support
9.1 Garanzia infurmazione
Xega products typically come with a manufacturer's warranty. Please refer to the product packaging or the official Xega websitu per i termini è e cundizioni specifiche di garanzia. Conservate a vostra ricevuta d'acquistu cum'è prova d'acquistu.
9.2 Assistenza Clienti
For technical assistance, troubleshooting, or any product-related inquiries, please contact Xega customer support. You can usually find contact information on the Xega official website or through the Ubox app.

Image: Xega offers 24/7 online customer support for assistance.