1. Introduzione è Overview
The StarTech.com SV231DPDDUA is a 2-Port Dual DisplayPort KVM Switch designed to provide seamless control over two dual-head or twin DisplayPort computer systems from a single console. This device integrates advanced digital display standards with comprehensive KVM functionality, allowing users to manage two computers using one keyboard, mouse, and two DisplayPort monitors.
Key features of this KVM switch include:
- Supportu Dual Monitor: Connect and control two high-resolution dual DisplayPort computers with a single console setup.
- High Resolution Capabilities: Supports resolutions up to 2560x1600 at 60 Hz, suitable for demanding applications such as multimedia design and video editing. It also supports a maximum resolution of 3840x2400 (4K) at reduced refresh rates for high-quality static imaging.
- Ampia cumpatibilità: Operates effectively with DisplayPort-equipped desktops, notebook computers, and DisplayPort monitors.
- Integrated USB 2.0 Hub: Features a built-in USB 2.0 hub for sharing peripherals between connected computers.
- Audio and Microphone Support: Includes 2-channel analog stereo audio and microphone input for a complete multimedia experience.
2. Ciò chì hè in a scatula
Verificate chì u vostru pacchettu cuntene i seguenti elementi:
- 1x StarTech.com SV231DPDDUA 2-Port Dual DisplayPort KVM Switch
- 1x Universal Power Adapter (NA/EU/UK/AU)
- 1x Manuale d'istruzzioni (questu documentu)
- 4x Piedi di Gomma

Figure 2.1: Package Contents of the SV231DPDDUA KVM Switch.

Figure 2.2: The SV231DPDDUA KVM Switch and its accessories.
3. Setup Instructions
Follow these steps to properly set up your StarTech.com SV231DPDDUA KVM Switch:
- Dispositivi spenti: Ensure all computers, monitors, and the KVM switch are powered off before making any connections.
- Cunnette i monitors: Connect your two DisplayPort monitors to the KVM switch's CONSOLE DisplayPort 1 è CONSOLE DisplayPort 2 porti.
- Connect Console Peripherals: Connect your USB keyboard and USB mouse to the dedicated CONSOLA USB ports on the KVM switch. If using a USB hub for additional peripherals, connect it to one of the CONSOLE USB 2.0 Hub porti.
- Connect Console Audio (Optional): If desired, connect your speakers/headphones and microphone to the CONSOLE Audio Out è CONSOLE Mic In porti.
- Connect Computer 1:
- Connect the DisplayPort outputs from Computer 1 to the KVM switch's PC 1 DisplayPort 1 è PC 1 DisplayPort 2 porti.
- Connect a USB cable from Computer 1 to the KVM switch's PC 1 USB portu.
- Connect the audio output and microphone input from Computer 1 to the KVM switch's PC 1 Audio In è PC 1 Mic In ports (optional).
- Connect Computer 2: Repeat the steps for Computer 1, connecting its DisplayPort outputs, USB, and optional audio/mic to the corresponding pc 2 ports on the KVM switch.
- Connect Power: Connect the universal power adapter to the KVM switch's DC 9-12V power input and then plug it into a power outlet.
- Power On: Power on the KVM switch first, then your monitors, and finally your connected computers. This sequence helps ensure proper device detection.

Figure 3.1: Rear Panel Connections of the SV231DPDDUA KVM Switch.
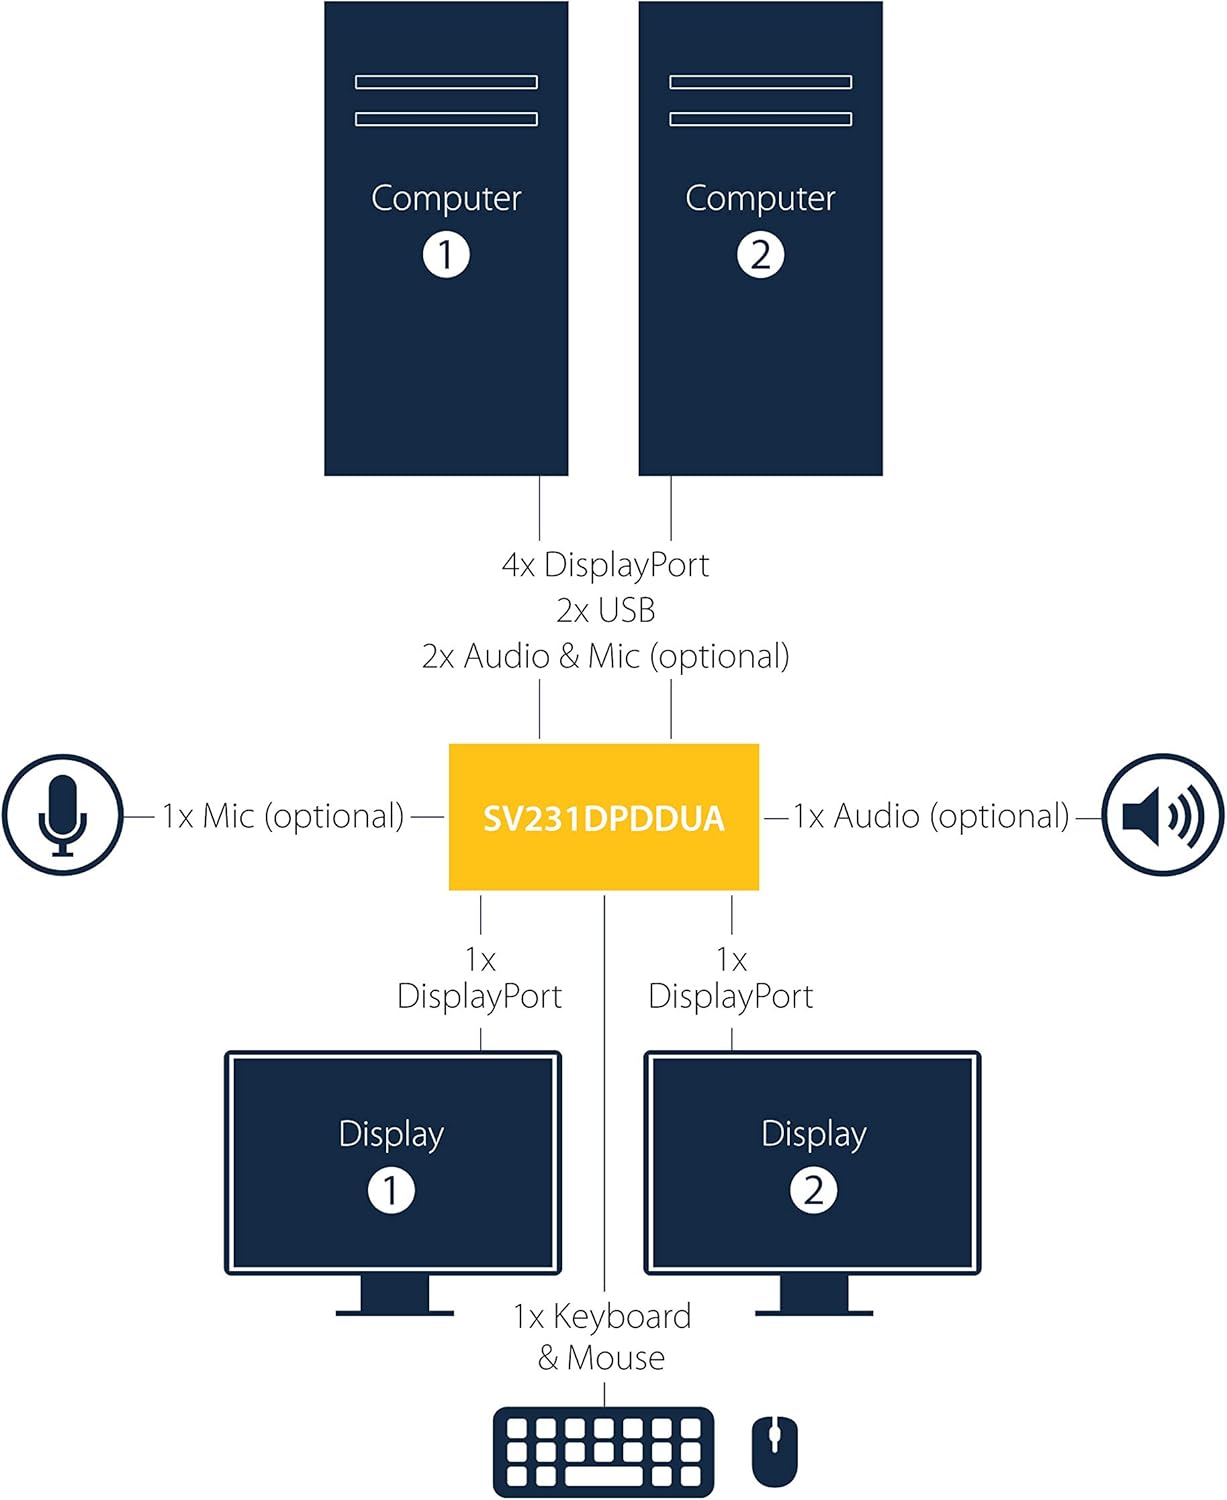
Figure 3.2: Typical Connection Diagram for the SV231DPDDUA KVM Switch.
4. Operating Instructions
The StarTech.com SV231DPDDUA KVM Switch offers straightforward operation for switching between connected computers.
4.1 Cambià trà l'urdinatori
You can switch between the two connected computers using the front panel push buttons:
- Press u buttone marcatu 1 to switch control to Computer 1.
- Press u buttone marcatu 2 to switch control to Computer 2.

Figure 4.1: Front Panel of the SV231DPDDUA KVM Switch with selection buttons.
4.2 Funzionalità di l'hub USB
The integrated USB 2.0 hub allows you to share additional USB peripherals (e.g., printers, external drives) between the two connected computers. When you switch to a computer, the USB devices connected to the KVM's USB hub ports will automatically connect to that computer.
4.3 Audio Switching
Audio and microphone signals are switched along with the video and USB signals. Ensure your computer's audio settings are configured to output sound through the DisplayPort or the connected audio cables to the KVM switch.
5. Mantenimentu
Per assicurà a longevità è e prestazioni ottimali di u vostru switch KVM, seguitate queste linee guida di manutenzione:
- Pulizia: Use a soft, dry cloth to clean the exterior of the KVM switch. Avoid using abrasive cleaners, solvents, or strong chemicals, as these can damage the device.
- Cundizioni Ambientali: Operate the KVM switch within its specified temperature and humidity ranges. Avoid exposing the device to extreme temperatures, direct sunlight, or excessive moisture.
- Gestione di Cable: Ensure all cables are securely connected and not under undue strain. Proper cable management can prevent accidental disconnections and damage to ports.
- Actualizazioni di firmware: Periodically check the StarTech.com website for any available firmware updates for your KVM switch. Updates can improve performance, add features, or resolve known issues.
6. Risoluzione di prublemi
If you encounter issues with your SV231DPDDUA KVM switch, refer to the following common problems and solutions:
- Nisuna visualizazione nantu à i monitori:
- Ensure the KVM switch is powered on and the power adapter is securely connected.
- Verify that all DisplayPort cables are firmly connected between the computers, KVM, and monitors.
- Confirm that the correct input is selected on your monitors.
- Try restarting the KVM switch, then the monitors, and finally the computers in that order.
- Test with different DisplayPort cables if possible.
- A tastiera o u mouse ùn risponde micca:
- Ensure the keyboard and mouse are connected to the dedicated CONSOLA USB porti.
- Verify the USB cables from the computers to the KVM switch are securely connected.
- Try connecting the keyboard and mouse directly to the computer to confirm they are functional.
- Some specialized gaming keyboards/mice with advanced features or requiring specific drivers may not function optimally through a KVM. Try a standard keyboard/mouse for testing.
- If using a USB hub, try connecting devices directly to the KVM's USB hub ports.
- No Audio or Microphone Functionality:
- Check all audio and microphone cables for secure connections between the computers, KVM, and speakers/microphone.
- Verify the audio output and input settings on your operating system for the selected computer.
- Slow Switching or Intermittent Issues:
- Ensure all cables are of good quality and appropriate length. Longer or lower-quality cables can sometimes cause signal degradation.
- Power cycle the KVM switch and all connected devices.
- If using video adapters (e.g., DisplayPort to HDMI/DVI), ensure they are active adapters and compatible with the KVM. Direct DisplayPort connections are recommended for optimal performance.
7. Specificazioni
| Feature | Specificazione |
|---|---|
| Numero di mudellu | SV231DPDDUA |
| Numero di Porti | 2 |
| Interfaccia Video | DisplayPort |
| Risoluzioni digitali massime | 2560x1600 @ 60Hz (with DisplayPort HD audio), 3840x2400 (4K) at reduced refresh rates |
| Hub USB | USB 2.0 (4 porti) |
| Supportu Audio | 2-channel analog stereo audio and microphone input |
| Tipu di cuntrollu | Pulsante |
| Materiale | Steel |
| Culore | Neru |
| Dimensioni di l'articulu (L x W x H) | 6.34 x 2.27 pollici (circa) |
| Pesu di l'articulu | 1.62 liri |
| Voltage | 12 Volts |
| Valutazione attuale | 1.5 Amps |
| Classificazione di Prutezzione Internaziunale | IP30 |
8. Garanzia è Support
StarTech.com products are backed by a comprehensive warranty. For specific warranty details, please refer to the warranty information provided with your product or visit the official StarTech.com websitu.
StarTech.com offers free 24-hour pre and post-sales technical support from Monday to Friday. If you require assistance with your SV231DPDDUA KVM Switch, you can reach out through various channels:
- Chat in diretta: Available on the StarTech.com websitu.
- Assistenza telefonica: Contact their technical support line.
- Supportu per email: Send your inquiries via email.
For the most up-to-date support information and resources, please visit the official StarTech.com websitu.
Video 8.1: Un overview of StarTech.com's commitment to connectivity solutions and customer support, highlighting their extensive product range and 24-hour pre and post-sales support.


