1. Introduzione
Welcome to the user manual for your HP EliteBook 2560p laptop. This document provides essential information for setting up, operating, maintaining, and troubleshooting your device. Please read this manual thoroughly to ensure proper use and to maximize the lifespan of your laptop.
2. Informazioni di sicurezza
To prevent injury, damage to the product, or loss of data, observe the following safety precautions:
- Aduprate solu l'adattatore di alimentazione furnitu cù u vostru laptop.
- Ùn espone micca u laptop à temperature estreme, umidità o luce diretta di u sole.
- Evitate di mette oggetti pesanti nantu à u laptop.
- Mantene i liquidi luntanu da u dispusitivu.
- Ùn pruvate micca di smuntà o riparà u laptop da per voi. Cuntattate un persunale di serviziu qualificatu.
- Assicuratevi una ventilazione curretta per prevene u surriscaldamentu.
3. Cuntenutu di u pacchettu
Verificate chì tutti l'articuli sò presenti in u vostru pacchettu:
- HP EliteBook 2560p Laptop
- Adattatore di alimentazione CA è cavu di alimentazione
- Pack batterie
- Documentazione (stu manuale, infurmazioni di garanzia)
4. Produttu Finituview
Familiarize yourself with the components of your HP EliteBook 2560p.
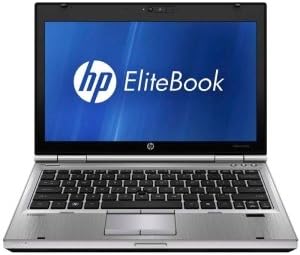
Figura 4.1: Fronte view of the HP EliteBook 2560p laptop. This image shows the laptop open, revealing the 12.5-inch display, keyboard, and touchpad. The screen displays the "HP EliteBook" logo.
4.1. Front and Top Components
- 12.5-inch HD Anti-Glare LED Display: Per a pruduzzione visuale.
- Tastiera: Standard QWERTY layout for text input.
- Touchpad: Per u cuntrollu di u cursore è a navigazione.
- Webcamma: Integrated for video conferencing and imaging.
- Fingerprint Reader (FPR): For enhanced security.
4.2. Side and Rear Components
- Porti USB 2.0: For connecting peripheral devices.
- DVD+/-RW Optical Drive: For reading and writing CDs/DVDs.
- Lînia Power: Per cunnette l'adattatore CA.
- Portu Ethernet: Per cunnessione di rete cablata.
- Porti di visualizazione: Per cunnette monitori esterni.
- Prese audio: Per cuffie è microfonu.
5. Setup
5.1. Cunnessione di l'adattatore di alimentazione
- Cunnette u cordone di alimentazione AC à l'adattatore AC.
- Inserite l'adattatore CA in una presa elettrica cun messa à terra.
- Connect the DC output plug of the AC adapter to the power connector on your laptop.
- Lasciate chì a batteria si carica cumpletamente prima di l'usu iniziale, o aduprate u laptop mentre hè cunnessu à a presa elettrica.
5.2. Initial Boot-Up and Operating System Setup
- Aprite a tapa di u laptop.
- Press the power button, typically located above the keyboard.
- Follow the on-screen instructions to complete the Windows 7 Professional setup, including language selection, user account creation, and network configuration.
6. Operating Instructions
6.1. Powering On and Off
- Per accende: Press u buttone di putenza.
- Per chjude: Click the Start button, then select "Shut Down."
- Per riavvià: Click the Start button, then select "Restart."
- Per dorme: Close the lid or click the Start button and select "Sleep."
6.2. Usendu u Touchpad
The touchpad allows you to control the cursor on the screen.
- Tap: Single tap to click, double tap to double-click.
- Drag: Tap and hold, then drag your finger across the touchpad.
- Scroll: Aduprate dui dite per scorrere verticalmente o orizzontalmente.
6.3. Cunnessione à una rete senza filu (Wi-Fi)
- Click the network icon in the system tray (bottom-right corner of the screen).
- Selezziunate a rete Wi-Fi desiderata da a lista.
- Cliccate "Cunnette" è inserite a chjave di sicurezza di a rete (password) se dumandatu.
6.4. Usendu l'unità ottica
The integrated DVD+/-RW drive allows you to read and write CDs and DVDs.
- Press the eject button on the drive to open the tray.
- Place a disc gently onto the tray, label side up.
- Push the tray back into the laptop until it clicks shut.
7. Mantenimentu
7.1. Pulizia di u vostru urdinatore purtatile
- Spegne sempre è scollega u laptop prima di pulisce.
- Aduprate un panno morbido e senza pelucchi leggermente dampinnaffiatu cù acqua o un pulitore di schermu specializatu per u display.
- Per a tastiera è u chassis, aduprate un pannu dolce. Evitate i prudutti chimichi aggressivi.
- Aduprate aria compressa per caccià a polvera da e prese d'aria è da e fessure di a tastiera.
7.2. Cura di batterie
- Evitate di scaricà cumpletamente a batteria spessu.
- Conservate u laptop in un locu frescu è asciuttu s'ellu ùn hè micca adupratu per periodi prolungati.
- If the battery is removable, ensure it is securely seated.
7.3. Updates Software
Regularly check for and install operating system updates (Windows Update) and driver updates from the HP support websitu per assicurà u rendiment ottimali è a sicurità.
8. Risoluzione di prublemi
| Prublemu | Soluzione Possibile |
|---|---|
| U laptop ùn s'accende micca. | Ensure the AC adapter is securely connected and the power outlet is functional. Check battery charge. |
| Nisuna cunnessione Wi-Fi. | Verify Wi-Fi is enabled (check physical switch or function key). Restart router and laptop. Re-enter Wi-Fi password. |
| U schermu hè viotu. | Connect an external monitor to check if the display is faulty. Adjust brightness settings. Restart the laptop. |
| U sistema hè lentu o ùn risponde micca. | Close unnecessary applications. Check for malware. Ensure sufficient free disk space. Restart the laptop. |
Per prublemi più cumplessi, cunsultate l'assistenza HP. websitu o cuntattate u serviziu di u cliente.
9. Specificazioni
| Feature | Detail |
|---|---|
| Mudellu | HP EliteBook 2560p (LJ467UT#ABA) |
| Processore | Intel Core i5-2520M |
| Mostra | 12.5-inch HD Anti-Glare LED (1366 x 768 pixels) |
| RAM | 4 GB DDR3 (1333 MHz) |
| Storage | 320 GB HDD |
| Unità otticu | DVD+/-RW |
| Grafica | Grafica Intel integrata |
| Wireless | 802.11a/b/g/n, Bluetooth |
| Porti | USB 2.0 (x1), DisplayPort, VGA, Ethernet, Audio Jacks |
| Sistema upirativu | Windows 7 Professional 64-bit |
| Webcamma | Integrata Webcamma |
| Sicurezza | Lettore di impronte digitali |
| A vita di a batteria | Finu à 8.5 ore (in media) |
| Dimensioni (LxPxH) | 16.5 x 13.5 x 4.5 inch |
| Pesu | 6.8 liri |
10. Garanzia è Support
For information regarding your product's warranty, please refer to the warranty document included with your purchase or visit the official HP support websitu.
HP provides various support resources, including online documentation, driver downloads, and customer service contact options.
- Support HP Websitu: www.hp.com/support
- Cuntattate l'assistenza: Consultate l'HP website for regional contact numbers and chat options.


