1. Introduzione
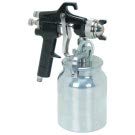
This instruction manual provides essential information for the safe and effective operation, maintenance, and troubleshooting of your Central Pneumatic 32 oz. Heavy Duty Multi-Purpose Air Spray Gun. This air spray gun is designed for automotive and industrial painting applications, providing professional results.
Funzioni chjave:
- Designed for automotive and industrial use.
- One quart aluminum dripless, vented cup.
- Ergonomic pistol grip and trigger for comfortable operation.
- Heavy duty construction for lasting durability.
- Top hook for easy hanging.
2. Informazioni di sicurezza
Always observe basic safety precautions when using this product to reduce the risk of personal injury and damage to the equipment. Read all instructions before operation.
Avvertimenti Generali di Sicurezza:
- Portate l'equipaggiu di prutezzione individuale (DPI): Always wear safety goggles, a respirator, and protective gloves when operating the spray gun. Ensure adequate ventilation in the work area.
- Materiali infiammabili: Do not spray flammable materials near open flames, pilot lights, or other ignition sources. Ensure the work area is free of sparks and heat.
- Sicurezza di pressione: Never exceed the maximum recommended air pressure for the spray gun. Always disconnect the air supply before cleaning, adjusting, or servicing the gun.
- Esposizione chimica: Be aware of the hazards associated with the materials being sprayed. Refer to the material manufacturer's safety data sheets (SDS) for specific precautions.
- Cunnessioni sicure: Ensure all air hose connections are secure and free of leaks before operating.
- Mantene i zitelli luntanu: Do not allow children or untrained persons to operate the spray gun.
3. Setup
Proper setup is crucial for safe and effective operation.
3.1. Preparing the Work Area
- Ensure the work area is well-ventilated and free from dust and debris.
- Cover surrounding areas and objects to protect them from overspray.
- Have all necessary materials, including paint, thinner, and cleaning supplies, readily available.
3.2. Connecting to Air Supply
- Attach an air hose (not included) to the air inlet fitting on the spray gun. Ensure the connection is tight.
- Connect the other end of the air hose to an air compressor equipped with a pressure regulator and moisture trap.
- Set the air compressor pressure regulator to the recommended operating pressure for your paint material (typically between 30-60 PSI, refer to paint manufacturer guidelines).
3.3. Preparing Paint Material
- Thoroughly mix the paint material according to the manufacturer's instructions.
- Strain the paint through a fine mesh filter to remove any impurities that could clog the spray gun.
- Pour the prepared paint into the 32 oz. aluminum cup. Do not overfill.
- Securely attach the cup to the spray gun body.
4. Operating Instructions
Follow these steps for effective and consistent spraying.
4.1. Adjusting the Spray Gun
- Fluid Control Knob: Adjusts the amount of paint flow. Turn clockwise for less paint, counter-clockwise for more.
- Fan Control Knob: Adjusts the spray pattern from a round spot to a wide fan. Turn clockwise for a narrower pattern, counter-clockwise for a wider pattern.
- Pressione d'aria: Adjust the air compressor regulator to achieve the desired atomization and spray pattern. Test on a scrap piece of material.
4.2. Tecnica di spruzzatura
- Hold the spray gun perpendicular to the surface, approximately 6-10 inches away.
- Begin moving the gun before pulling the trigger and release the trigger before stopping the movement. This prevents paint buildup at the start and end of strokes.
- Overlap each pass by about 50% to ensure even coverage.
- Maintain a consistent speed and distance from the surface.
- Apply multiple thin coats rather than one thick coat to avoid runs and sags. Allow adequate drying time between coats as recommended by the paint manufacturer.
5. Mantenimentu
Regular cleaning and maintenance will prolong the life of your spray gun and ensure optimal performance.
5.1. Pulizia dopu ogni usu
- Disconnect the air supply from the spray gun.
- Svuotate ogni pittura restante da a tazza.
- Pour a small amount of appropriate cleaning solvent (e.g., paint thinner, lacquer thinner, water for water-based paints) into the cup.
- Reattach the cup, connect the air supply, and spray the solvent through the gun into a waste container until it sprays clear.
- Disconnect the air supply again.
- Disassemble the air cap, fluid nozzle, and needle. Clean these components thoroughly with a brush and solvent.
- Clean the inside of the paint cup and the gun body.
- Reassemble all parts, ensuring they are tightened correctly. Do not overtighten.
5.2. Storage
- Store the clean and dry spray gun in a cool, dry place, away from direct sunlight and extreme temperatures.
- Keep the gun out of reach of children.
6. Risoluzione di prublemi
Riferitevi à sta sezione per i prublemi cumuni è e so suluzioni.
| Prublemu | Causa Possibile | Soluzione |
|---|---|---|
| Poor spray pattern / Uneven coverage | Incorrect air pressure, paint too thick, clogged nozzle/air cap, damaged nozzle/air cap. | Adjust air pressure, thin paint, clean nozzle/air cap, replace damaged parts. |
| Nisun flussu di pittura | Clogged fluid nozzle, paint cup empty, fluid needle stuck, air vent in cup lid blocked. | Clean nozzle, refill cup, free fluid needle, clear air vent. |
| Paint leaks from nozzle | Loose fluid nozzle, worn fluid needle packing, damaged fluid needle. | Tighten nozzle, replace packing, replace fluid needle. |
| Spruzzatura eccessiva | Too much air pressure, gun too far from surface, paint too thin. | Reduce air pressure, move gun closer, thicken paint. |
7. Specificazioni
- Produttore: Pneumatica Centrale
- Numero di mudellu di l'articulu: c0020f19-53b3-4117-95fe-f7536972d074
- Stile: Pistola
- Materiale: Alluminiu
- Volum di Cisterna: 0.25 Gallons (32 oz.)
- UPC: 792363978552
- ASIN: B006ZBAE6S
8. Garanzia è Support
For warranty information or technical support regarding your Central Pneumatic 32 oz. Heavy Duty Multi-Purpose Air Spray Gun, please contact the manufacturer directly. Keep your purchase receipt for any warranty claims.