1. Introduzione
This manual provides comprehensive instructions for the installation, operation, maintenance, and troubleshooting of the NUUO NVRmini2 NE-4160 Network Video Recorder. The NE-4160 is a 16-channel NVR designed for robust surveillance systems, featuring 4 drive bays and a 4TB storage capacity, compatible with various IP cameras.
Please read this manual thoroughly before operating the device to ensure proper setup and optimal performance.
2. Precauzioni di sicurità
- Ensure the device is placed on a stable, level surface to prevent accidental falls.
- Do not expose the NVR to water or excessive humidity.
- Aduprate solu l'adattatore di corrente furnitu cù u dispusitivu.
- Evitate di bluccà l'apertura di ventilazione per prevene u surriscaldamentu.
- Scollegate l'alimentazione prima di fà qualsiasi prucedura di manutenzione o installazione.
- Riferite tutte l'assistenza à u persunale di serviziu qualificatu.
3. Cuntenutu di u pacchettu
Verificate chì tutti l'articuli sò presenti in u pacchettu:
- NUUO NVRmini2 NE-4160 Unit
- Adattatore di putenza
- Cavu Ethernet
- Guida d'installazione rapida
- CD di software (s'ellu hè applicabile)
- Viti per l'installazione di HDD
4. Produttu Finituview
The NUUO NVRmini2 NE-4160 is a robust network video recorder designed for professional surveillance applications. It supports up to 16 IP camera channels and features four hot-swappable drive bays for extensive storage, pre-installed with 4TB capacity.
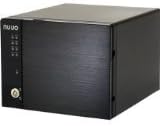
Figura 4.1: Fronte view of the NUUO NVRmini2 NE-4160 NVR unit. This image shows the compact black chassis with the NUUO logo on the left side, status indicator lights, and a lockable front panel for drive bay access.
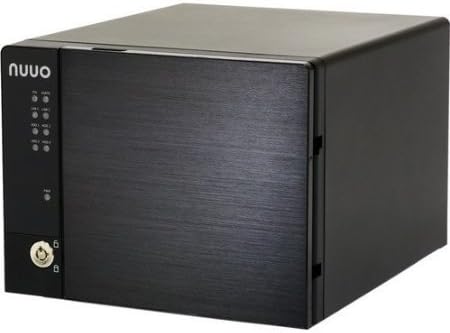
Figura 4.2: Angulata view of the NUUO NVRmini2 NE-4160 NVR unit. This perspective highlights the sleek design and the textured finish of the front panel, providing a better sense of the unit's dimensions.
Indicatori di u pannellu frontale:
- LED di putenza: Indica u statu di putenza.
- HDD LEDs: Indicate hard drive activity for each bay.
- LED di rete: Indicates network connectivity.
- LED d'alarme: Indicates system alarms or errors.
5. Setup è Installazione
5.1 Installazione di hardware
- Unpacking: Eliminate cù cura l'NVR da u so imballaggio.
- Installazione di u discu duru (s'ellu ùn hè micca preinstallatu):
- Unlock the front panel and open the drive bay door.
- Slide the hard drive trays out.
- Secure 3.5-inch SATA hard drives into the trays using the provided screws.
- Slide the trays back into the bays until they click into place.
- Chiudi è chjude u pannellu frontale.
- Cunnessione di Rete: Connect one end of the Ethernet cable to the NVR's LAN port and the other end to your network router or switch.
- Cunnessione di putenza: Cunnette l'adattatore di corrente à l'entrata di alimentazione di u NVR è dopu inseritelu in una presa di corrente. U NVR s'accenderà automaticamente.
5.2 Cunfigurazione iniziale di u software
Upon first boot, the NVR will acquire an IP address via DHCP (if available). You can access the NVR's web interface using its IP address or by using the NUUO Finder utility.
- Discovering the NVR:
- Install the NUUO Finder utility from the provided CD or NUUO websitu nant'à un urdinatore cunnessu à a listessa rete.
- Run NUUO Finder to scan for the NVRmini2 NE-4160 on your network.
- Note down the NVR's IP address.
- Accessu Web Interfaccia:
- apre a web browser (e.g., Chrome, Firefox) and enter the NVR's IP address in the address bar.
- Log in using the default username (e.g., "admin") and password (e.g., "admin"). It is highly recommended to change the default password immediately after the first login.
- Inizializazione di u Sistema: Follow the on-screen wizard for initial setup, which typically includes:
- Impostazione di data è ora
- Network Settings (Static IP configuration, if desired)
- Hard Drive Formatting (if required)
- Adding Camera IP
6. Funziunamentu di u NVR
6.1 Live View
U Live View interface allows you to monitor all connected cameras in real-time. You can customize the layout, view multiple cameras simultaneously, and access various controls.
- Layout Selection: Choose from various grid layouts (e.g., 1x1, 2x2, 3x3, 4x4) to display cameras.
- Cuntrollu PTZ: If your cameras support Pan/Tilt/Zoom, use the on-screen controls to adjust camera angles and zoom levels.
- Riproduzione istantanea: Rapidu riview recent recordings from the live view.
6.2 Gestione di registrazione
The NVRmini2 NE-4160 supports various recording modes:
- Registrazione cuntinua: Registrazioni 24 ore su 24, 7 ghjorni su 7.
- Registrazione di Rilevazione di Movimentu: Records only when motion is detected by the camera.
- Schedule Recording: Records based on a predefined schedule.
- Registrazione di Alarma: Registra quandu un ingressu d'allarme esternu hè attivatu.
Configure recording settings for each camera in the "Recording" section of the web interfaccia.
6.3 Playback and Export
À review arregistratu footage:
- Navigate to the "Playback" section.
- Selezziunate a(e) camera(e) desiderata(e) è l'intervallu di data/ora.
- Aduprate a cronologia per navigà trà e registrazioni.
- Per esportà footage, select the desired segment and choose the export format (e.g., AVI, MP4).
7. Mantenimentu
7.1 Cuntrolli regulari
- Status di u sistema: Periodically check the NVR's system status via the web interface to ensure all components are functioning correctly.
- Salute di u discu duru: Monitor hard drive health and capacity. Replace drives showing signs of failure promptly.
- Actualizazioni di firmware: Check the NUUO website regularly for firmware updates. Applying updates can improve performance, add features, and fix bugs.
- Pulizia fisica: Keep the NVR unit clean and free of dust. Use a soft, dry cloth. Do not use liquid cleaners.
7.2 Backup di Dati
While the NVR records continuously, it is advisable to back up critical footage regularly to external storage or a network location.
8. Risoluzione di prublemi
| Prublemu | Causa Possibile | Soluzione |
|---|---|---|
| NVR not powering on | No power, faulty power adapter | Check power cable connection; try a different power outlet; test power adapter. |
| Ùn pò micca accede web interfaccia | Incorrect IP address, network issue, firewall | Verify NVR's IP address using NUUO Finder; check network cable; temporarily disable firewall on PC. |
| No video from cameras | Camera not connected, incorrect camera settings, network issue | Ensure cameras are powered and connected; verify camera IP addresses and credentials in NVR settings; check network connectivity. |
| U discu duru ùn hè micca rilevatu | Improper installation, faulty drive, incorrect format | Re-seat the hard drive; try a different drive bay; ensure drive is compatible and formatted correctly. |
If the problem persists after attempting the above solutions, please contact NUUO technical support.
9. Specificazioni
| Feature | Detail |
|---|---|
| Numero di mudellu | NE-4160-US |
| Marca | NUU |
| Canali supportati | 16 |
| Drive Bays | 4 |
| Pre-installed Storage | 4 TB (4000 GB) |
| Connettività | Ethernet |
| Dispositivi compatibles | Camera IP |
| Prima Data Disponibile | 9 di dicembre di u 2013 |
10. Garanzia infurmazione
NUUO products typically come with a limited manufacturer's warranty. Please refer to the warranty card included with your product or visit the official NUUO website for detailed warranty terms and conditions specific to the NE-4160-US model. Keep your proof of purchase for warranty claims.
11. Support tecnicu
For technical assistance, software updates, or further inquiries, please contact NUUO technical support through their official channels:
- Websitu: Visit the official NUUO website for support resources, FAQs, and downloads.
- E-mail: Refer to the NUUO website for regional support email addresses.
- Telefonu: Refer to the NUUO websitu per i numeri di telefonu di supportu regiunale.
When contacting support, please have your product model number (NE-4160-US) and serial number ready.


