1. Introduzione
Thank you for choosing an Electrolux appliance. This user manual provides essential information for the safe and efficient operation, installation, and maintenance of your Electrolux ESF2400OW countertop dishwasher. Please read these instructions carefully before using your appliance and keep them for future reference.
2. Informazioni di sicurezza
For your safety and to ensure correct use, before installing and first using the appliance, read this user manual carefully, including its hints and warnings. To avoid unnecessary mistakes and accidents, it is important to ensure that all people using the appliance are thoroughly familiar with its operation and safety features.
- Stu apparecchiu hè destinatu solu à l'usu domesticu.
- Ùn permettenu micca i zitelli à ghjucà cù l'apparechju.
- Scollegate sempre l'apparechju da l'alimentazione elettrica prima di pulisce o di mantene.
- Ùn operate micca a lavastoviglie se u cordone di alimentazione o u plug hè dannatu.
- Assicurà una messa à terra curretta per a sicurità elettrica.
- L'uggetti affilati devenu esse caricati cù e punte in giù per evità ferite.
3. Produttu Finituview
The Electrolux ESF2400OW is a compact countertop dishwasher designed for efficient cleaning of up to 6 place settings. It features multiple wash programs and indicators for ease of use.
3.1 Interior Components

Figura 1: Interior view with dish racks and cutlery basket. This image shows the upper and lower racks, along with the removable cutlery basket, designed for optimal loading of various dishware.

Figura 2: Interior view with the lower rack. The lower rack is suitable for larger plates and bowls, ensuring thorough cleaning.

Figure 3: Empty interior view. This shows the clean, stainless steel interior of the dishwasher, highlighting its compact design.

Figure 4: Close-up of the filter and spray arm. The central spray arm and filter system are crucial for effective cleaning and require regular maintenance.
4. Installazione è Setup
4.1 Unpacking
Carefully remove all packaging materials. Inspect the dishwasher for any damage during transit. Report any damage to your retailer immediately.
4.2 Placement
Place the dishwasher on a stable, level countertop near a water supply, drain, and electrical outlet. Ensure there is adequate space for the door to open fully.
4.3 Cunnessione di l'acqua è di u scaricu
Connect the water inlet hose to a cold water tap. Connect the drain hose to a suitable drain point, ensuring it is securely fastened to prevent leaks. Refer to the diagram below for hose connections.

Figura 5: Posteriore view with connections. This image illustrates the proper connection points for the water inlet hose (left), drain hose (right), and power cable (bottom center).
4.4 Cunnessione elettrica
Cunnette l'apparecchiu à una presa elettrica cun messa à terra. Assicuratevi chì u vulumetage è a frequenza corrispondanu à e specificazioni nantu à a targhetta.
5. Operating Instructions
5.1 Pannellu di cuntrollu
The dishwasher features a user-friendly control panel with buttons for program selection and an integrated display for cycle information. The control type is push-button.
5.2 Caricamentu di a lavastoviglie
Load dishes according to the rack design, ensuring water can reach all surfaces. Place larger items in the lower rack and smaller items, glasses, and cups in the upper rack. Use the cutlery basket for forks, knives, and spoons.
5.3 Aghjunghjendu Detergente è Aiutu di Brillantante
Add the appropriate amount of dishwasher detergent to the dispenser. Check the rinse aid indicator; if low, refill the rinse aid dispenser to ensure optimal drying performance and to prevent water spots.
5.4 Aggiunta di sale per lavastoviglie
If your water is hard, add dishwasher salt to the dedicated compartment. The salt level indicator will illuminate when a refill is needed. Adjust the water softening setting based on your local water hardness.
5.5 Selezzione di un prugramma di lavaggio
Choose from the 6 available wash programs based on the soil level of your dishes. The integrated display will show the remaining wash time.
- Number of wash programs: 6
- Number of temperature settings: 4
- Cycle time: 150 minutes (average)
5.6 Cumincià un Ciclu
Close the dishwasher door firmly. Press the start button to begin the selected wash program. The remaining time display will count down until the cycle is complete.
6. Mantenimentu è Cura
6.1 Pulizia di i filtri
Regularly clean the filter system located at the bottom of the dishwasher tub (refer to Figure 4). Remove food particles and rinse under running water. Reassemble correctly to prevent damage and ensure efficient operation.
6.2 Pulizia di i bracci spruzzatori
Check the spray arms for clogged nozzles. If necessary, remove the spray arms and clean the holes with a thin object like a toothpick. Ensure they rotate freely after reinstallation.
6.3 Pulizia esterna
Asciugate e superfici esterne di a lavastoviglie cù un pannu dolce èamp tela. Ùn aduprate micca detergenti abrasivi o solventi.
6.4 Decalcificazione
If you notice limescale buildup, use a dishwasher-safe descaling product according to its instructions. Ensure the salt dispenser is always filled if you have hard water.
7. Risoluzione di prublemi
Prima di cuntattà u serviziu, verificate i seguenti prublemi cumuni è suluzioni:
| Prublemu | Causa Possibile | Soluzione |
|---|---|---|
| A lavastoviglie ùn si mette micca | Prublema d'alimentazione, porta micca chjusa bè, prugramma micca sceltu. | Verificate a cunnessione elettrica, assicuratevi chì a porta sia chjusa, selezziunate un prugramma di lavaggio. |
| I piatti ùn sò micca puliti | Caricamentu impropriu, bracci spruzzatori intasati, detergente insufficiente, filtri intasati. | Reload dishes, clean spray arms and filters, add more detergent. |
| Macchie d'acqua nantu à i piatti | Livellu bassu di brillantante, acqua dura. | Refill rinse aid dispenser, ensure salt dispenser is filled and water softening is set correctly. |
| Perdite di u Lavapiatti | Improper hose connection, damaged door seal. | Check hose connections for tightness, inspect door seal for damage. |
8. Specificazioni
Detailed technical specifications for the Electrolux ESF2400OW countertop dishwasher:
- Numero di mudellu: ESF2400OW
- Dimensioni di u produttu (L x P x H): 55 x 50 x 43.8 cm
- Pesu: 20.6 kg
- Capacità: 6 paràmetri di locu
- Classe di efficienza energetica: A+ (old rating) / F (new rating)
- Cunsumu energeticu annuale: 174 kWh
- Cunsumu d'energia per ciclu: 0.61 kWh
- Cunsumu annuale d'acqua: 1820 litri
- Cunsumu d'acqua per ciclu: 6.5 litri
- Sistema di asciugatura: Condensazione
- Livellu di rumore: 50 dB (old rating) / 52 dB (new rating)
- Numeru di prugrammi di lavaggio: 6
- Number of Temperature Settings: 4
- Tempu di ciclu: 150 minutes (average) / 3:50 (new rating)
- Tipu di cuntrollu: Pulsanti
- Materiale: Stainless steel (interior)
- AC Input Voltage: 230 V
- Carica cunnessa: 1180 W
- attuale: 10 A
8.1 Etichetta energetica
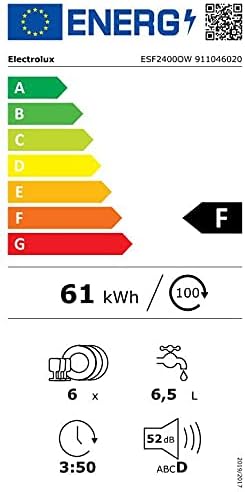
Figure 6: Energy Label for Electrolux ESF2400OW. This label provides key information on energy consumption, water usage, noise level, and capacity according to current EU standards.
8.2 Diagramma di e dimensioni di u produttu

Figure 7: Product Dimensions Diagram. This technical drawing provides precise measurements for installation planning.
9. Garanzia è Support
Your Electrolux ESF2400OW dishwasher comes with a manufacturer's warranty. Please refer to the warranty card included with your purchase for specific terms and conditions. For technical support, spare parts, or service requests, please contact your local Electrolux customer service or visit the official Electrolux websitu.
When contacting support, please have your model number (ESF2400OW) and serial number ready.