1. Introduzione
Thank you for choosing the Lenco PDR-030 DAB+/FM Portable Digital Radio. This manual provides essential information for setting up, operating, and maintaining your device. The PDR-030 offers high-quality digital radio reception (DAB+) and traditional FM radio, along with features such as an integrated rechargeable battery for portability, an RDS display, station memory, and an alarm clock function.
Cumpunenti inclusi:
- Lenco PDR-030 Digital Radio
- AC Power Adapter (220 Volt)
- Manuale d'usu
2. Impurtante Information Safety
- Ùn espone micca l'apparechju à a pioggia o à l'umidità per impedisce u focu o a scossa elettrica.
- Assicuratevi chì l'adattatore di alimentazione abbia un vulumetage currisponde à a vostra alimentazione lucale.
- Ùn aprite micca u casing. Affidate tutta a manutenzione à persunale qualificatu.
- Evitate di mette l'unità vicinu à fonti di calore o in luce diretta di u sole.
- Handle the integrated battery with care. Do not attempt to replace it yourself.
- Mantene u dispusitivu luntanu da campi magnetichi forti.
3. Produttu Finituview
Familiarize yourself with the main components and controls of your Lenco PDR-030 radio.
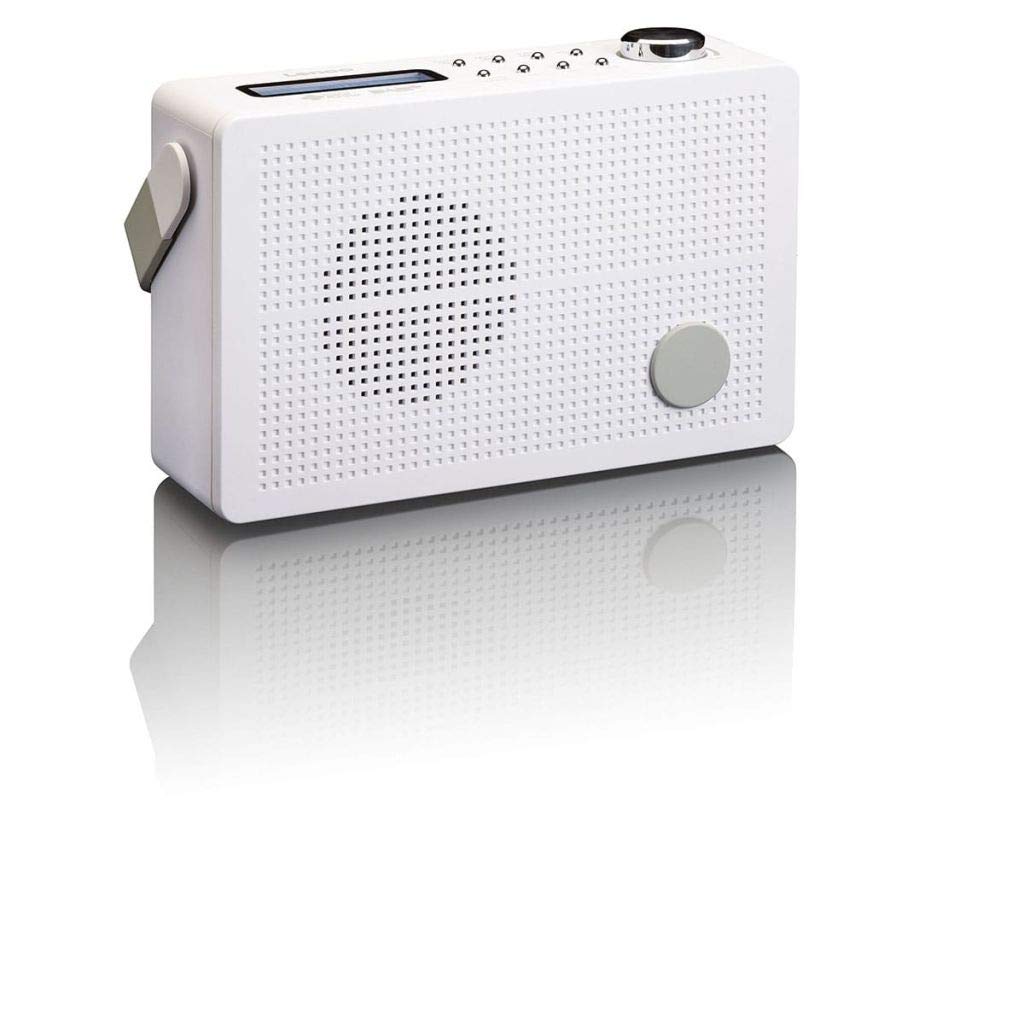
Figura 3.1: Front Panel of Lenco PDR-030 Radio. Features include a blue backlit LCD display, power/source button, alarm, sleep, info/menu, preset buttons, select/snooze, scan, previous, next buttons, and a rotary volume knob.
Key Controls and Features:
- Display: Two-line illuminated LCD for time, date, station name, and information.
- Pulsante di alimentazione/fonte: Turns the radio on/off and switches between DAB+ and FM modes.
- Manopola di Volume: Ajusta u livellu di output audio.
- Antenna telescopica: Per una ricezione ottimale di u signale radio.
- Jack per cuffie (3.5 mm): Per l'ascolta privata.
- Alarm/Sleep/Info/Menu/Preset Buttons: For various functions including setting alarms, sleep timer, accessing information, menu navigation, and managing station presets.
- Select/Snooze/Scan/Prev/Next Buttons: For station tuning, menu selection, and snooze function.
4. Setup
4.1 Alimentazione di a Radio
The PDR-030 can be powered by the included AC adapter or its integrated rechargeable battery.
- Alimentazione AC: Connect the supplied 220V AC power adapter to the DC input jack on the radio and then to a wall outlet. The radio will automatically begin charging the internal battery.
- Alimentazione di a batteria: The integrated Lithium-ion battery allows for portable use. Ensure the battery is sufficiently charged before use without the AC adapter.
4.2 Installazione di l'antenna
Extend the telescopic antenna fully for optimal reception of both DAB+ and FM signals. Adjust its position for the best signal quality.
4.3 Accensione iniziale è scansione di stazione
- Press u Potenza / Fonte buttone per accende a radiu.
- Upon first use, the radio will automatically enter DAB+ mode and perform a full scan for available digital radio stations. This may take a few minutes.
- Una volta chì a scansione hè cumpleta, a radio si sintonizerà nantu à a prima stazione dispunibile.
5. Operating Instructions
5.1 Power On/Off
Press u Potenza / Fonte buttone per accende o spegne a radio.
5.2 Mode Selection (DAB+/FM)
Press u Fonte button repeatedly to switch between DAB+ and FM radio modes.
5.3 Stazioni di sintonizazione
- Modu DAB+:
- After the initial scan, use the Prev è Dopu buttons to navigate through the list of available DAB+ stations.
- To perform a new full scan, press the Menu button, navigate to "Full Scan" using Precedente / Seguente, è pressu Selezziunà.
- Modu FM:
- Press u Scansà buttone per scansà automaticamente a prossima stazione FM dispunibule.
- Per l'accordatura manuale, tene premutu è tenutu premutu Prev or Dopu buttoni per aghjustà cù precisione a frequenza.
5.4 Saving and Recalling Preset Stations
The radio allows you to store up to 10 DAB+ and 10 FM preset stations.
- Per salvà una preimpostazione:
- Sintonizà a stazione desiderata.
- Appughjà è tene premutu Preset button until "Preset Store" appears on the display.
- Aduprà u Precedente / Seguente buttons to select a preset number (1-10).
- Press Selezziunà to confirm and save the station.
- Per ricurdà un Preset:
- Press u Preset buttone brevemente.
- Aduprà u Precedente / Seguente buttons to select the desired preset number.
- Press Selezziunà to tune to the preset station.
5.5 Volume Control
Girate u Manopola di Volume clockwise to increase the volume and counter-clockwise to decrease it.
5.6 RDS Functionality (FM Mode)
In FM mode, the RDS (Radio Data System) function displays information such as station name, program type, and other broadcast data on the two-line LCD display.
5.7 Funzione di sveglia
The PDR-030 can be used as an alarm clock with two separate alarm times.
- Stabbilimentu di una alarma:
- Press u Alarma buttone.
- Aduprà Precedente / Seguente to select Alarm 1 or Alarm 2, then press Selezziunà.
- Follow the on-screen prompts to set the alarm time, duration, source (Buzzer or Radio), frequency (Daily, Once, Weekdays, Weekends), and volume.
- Ensure the alarm is set to "On" and press Selezziunà per salvà.
- Funzione Snooze: Quandu sona l'alarma, preme u Snooze buttone per silenziallu temporaneamente per un periodu definitu.
- Timer di sonnu: Press u Dormi button repeatedly to set a sleep timer (e.g., 15, 30, 45, 60 minutes) after which the radio will automatically turn off.
5.8 Cunnessione di e cuffie
Connect 3.5mm stereo headphones to the headphone jack for private listening. The internal speaker will be muted automatically.
6. Mantenimentu
6.1 Pulizia
Wipe the radio's exterior with a soft, dry cloth. Do not use abrasive cleaners, waxes, or solvents as they may damage the finish. Ensure no liquids enter the device.
6.2 Cura di a batteria
The integrated Lithium-ion battery is designed for long life. To maximize battery lifespan:
- Evitate di scaricà cumpletamente a batteria spessu.
- Sè vo conservate a radio per un periodu prolongatu, caricate a batteria à circa 50% è conservatela in un locu frescu è asciuttu.
- Do not attempt to replace the battery yourself. Contact qualified service personnel if battery issues arise.
7. Risoluzione di prublemi
| Prublemu | Causa Possibile | Soluzione |
|---|---|---|
| Nisun putere | AC adapter not connected or faulty; battery discharged. | Check AC adapter connection. Charge the battery. |
| Ricezione DAB+/FM scarsa | Antenna micca stesa; zona di signale debule; interferenza. | Fully extend and adjust the telescopic antenna. Move the radio to a location with better signal. Avoid placing near other electronic devices. |
| Nisun sonu | Vulume troppu bassu; cuffie cunnesse; silenziu attivatu. | Increase volume. Disconnect headphones. Check if mute is active (if applicable). |
| L'alarma ùn sona micca | Alarm not activated; alarm volume too low; incorrect time setting. | Ensure alarm is set to "On". Check alarm volume. Verify current time and alarm time settings. |
8. Specificazioni
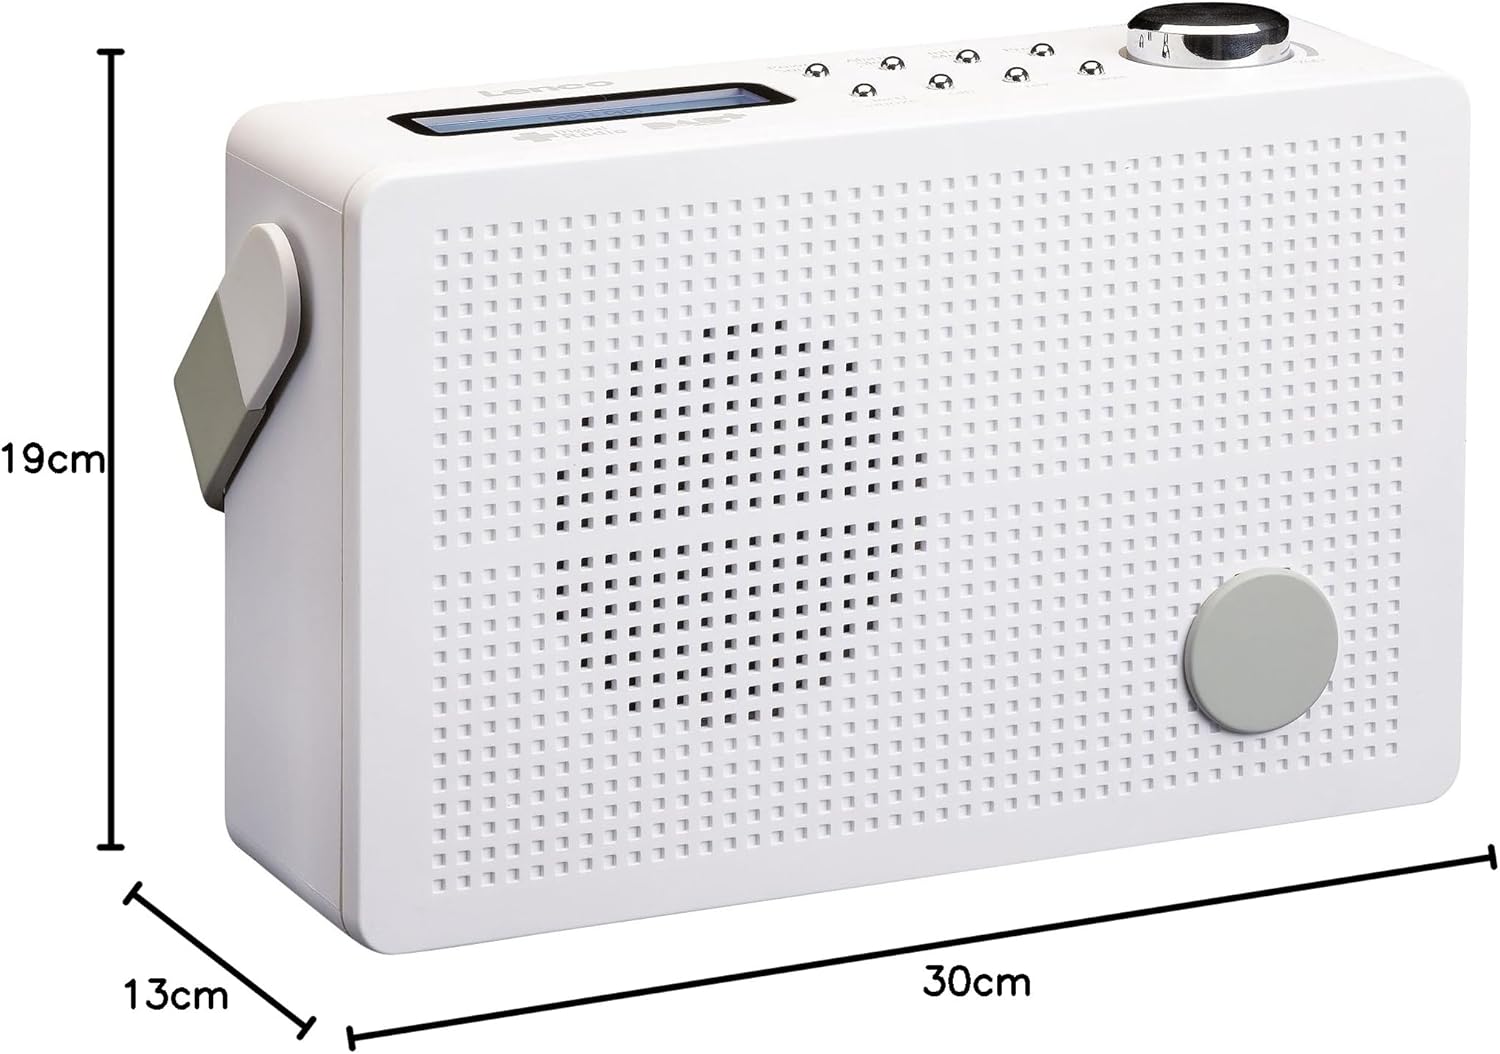
Figura 8.1: Lenco PDR-030 Dimensions.
| Feature | Detail |
|---|---|
| Numero di mudellu | PDR-030 |
| Tuner Technology | DAB+, FM (Ukw) |
| Fonte d'energia | Battery-Powered (Integrated Lithium-ion), AC Adapter |
| AC Voltage | 220 Volt |
| Dimensioni di u Produttu (L x P x A) | 21.4 x 6.5 x 13.8 cm (approx. 22.5 x 8.5 x 15 cm as per another spec) |
| Pesu di l'articulu | 9 g (Note: This seems incorrect, likely 670g from description) |
| Tipu di materiale | Plastica |
| Interfaccia Hardware | 3.5 mm Audio (Headphone Jack) |
| Funzioni spiciali | Portable, RDS Display, Alarm Clock, Station Memory (10 DAB+, 10 FM) |
Note: Some dimensions and weight specifications provided by the manufacturer may vary slightly. The description states 670 grams for weight, while specifications list 9g. Please refer to the product packaging for the most accurate information.
9. Garanzia è Support
Lenco products are designed for reliability and performance. This product typically comes with a 24-month manufacturer's warranty from the date of purchase, covering defects in materials and workmanship. Please retain your proof of purchase for warranty claims.
For technical support, service, or warranty inquiries, please refer to the contact information provided on the Lenco official website or your local retailer. Do not attempt to repair the device yourself.
Per più infurmazione, pudete visità u Lenco Store on Amazon.


