1. Introduzione
Thank you for choosing the BECA BHT-2000GALTP Smart Floor Heating Thermostat. This device is designed to provide intelligent and efficient control over your electric floor heating system, ensuring optimal comfort and energy savings. Featuring a modern black screen display and intuitive touch controls, this thermostat offers 5+2 weekly programming capabilities to suit your lifestyle.

Figura 1: Fronte view of the BECA BHT-2000GALTP Smart Floor Heating Thermostat, displaying temperature, time, and mode indicators.
2. Informazioni di sicurezza
Please read this section carefully before installation and operation to prevent personal injury or damage to the product.
- Installation must be carried out by a qualified electrician in accordance with local electrical codes and regulations.
- Always disconnect power at the circuit breaker before installing, cleaning, or servicing the thermostat.
- Ùn espone micca u termostatu à l'acqua o à l'umidità eccessiva.
- Assicuratevi chì tutte e cunnessione di cablaggio sò assicurate è ben insulate.
- Stu termostatu hè cuncipitu solu per usu internu.
3. Cuntenutu di u pacchettu
Verificate chì tutti l'articuli sò presenti in u pacchettu:
- BECA BHT-2000GALTP Thermostat Unit
- Viti di montaggio (2)
- Manuale d'uso (stu documentu)
4. Specificazioni
| Feature | Specificazione |
|---|---|
| Mudellu | BHT-2000GALTP |
| Alimentazione elettrica | AC 95 ~ 240V, 50/60Hz |
| Carica currente | 3A |
| Dimensioni (L x W x H) | 8.61 x 8.61 x 1.32 cm |
| Culore | Neru |
| Retroilluminazione | Iè |
| Classificazione IP | IP20 |
| Sensore | NTC |
5. Installazione (Configurazione)
The thermostat is designed for installation into a standard 86mm square or European 60mm round wall box. Ensure the power supply is disconnected before beginning installation.
- Turn off the main power supply to the heating system at the circuit breaker.
- Separate the mounting plate from the thermostat unit by gently prying the bottom clips.
- Connect the wiring according to the diagram in Section 6.
- Mount the back plate into the wall box using the provided screws.
- Align the thermostat unit with the mounting plate and snap it into place.
- Ripristinà l'alimentazione di u sistema di riscaldamentu.

Figura 2: Prughjettu lateralefile of the thermostat, illustrating its compact design for wall mounting.
6. Schema di Cablaggio
Proper wiring is essential for the safe and correct operation of your thermostat. Refer to the diagrams below and ensure all connections are secure.

Figura 3: Posteriore view of the thermostat with terminal labels for power, load, and NTC sensor.
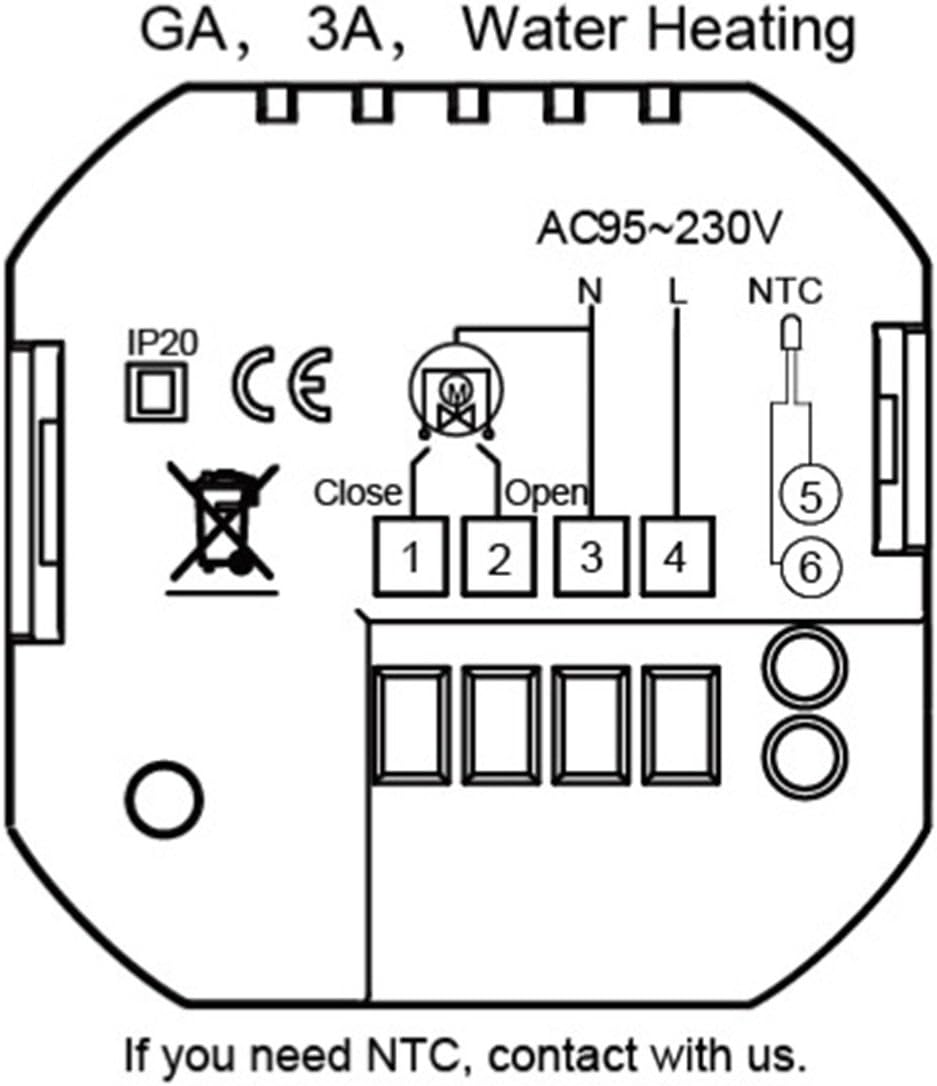
Figure 4: Detailed wiring schematic for GA, 3A, Water Heating models. Connect Live (L) and Neutral (N) to terminals 3 and 4 respectively. Connect the heating load to terminals 1 and 2. The NTC floor sensor connects to terminals 5 and 6.
Descrizzione di u terminal:
- N: Neutral wire for power supply.
- L: Live wire for power supply.
- 1, 2: Load connections for the heating element.
- 5, 6: NTC sensor connections (for floor temperature sensing).
7. Operazione
The thermostat features a clear display and touch buttons for easy operation.

Figure 5: Thermostat display and button function overview.
Funzioni di u buttone:
- M (mode): Press to switch between Manual mode and Program mode.
- ⏱ (Clock/Time): Press to set time and date. Hold to enter programming settings.
- ⏻ (Potenza): Press to turn the thermostat ON/OFF.
- ▲ (Freccia in sù): Increase temperature or adjust settings.
- ▼ (Freccia in giù): Decrease temperature or adjust settings.
Tempu è Data di Stabilimentu:
- With the thermostat ON, press the ⏱ button once. The hour digit will flash.
- Aduprà ▲ è ▼ per aghjustà l'ora.
- Press ⏱ again to move to minutes, then use ▲ è ▼ per aghjustà.
- Press ⏱ again to move to the day of the week (1-7, Monday-Sunday), then use ▲ è ▼ per aghjustà.
- Press ⏱ again or wait 10 seconds to save and exit.
8. Programming (5+2 Weekly Schedule)
The thermostat supports 5+2 weekly programming, allowing you to set different temperatures for weekdays (Monday-Friday) and weekends (Saturday-Sunday) across six time periods each day.
- With the thermostat ON, hold the ⏱ button for 3-5 seconds to enter programming mode. The display will show "WEEK" and the first period (Period 1) for weekdays.
- Aduprà ▲ è ▼ to adjust the start time for Period 1.
- Press ⏱ to move to the temperature setting for Period 1. Use ▲ è ▼ per aghjustà a temperatura desiderata.
- Repeat steps 2 and 3 for Period 2 through Period 6 for weekdays.
- After setting all 6 periods for weekdays, the display will switch to weekend programming (Saturday-Sunday). Repeat the process for Period 1 through Period 6 for weekends.
- Once all periods are set, press ⏱ again or wait 10 seconds to save the settings and exit programming mode.
Default Program Settings (Example):
| Periodu | Time (Mon-Fri) | Temp (Mon-Fri) | Time (Sat-Sun) | Temp (Sat-Sun) |
|---|---|---|---|---|
| 1 | 06: 00 | 22 ℃ | 08: 00 | 23 ℃ |
| 2 | 08: 00 | 18 ℃ | 11: 00 | 20 ℃ |
| 3 | 11: 30 | 18 ℃ | 14: 00 | 20 ℃ |
| 4 | 13: 30 | 18 ℃ | 17: 00 | 23 ℃ |
| 5 | 17: 00 | 22 ℃ | 20: 00 | 20 ℃ |
| 6 | 22: 00 | 18 ℃ | 22: 00 | 18 ℃ |
9. Mantenimentu
The BECA BHT-2000GALTP thermostat requires minimal maintenance.
- Pulizia: Sguassate u screnu è casing cù un dolce, damp tela. Ùn aduprate micca detergenti abrasivi o solventi.
- Nisuna Parti Serviceable d'Usuariu: Do not attempt to open or repair the thermostat yourself. Refer all servicing to qualified personnel.
10. Risoluzione di prublemi
Sè avete prublemi cù u vostru termostatu, riferitevi à i seguenti prublemi è suluzioni cumuni:
| Prublemu | Causa Possibile | Soluzione |
|---|---|---|
| Thermostat has no power/display is off. | Nisuna alimentazione elettrica; l'interruttore automaticu hè scattatu; cablaggi allentati. | Check power supply at the circuit breaker. Ensure wiring connections are secure (refer to Section 6). |
| U sistema di riscaldamentu ùn si accende / spegne cum'è previstu. | Incorrect temperature setting; thermostat in wrong mode (Manual/Program); wiring issue. | Verify desired temperature is set correctly. Check thermostat mode (M button). Inspect wiring. |
| A lettura di a temperatura pare imprecisa. | Sensor issue; thermostat location. | Ensure the NTC sensor is properly connected and not damaged. Avoid placing thermostat near heat sources or drafts. |
| Cannot enter programming mode. | U buttone ùn hè micca tenutu abbastanza longu. | Mantene u ⏱ buttone per 3-5 seconde. |
11. Garanzia è Support
For warranty information or technical support, please contact your point of purchase or the manufacturer directly. Keep your purchase receipt as proof of purchase.
Manufacturer: BECA


