1. Introduzione è Overview
The AT&T Air 4920 Airties Smart Wi-Fi Extender is designed to expand the coverage and improve the signal strength of your existing Wi-Fi network. It creates a seamless mesh network, allowing your devices to automatically connect to the strongest Wi-Fi signal as you move around your home or office. This manual provides detailed instructions for setting up, operating, maintaining, and troubleshooting your Wi-Fi extender.

Figura 1: Fronte view of the AT&T Air 4920 Airties Smart Wi-Fi Extender.
2. Cuntenutu di u pacchettu
Verificate chì tutti l'articuli sò presenti in u vostru pacchettu:
- AT&T Air 4920 Airties Smart Wi-Fi Extender Unit
- Adattatore di putenza
- Guida di avvio rapidu (questu manuale serve cum'è una guida cumpleta)
3. Caratteristiche è cumpunenti di u pruduttu
Familiarize yourself with the various ports, buttons, and indicator lights on your Wi-Fi Extender.

Figura 2: Davanti è daretu view of the Wi-Fi Extender with labeled components.
- 5 GHz Wi-Fi Indicator: Shows the status of the 5 GHz Wi-Fi band.
- 2.4 GHz Wi-Fi Indicator: Shows the status of the 2.4 GHz Wi-Fi band.
- Power Indicator / On/Off Button: Indicates power status. Can also be used to turn the device on/off.
- Pulsante WPS: Used for Wi-Fi Protected Setup to quickly connect to your router.
- Gigabit Ethernet Ports (1 & 2): For wired connections to devices like computers, gaming consoles, or smart TVs.
- Interruttore di accensione / spegnimentu: A physical switch to turn the device completely off or on.
- Ingressu di alimentazione CC (12V): Cunnette quì l'adattatore di alimentazione furnitu.
- Pulsante di reset: Used to restore the device to factory default settings. (Requires a paperclip or similar pointed object).
4. Setup Guide
Follow these steps to set up your AT&T Air 4920 Wi-Fi Extender:
4.1 Piazzamentu iniziale
For initial setup, place the Wi-Fi Extender near your AT&T gateway (router). Once paired, you can move it to a more central location in your home where Wi-Fi signal is weak.
4.2 Cunnessione di putenza
- Connect the provided power adapter to the DC Power Input (7) on the back of the extender.
- Inserite l'adattatore di corrente in una presa murale.
- Ensure the Power On/Off Switch (6) is in the 'On' position. The Power Indicator (3) should light up.
4.3 Pairing with Your AT&T Gateway (Router)
There are two primary methods for pairing:
Method A: Using WPS (Wi-Fi Protected Setup) - Recommended
- Appughjà è tene premutu WPS Button (4) on the front of the Wi-Fi Extender for 2-3 seconds until the indicator lights start blinking.
- In dui minuti, preme u buttone WPS on your AT&T gateway (router). Refer to your gateway's manual for the exact location of its WPS button.
- Wait for the indicator lights on the extender (1, 2, and 3) to turn solid green, indicating a successful connection. This may take a few minutes as the extender updates its firmware and synchronizes with your gateway.
Method B: Using an Ethernet Cable (If WPS fails or is not preferred)
- Connect one end of an Ethernet cable (not included) to one of the Gigabit Ethernet Ports (5) on the back of the extender.
- Connect the other end of the Ethernet cable to an available LAN port on your AT&T gateway (router).
- The extender will automatically detect the connection and begin pairing. Wait for the indicator lights (1, 2, and 3) to turn solid green.
- Once paired, you can disconnect the Ethernet cable if you wish to use the extender wirelessly.
4.4 Piazzamentu Ottimale
After successful pairing, unplug the extender and move it to a location roughly halfway between your AT&T gateway and the area where you need improved Wi-Fi coverage. Ensure the extender is placed in an open area, away from large metal objects, concrete walls, or other electronic devices that might cause interference. Plug it back into a power outlet. The indicator lights should turn solid green again, confirming a good connection.

Figure 3: The Wi-Fi Extender connected to its power adapter.
5. Operating Your Wi-Fi Extender
Once set up, the AT&T Air 4920 operates automatically to extend your Wi-Fi network. Your devices will seamlessly connect to the strongest signal, whether from your gateway or the extender, using your existing Wi-Fi network name (SSID) and password.
Status di l'indicatore luminoso:
- Verde solidu: Excellent connection and operation.
- Solid Amber/Orange: Fair connection. Consider repositioning the extender closer to your gateway.
- Rossu solidu: No connection or poor signal. Reposition the extender or check connections.
- Lampendu: During WPS pairing or firmware update.
- Off: Device is powered off or not receiving power.
Cunnessioni cablate:
You can connect wired devices (e.g., desktop computers, smart TVs, gaming consoles) to the Gigabit Ethernet Ports (5) on the back of the extender for a stable, high-speed connection.
6. Mantenimentu
To ensure optimal performance and longevity of your Wi-Fi Extender:
- Pulizia: Gently wipe the exterior with a soft, dry cloth. Do not use liquid cleaners or aerosols.
- Ventilazione: Assicuratevi chì e fessure di ventilazione ùn sianu micca bluccate per impedisce u surriscaldamentu.
- Actualizazioni di firmware: The extender typically receives automatic firmware updates from AT&T. Ensure it remains connected to power and your network for these updates to occur.
- Ciclu di putenza: If you experience minor issues, try unplugging the extender from the power outlet for 10 seconds and then plugging it back in.
7. Risoluzione di prublemi
If you encounter issues with your Wi-Fi Extender, refer to the following common problems and solutions:
| Prublemu | Causa Possibile | Soluzione |
|---|---|---|
| Extender lights are off. | Nisun putere. | Ensure the power adapter is securely connected and plugged into a working outlet. Check the Power On/Off Switch (6). |
| Indicator lights are red or amber. | Poor or no connection to the gateway. |
|
| Wi-Fi signal is still weak in extended areas. | Suboptimal placement. | Move the extender to a more central location between your gateway and the weak signal area. Avoid placing it in corners or behind furniture. |
| Devices not connecting to the extender. | Extender not properly paired or network issues. |
|
| Need to reset to factory settings. | Configuration issues or preparing for new setup. | With the extender powered on, use a paperclip or similar pointed object to press and hold the Pulsante di reset (8) for about 10 seconds until the lights flash. The extender will restart with factory defaults. |
8. Specificazioni
| Feature | Detail |
|---|---|
| Numero di mudellu | AIR-4920 |
| Dimensioni di u produttu (H x L x P) | 3.94 x 4.27 x 1.63 pollici (circa) |
| Pesu di l'articulu | 15 once |
| Standard di Cumunicazione Wireless | 802.11ac |
| Rate di trasferimentu di dati | Finu à 1000 Megabit per seconda |
| Tipu di cunnessu | RJ45 (Ethernet) |
| Culore | Biancu |
| U fabricatore | AirTies |
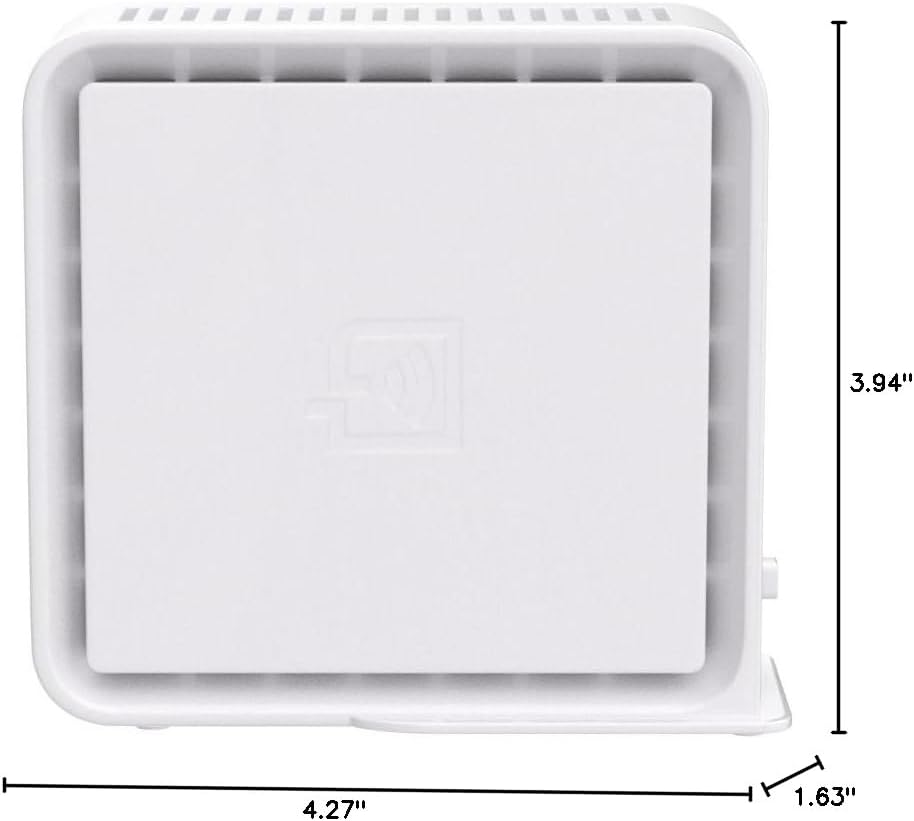
Figure 4: Approximate dimensions of the Wi-Fi Extender.


