1. Introduzione
The Hioki CM3286 Clamp On Power Tester is a versatile instrument designed for precise measurement of electrical parameters. It is capable of measuring voltage, current, power, power factor, phase angle, reactive power, and frequency. Additionally, it can detect phase sequence on live lines within single-phase or three-phase circuits at any desired point. This manual provides essential information for the safe and effective operation, maintenance, and troubleshooting of your CM3286 device.
2. Informazioni di sicurezza
WARNING: Read all safety warnings and instructions before using this product. Failure to follow the warnings and instructions may result in electric shock, fire, or serious injury.
- Always observe local and national safety codes.
- Ùn aduprate micca u dispusitivu s'ellu pare dannighjatu o funziona in modu anormale.
- Ensure the device is rated for the voltage and current levels you intend to measure.
- Wear appropriate personal protective equipment (PPE), such as insulated gloves and eye protection.
- Avoid touching live conductors with bare hands or non-insulated tools.
- Do not operate the device in wet environments or explosive atmospheres.
- Keep fingers behind the tactile barrier on the instrument during measurements.
- Disconnect the device from the circuit before opening the battery compartment.
3. Cuntenutu di u pacchettu
Verify that all items listed below are present and undamaged upon opening the package:
- Hioki CM3286 Clamp On Power Tester Unit
- Cavi di prova (rossi è neri)
- Custodia di trasportu
- Batterie AAA (x2)
- Manuale d'istruzzioni (stu documentu)
4. Caratteristiche è cumpunenti di u pruduttu

Figure 4.1: Hioki CM3286 Clamp On Power Tester (Overall View)
This image displays the complete Hioki CM3286 Clamp On Power Tester, showcasing its ergonomic design, the large clamp jaw for current measurement, and the clear digital display. The function dial and various control buttons are visible on the front panel.
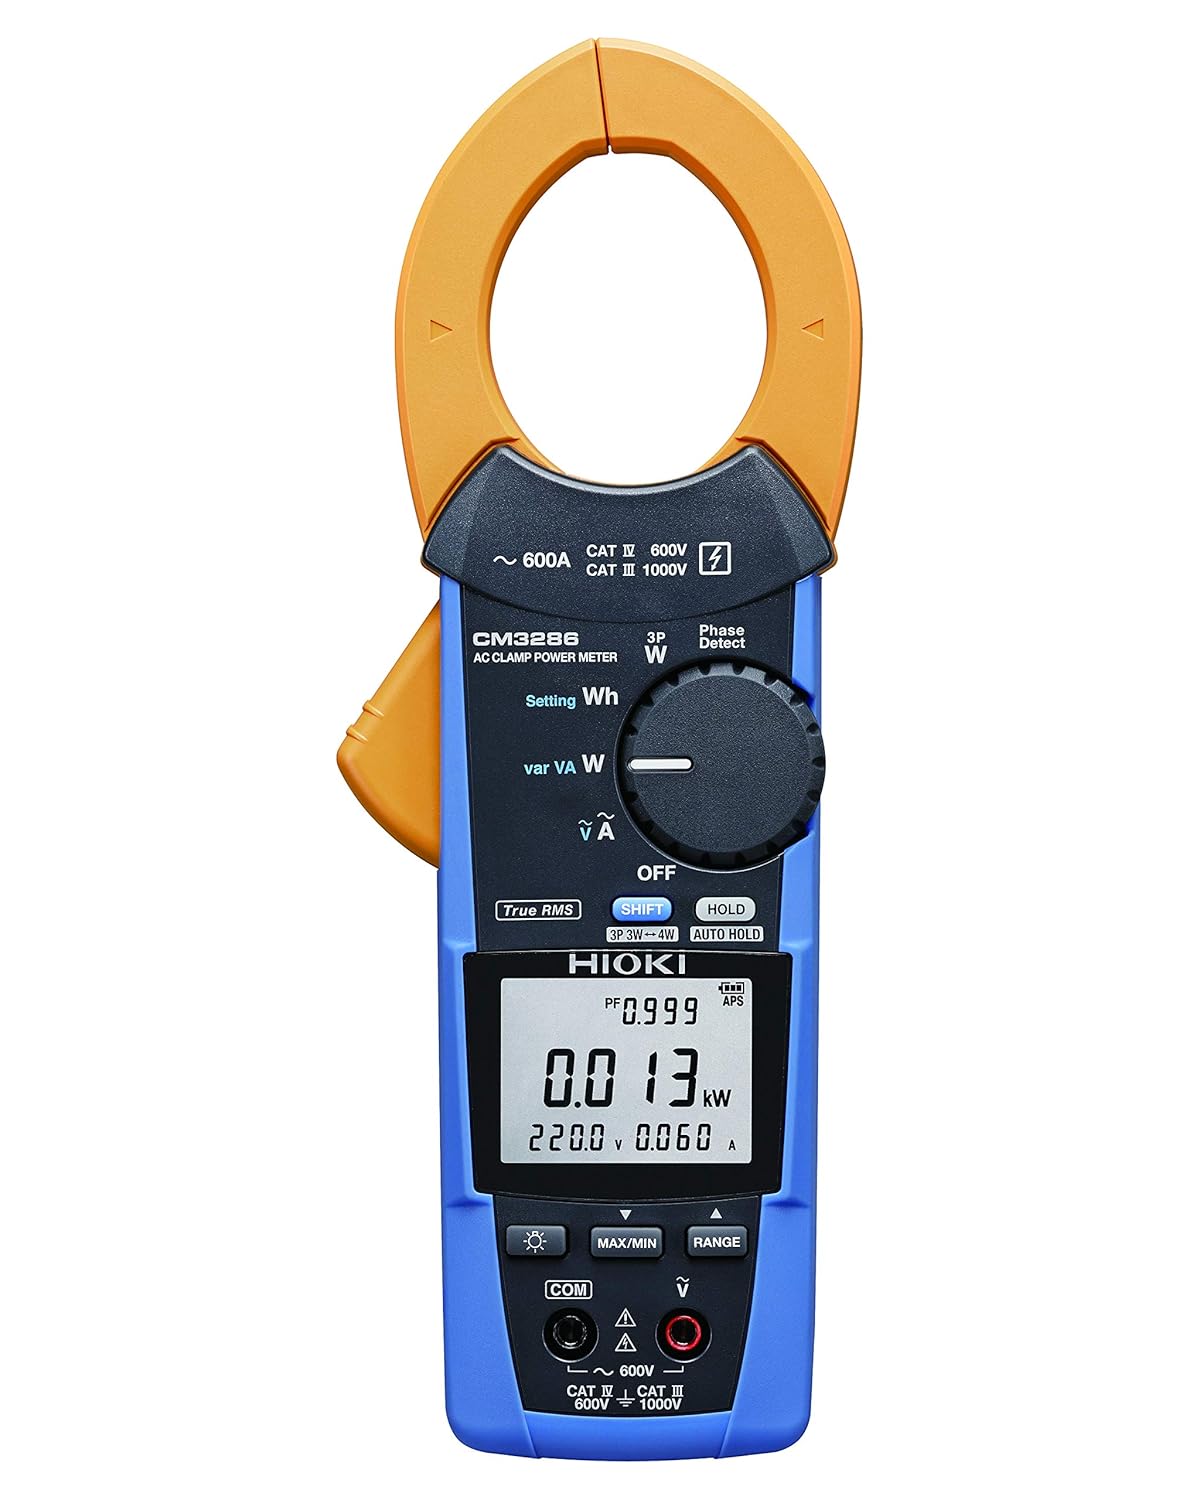
Figure 4.2: Hioki CM3286 Clamp On Power Tester (Front Panel Detail)
This image provides a closer look at the front panel of the Hioki CM3286, highlighting the digital display, the rotary function dial with various measurement settings (e.g., W, Wh, V, A), and the control buttons such as SHIFT, HOLD, MAX/MIN, and RANGE. The input terminals for voltage measurement are also visible at the bottom.
Cumpunenti chjave:
- Clamp Mascella: Adupratu per a misurazione di corrente AC senza cuntattu.
- Dial di funzione: Selects the desired measurement mode (e.g., Voltage, Current, Power, Frequency).
- Display LCD: Mostra letture di misurazione, unità è indicatori.
- Terminali di input: Per cunnette i cavi di prova per u vulumetage and other measurements.
- Pulsante HOLD: Blocca a lettura attuale di u display.
- Pulsante MAX/MIN: Registra letture massime è minime.
- Pulsante RANGE: Manually selects the measurement range.
- Pulsante SHIFT: Accesses secondary functions marked in blue on the dial.
5. Setup
5.1. Installazione di batterie
- Assicuratevi chì u dispusitivu hè spenta.
- Locate the battery compartment cover on the rear of the unit.
- Aduprate un cacciavite (s'ellu hè necessariu) per apre u coperchio.
- Insert two (2) AAA batteries, observing the correct polarity (+/-) as indicated inside the compartment.
- Sustituite u coperchiu di u compartmentu di a bateria è assicuratelu.
5.2. Accensione iniziale
After battery installation, turn the function dial from "OFF" to any measurement setting to power on the device. The display should illuminate, indicating readiness for use.
6. Operating Instructions
6.1. Power On / Off
- To power on, rotate the function dial from the "OFF" position to the desired measurement function.
- To power off, rotate the function dial back to the "OFF" position.
6.2. Misurazione di a corrente alternata (Clamp)
- Rotate the function dial to the "A" (Current) setting.
- Aprite u clamp mandibula premendu a leva.
- Enclose only one conductor (live or neutral) within the clamp mandibula. Assicuratevi chì a mandibula sia cumpletamente chjusa.
- Leghjite u valore attuale nantu à u display LCD.
6.3. voltage Misura (V)
- Rotate the function dial to the "V" (Voltage) réglage.
- Connect the red test lead to the "V" input terminal and the black test lead to the "COM" input terminal.
- Cunnette i cavi di prova in parallelu à traversu u circuitu o u cumpunente da misurà.
- Leghjite u voltage valore nantu à u display LCD.
6.4. Power Measurement (W, Wh, var, VA)
The CM3286 can measure various power parameters. Select the appropriate setting on the function dial (W for active power, Wh for energy, var for reactive power, VA for apparent power). Connect test leads for voltage è clamp the jaw around the current conductor as per the specific measurement method outlined in the full manual (not provided here, but implied by the device's capabilities).
6.5. Frequency Measurement (Hz)
Select the "Hz" setting on the function dial. Connect test leads across the circuit where frequency is to be measured, similar to voltage misurazione.
6.6. Rilevazione di a sequenza di fase
The device features a "Phase Detect" function. Refer to the detailed instructions in the complete manual for proper connection and interpretation of phase sequence on single-phase or three-phase circuits.
6.7. Using Buttons (HOLD, MAX/MIN, RANGE, SHIFT)
- HOLD: Appughjà per bluccà a lettura attuale nant'à u screnu. Appughjà torna per liberà.
- MAX / MIN: Press to enter Max/Min recording mode. The display will show the maximum or minimum value recorded since activation. Press again to cycle through Max, Min, and current readings.
- GAMMA: Appughjà per cambià trà a misurazione automatica di a gamma è a misurazione manuale. In a misurazione manuale di a gamma, appughjà ripetutamente per passà da e gamme dispunibili.
- SHIFT: Press to access secondary functions indicated in blue text next to the primary function on the dial.
7. Mantenimentu
7.1. Pulizia
Asciugà u dispusitivu cù un soft, damp pannu. Ùn aduprate micca detergenti abrasivi o solventi. Assicuratevi chì u dispusitivu sia cumpletamente asciuttu prima di almacenallu o di u prossimu usu.
7.2. Sustituzione di batterie
When the low battery indicator appears on the display, replace the batteries promptly to ensure accurate measurements. Follow the battery installation steps outlined in Section 5.1.
7.3. Storage
Store the device in its carrying case in a cool, dry place, away from direct sunlight and extreme temperatures. If storing for extended periods, remove the batteries to prevent leakage.
8. Risoluzione di prublemi
| Prublemu | Causa Possibile | Soluzione |
|---|---|---|
| U dispusitivu ùn accende micca. | Batterie morte o installate in modu incorrectu. | Verificate a polarità di a batteria; rimpiazzate e batterie. |
| No reading on display. | Incorrect function selected; open circuit; test leads not connected properly. | Select correct function; ensure circuit is complete; check test lead connections. |
| "OL" o "OVER" hè visualizatu. | Measurement exceeds selected range or device maximum. | Select a higher range (if manual ranging) or ensure measurement is within device limits. |
| Letture imprecise. | Low battery; environmental interference; damaged test leads. | Replace batteries; move away from strong electromagnetic fields; inspect and replace test leads if damaged. |
9. Specificazioni
| Parametru | Valore |
|---|---|
| Numero di mudellu | CM3286 |
| Marca | Hioki |
| Dimensioni di u pacchettu | 9.92 x 2.76 x 2.05 inch |
| Pesu di l'articulu | 0.45 kilogrammi (15.87 ounces) |
| Batterie | 2 batterie AAA (incluse) |
| Fonte d'energia | Corded Electric (Note: This refers to the type of power it measures, not its own power source. The device is battery-powered.) |
| U fabricatore | Hioki |
| Data Prima Disponibile | 20 d'aostu di u 2020 |
10. Garanzia è Support
For detailed warranty information, please refer to the warranty card included with your product or visit the official Hioki website. Hioki provides comprehensive customer support for its products.
If you encounter any issues not covered in this manual or require technical assistance, please contact Hioki customer support through their official channels. Ensure you have your product model number (CM3286) and purchase details ready when contacting support.
Nota: I termini è e cundizioni di garanzia ponu varià secondu a regione.


