1. Importanti Instructions Safety
Please read all instructions carefully before using the GASTROBACK Mini Oven Design Bake & Grill. Retain this manual for future reference.
- Assicuratevi sempre chì l'apparecchiu sia piazzatu nantu à una superficia stabile è resistente à u calore.
- Ùn toccate micca e superfici calde. Aduprate guanti da fornu o guanti quandu maneghjate oggetti caldi.
- Assicuratevi una ventilazione adatta intornu à u fornu durante u funziunamentu.
- Ùn immergete micca l'apparechju, u cordone, o plug in acqua o altri liquidi.
- A vigilazione stretta hè necessaria quandu qualsiasi apparecchiu hè utilizatu da o vicinu à i zitelli.
- Scollegate da a presa quandu ùn hè micca in usu è prima di pulisce. Lasciate rinfriscà prima di mette o toglie i pezzi.
- Ùn operate micca l'apparechju cù un cordone o una spina dannatu, o dopu chì l'apparechju hà malfunzionatu o hè statu dannatu in ogni modu.
- Ùn aduprate micca annessi micca raccomandati da u fabbricante di l'apparechju.
- Ùn mette micca sopra o vicinu à un bruciatore di gas o elettricu caldu, o in un fornu cale.
- A prudenza estrema deve esse usata quandu si move un apparecchiu chì cuntene oliu caldu o altri liquidi caldi.
- Per disconnectà, mette qualsiasi cuntrollu in "off", poi caccià a spina da a presa murale.
- Ùn aduprate micca l'apparechju per altri usi domestici previsti.
- The exterior of the oven features a Cool Touch housing, but internal components and accessories will become very hot.
- This appliance is equipped with electronic child safety features.
2. Cumpunenti di u produttu
Familiarize yourself with the parts of your GASTROBACK Mini Oven.

Figura 2.1: Fronte view of the GASTROBACK Mini Oven, showcasing the digital control panel and oven door.

Figure 2.2: Included accessories: rotisserie spit, grill rack, pizza stone, and baking tray.
- Unità principale: The oven housing with integrated heating elements and control panel.
- Porta di u Fornu: Glass door for viewinghjuttendu l'alimentu durante a cottura.
- Pannellu di cuntrollu: Backlit touch display for program selection, temperature, and time settings.
- Placca di cottura: Per a cottura in fornu è arrustimentu.
- Grill à grille : Per griglià è mette i piatti.
- Pizza Stone: 30 cm diameter, for crispy pizzas.
- Rotisserie Spit: For roasting whole chickens or kebabs.
- Maniglia di Rotisserie: For safe insertion and removal of the rotisserie spit.
- Cassetta per a Molla: Situatu in fondu, amovibile per una facile pulizia.
3. Installazione è Primu Usu
- Unpacking: Carefully remove all packaging materials and accessories. Check for any damage.
- Placement: Place the oven on a flat, stable, and heat-resistant surface. Ensure there is sufficient space (at least 10 cm) around the oven for proper ventilation. Do not place it near flammable materials.
- Pulizia: Prima di u primu usu, pulite l'internu è l'accessori cù un pannu di gomma.amp cloth. Wash the baking tray, grill rack, pizza stone, and rotisserie spit in warm soapy water, then rinse and dry thoroughly.
- Burn-in iniziale:
- Cunnette u fornu à una presa elettrica cun messa à terra.
- Set the oven to 230°C (450°F) using the "Custom" function.
- Operate the empty oven for approximately 10-15 minutes to burn off any manufacturing residues. A slight odor or smoke is normal during this process. Ensure the area is well-ventilated.
- After 10-15 minutes, turn off the oven and unplug it. Allow it to cool completely.
- Your GASTROBACK Mini Oven is now ready for use.
4. Operating Instructions
4.1 Panel Control Overview
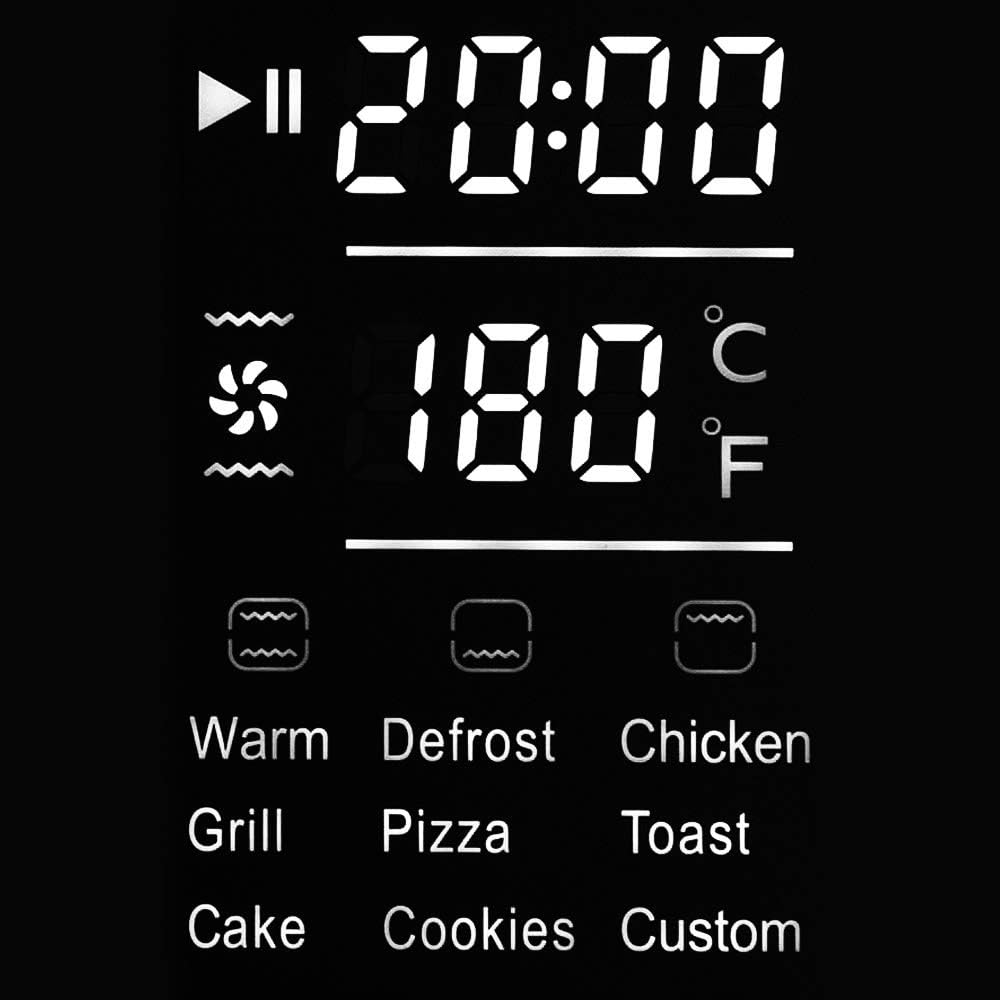
Figura 4.1: Detailed view of the backlit touch display, showing program icons, temperature, and time settings.
The control panel features a backlit touch display for easy operation. It displays the selected program, function, cooking time, and temperature.
- Pulsante di putenza: Accende/spegne u fornu.
- Selezzione di u prugramma: Icons for various pre-set programs (Warm, Defrost, Chicken, Grill, Pizza, Toast, Cake, Cookies, Custom).
- Icone di Funzione: Indicate heating elements (top, bottom, convection) and rotisserie.
- Ajuste di temperatura: Up/Down arrows to set temperature (30°C to 230°C).
- Ajustamentu di u tempu: Up/Down arrows to set cooking time.
- Pulsante Start/Pause: Avvia o interrompe a cottura.
4.2 Programmi predefiniti
The oven offers 9 pre-set programs for common cooking tasks:
- Caldu: Per mantene u cibu caldu.
- Sbrinamentu: For thawing frozen items.
- Pollu : Optimized for rotisserie chicken.
- Grill: Per griglià carne è ligumi.
- Pizza : Ideal for baking pizzas, especially with the pizza stone.
- Toast: For toasting bread.
- Torta: For baking cakes and pastries.
- Cookies: For baking cookies.
- Customizatu: Allows manual setting of temperature, time, and heating functions.
4.3 Manual Operation (Custom Program)
- Press u buttone Power per accende u fornu.
- Select the "Custom" program icon.
- Use the temperature adjustment arrows to set the desired temperature between 30°C and 230°C.
- Use the time adjustment arrows to set the desired cooking duration.
- Select the desired heating function(s):
- Calore Superiore: For browning and crisping the top.
- Calore di fondu: For baking bases and gentle cooking.
- Top & Bottom Heat: Standard baking and roasting.
- Cunvezione (aria calda): For even cooking and faster results, ideal for multiple racks.
- Rotisserie : Activates the rotisserie motor for even roasting.
- Preme u buttone Start per inizià a cucina.
- The display will show the remaining cooking time and current temperature.
- To pause cooking, press the Start/Pause button again. Press it once more to resume.
- When cooking is complete, the oven will beep and turn off the heating elements.
- Carefully remove food using oven mitts.
4.4 Usendu a funzione di girarrosto

Figure 4.2: A whole chicken being roasted on the rotisserie spit inside the oven.
- Prepare the food (e.g., a whole chicken) and secure it onto the rotisserie spit using the forks. Ensure it is balanced.
- Inserite l'estremità appuntita di u spiedu di girarrosto in a presa di trasmissione à u latu drittu di l'internu di u fornu.
- Rest the square end of the spit onto the support bracket on the left side.
- Chiude a porta di u fornu.
- Select the "Chicken" pre-set program or the "Custom" program and activate the rotisserie function along with desired heating elements (e.g., Top & Bottom Heat with Convection).
- Set temperature and time as required.
- Press Start. The rotisserie spit will begin to rotate.
- Once cooking is complete, use the rotisserie handle (Figure 2.3) to safely remove the hot spit from the oven.

Figure 4.3: The rotisserie handle and a separate rack lifter tool for safe handling of hot accessories.
4.5 Usendu a petra di pizza

Figure 4.4: A pizza cooking on the included pizza stone, positioned on the grill rack.
- Place the pizza stone on the grill rack.
- Insert the grill rack with the pizza stone into the desired rack position in the oven.
- Preheat the oven with the pizza stone inside for at least 10-15 minutes at the desired pizza baking temperature (e.g., 200-220°C).
- Carefully slide the pizza onto the hot pizza stone.
- Select the "Pizza" pre-set program or "Custom" with Top & Bottom Heat.
- Bake until the crust is golden brown and cheese is melted.
- Use oven mitts and a pizza peel or spatula to remove the pizza.
5. Mantenimentu è Pulizia
Una pulizia regulare assicura prestazioni ottimali è allunga a vita di u vostru fornu.
- Scollegate sempre u fornu da a presa di corrente è lasciallu raffreddà cumpletamente prima di pulisce.
- Esternu: Asciugà e superfici esterne cun un soffiu, damp tela. Ùn aduprate micca detergenti abrasivi o spazzole abrasive.
- Internu: The oven interior has a non-stick coating. Wipe with a damp cloth and mild detergent. For stubborn stains, a non-abrasive oven cleaner designed for non-stick surfaces can be used, following the product instructions. Ensure all cleaner residue is removed.
- Accessori: The baking tray, grill rack, rotisserie spit, and pizza stone can be washed in warm soapy water. Rinse thoroughly and dry completely before storing or reusing. The pizza stone should not be washed with soap if possible, as it can absorb odors; simply scrape off residue and wipe with a damp tela.
- Cassetta per a Molla: Pull out the crumb tray from the bottom of the oven. Empty crumbs and wash with warm soapy water. Rinse and dry thoroughly before reinserting.
- Ùn immerse micca l'unità principale in acqua o qualsiasi altru liquidu.
6. Risoluzione di prublemi
Riferitevi à sta sezione per i prublemi cumuni è e so suluzioni.
| Prublemu | Causa Possibile | Soluzione |
|---|---|---|
| U fornu ùn si accende. | Micca cunnessu; spenta a correntetage; presa difettosa. | Ensure the oven is securely plugged into a working electrical outlet. Check your circuit breaker. |
| L'alimentu ùn coce micca uniformemente. | Incorrect temperature/time; overcrowding; improper rack position. | Adjust temperature and time. Avoid overcrowding the oven. Use the convection function for more even heat distribution. Try different rack positions. |
| Fumu eccessivu durante a cottura. | Residui di cibo o accumuli di grassu; alimenti grassi. | Clean the oven interior and accessories thoroughly. Use the baking tray to catch drips from fatty foods. Ensure proper ventilation. |
| U spiedu di u girarrosto ùn gira micca. | Spit not correctly inserted; rotisserie function not selected; food too heavy/unbalanced. | Ensure the spit is correctly seated in both the drive socket and support bracket. Verify the rotisserie function is activated. Ensure food is balanced and not exceeding weight limits. |
| U schermu ùn risponde micca à u toccu. | Errore di software tempurale; schermu sporcu. | Unplug the oven for a few minutes, then plug it back in. Clean the touch screen with a soft, dry cloth. |
If the problem persists after attempting these solutions, please contact GASTROBACK customer support.
7. Specifications Product
- Mudellu: GASTROBACK Mini Oven Design Bake & Grill, Model 42814
- Capacità: 26 litri
- putenza: 1500 Watt
- Voltage: 220-240V~, 50/60Hz (Standard European voltage, adjust if needed for other regions)
- Gamma di temperatura: 30°C - 230°C
- Funzioni: Top Heat, Bottom Heat, Top & Bottom Heat, Convection (Hot Air), Rotisserie
- Tipu di cuntrollu: Electronic Touch Display
- Materiale: Stainless Steel housing, non-stick interior
- Pesu: 8.2 chilògrammi
- Accessori inclusi: Baking tray, grill rack, 30cm pizza stone, rotisserie spit, rotisserie handle.
- Funzioni di sicurezza: Cool Touch housing, Electronic Child Safety.
8. Garanzia è Assistenza Clienti
GASTROBACK products are manufactured with high-quality materials and undergo strict quality control. This product is covered by a manufacturer's warranty against defects in materials and workmanship from the date of purchase.
- Periudu di garanzia: Please refer to your purchase documentation or the official GASTROBACK websitu per i termini è a durata di a garanzia specifica in a vostra regione.
- Reclamazioni di garanzia: In the event of a defect, please contact the retailer where you purchased the product or GASTROBACK customer service directly. Proof of purchase is required for all warranty claims.
- Esclusioni: The warranty does not cover damage resulting from improper use, normal wear and tear, unauthorized repairs, or failure to follow the instructions in this manual.
Assistenza Clienti:
For further assistance, technical support, or spare parts, please visit the official GASTROBACK websitu web o cuntattate u so serviziu clienti:
Websitu: www.gastroback.de (o regiunale pertinente websitu)
Informazioni di cuntattu: Refer to the "Contact" section on the GASTROBACK website for phone numbers and email addresses specific to your country.


