1. Introduzione è Overview
The EPEVER Tracer3210AN is a 30A Maximum Power Point Tracking (MPPT) solar charge controller designed for 12V/24V automatic system voltage detection. It features a maximum PV input voltage of 100V and negative grounding. This controller is equipped with an MT50 remote meter, a temperature sensor (RTS), and an RS485 PC communication cable for comprehensive monitoring and control.
This manual provides detailed instructions for the safe and efficient installation, operation, and maintenance of your Tracer3210AN solar charge controller.
2. Caratteristiche di u produttu
- Tecnulugia MPPT Avanzata: Ensures high tracking efficiency (over 99.5%) for optimal solar energy harvesting.
- Volu di u Sistema Automaticutage: Rileva automaticamente i sistemi di batterie da 12V o 24V.
- Ingressu fotovoltaicu elevatu: Supports maximum PV input voltagè finu à 100V.
- Negative Grounding: Common negative grounding design for system compatibility.
- Compatibilità versatile di a batteria: Supports Sealed, Gel, Flooded, Lithium, and user-defined battery types.
- Schermu LCD integratu: Provides real-time display of key charging parameters.
- Opzioni di cumunicazione multiple: Includes RS-485 interface for PC software, mobile app connectivity (via optional accessories), and MT50 remote meter.
- Uscita USB: Dual USB ports (5V Max: 2.2A) for charging external devices.
- Funzione di limitazione di corrente: Allows for future expansion of solar panels without overloading.
- Disegnu robustu: Features aluminum alloy material for efficient heat dissipation.
3. Cumpunenti Overview
The EPEVER Tracer3210AN kit includes the following components:
- Tracer3210AN MPPT Solar Charge Controller
- MT50 Meter Remote
- Sensore di temperatura à distanza (RTS)
- PC Communication Cable (RS485 to USB)
- Viti di muntatura è tasselli murali
- Manuale d'usu


4. Setup è Installazione
Una stallazione curretta hè cruciale per u funziunamentu sicuru è efficiente di u vostru regulatore di carica solare. Seguite attentamente questi passi.
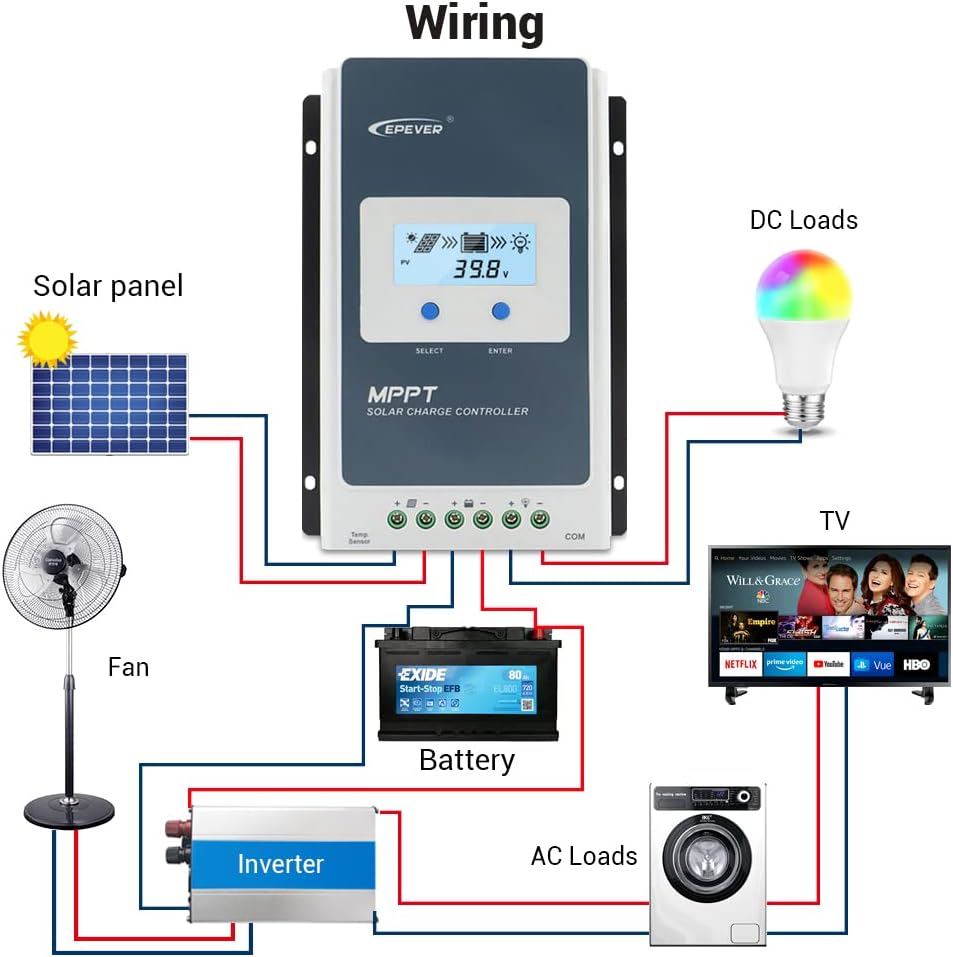
4.1 Istruzzioni di cablaggio
Ordine di cunnessione: Always connect the battery first, then the solar panel, and finally the load.
Disconnection Order: Disconnect the solar panel first, then the load, and finally the battery.
- Connect the battery to the controller's battery terminals (BAT+ and BAT-).
- Connect the solar panel to the controller's PV terminals (PV+ and PV-).
- Connect the load to the controller's load terminals (LOAD+ and LOAD-).
- Connect the Remote Temperature Sensor (RTS) to the designated RTS port.
- Connect the MT50 Remote Meter or PC Communication Cable to the RS485 port as needed.

4.2 Module Installation (if applicable)
The Tracer3210AN controller supports various interface modules for enhanced functionality. To change or install modules:
- Pry the cover of the controller off using a screwdriver.
- Insert the desired module (e.g., Display Standard 2 Modules (DS2), USB COM Slave (UCS)) into the designated slot.
- Sustituite a tappa.
5. Operating Instructions
5.1 Funzioni di u display LCD è di i buttoni
The controller features an LCD display and buttons for monitoring and setting parameters.
- PV Browsing Interface: Pulsà u buttone per view PV data. Hold for 5 seconds to set data.
- BATT Browsing Interface: Pulsà u buttone per view battery data. Hold for 5 seconds to set battery type, capacity, and temperature.
- Load Browsing Interface: Pulsà u buttone per view load data. Hold for 5 seconds to set load working mode.
- Setting Interface: Press the button to enter settings. Hold for 5 seconds to set parameters.
5.2 Setting Type Battery
To ensure proper charging, set the correct battery type:
- Press u SET button for the setting interface.
- Press u BATT button and hold for 5 seconds to enter the battery type interface.
- Press u PV + or LOAD- buttons to choose the battery type (e.g., Sealed, GEL, FLD, LiFePO4, Li(NiCoMn)O2, USE).
- Press u SET buttone per cunfirmà u tipu di bateria.
ATTENZIONE: Quandu u tipu di bateria predeterminatu hè sceltu, u voltage control parameters will be set by default and cannot be changed. To change these parameters, select "User" battery type.
5.3 Impostazione di a Modalità di Travagliu di Caricamentu
The controller offers various load working modes:
- Manual Control Mode (default): Press the button to open/close the load.
- Luce ON/OFF: Load turns on/off based on light conditions.
- Luce accesa + Timer: Load turns on based on light and stays on for a set duration.
- U cuntrollu di u tempu: Load operates according to a programmed schedule.
Refer to the MT50 remote meter or PC software for detailed configuration of load working modes.
6. Mantenimentu
To ensure optimal performance and longevity of your EPEVER Tracer3210AN solar charge controller, regular maintenance is recommended:
- Inspeccione i cunnessi: Verificate periodicamente tutti i cunnessione di i fili per a stretta è a currusione. Cunnessione allentata pò causà surriscaldamentu è danni.
- Pulizia di u cuntrollore: Keep the controller clean and free from dust and debris. Ensure the heat sink fins are not obstructed to maintain proper cooling.
- Monitorà u rendiment: Regularly check the LCD display or connected remote meter/app for normal operating parameters (PV voltage, batterie voltage, charging current).
- Ispezione di a batteria: Inspect battery terminals for corrosion and ensure the battery is in good condition. For flooded batteries, check electrolyte levels.
- Cuntrolla ambientale: Ensure the installation environment is within the specified temperature and humidity ranges.
7. Risoluzione di prublemi
If you encounter issues with your Tracer3210AN controller, consider the following common troubleshooting steps:
- Nisun Display/Alimentazione: Verificate i cunnessione di a batteria è assicuratevi chì u vulume di a batteriatage is within the operating range. Verify fuses are intact.
- Nisuna carica: Confirm solar panel connections are secure and receiving adequate sunlight. Check PV voltage on the display. Ensure the battery type is correctly set.
- Caricamentu micca funzionale: Verify load connections. Check the load working mode settings. Ensure the battery has sufficient charge.
- Codici d'errore: Refer to the full user manual for specific error codes displayed on the LCD or MT50 remote meter.
For persistent issues, contact EPEVER customer support or consult a qualified technician.
8. Specifiche tecniche
Below are the detailed specifications for the Tracer3210AN model:
| Articulu | Tracer 3210AN |
|---|---|
| Sistema nominali voltage | 12 / 24VDC Auto |
| Corrente di carica nominale | 30A |
| Corrente nominale di scaricamentu | 30A |
| Batteria voltaga gamma | 8 ~ 32 V |
| Max. PV circuitu apertu voltage | 100V |
| MPP voltaga gamma | (Battery voltage +2V)~72V |
| Max. putenza di input PV | 390 W / 12 V, 780 W / 24 V |
| Autoconsumu | ≤ 12 mA |
| Circuitu di scaricamentu voltage goccia | ≤0.23V |
| A temperatura cumpensà u coefficiente | -3mV/°C/2V (par défaut) |
| Metà a terra | Negativu cumuni |
| interfaccia RS485 | 5VDC / 100mA |
| Tempu di retroilluminazione LCD | 60S (Predefinitu) |
| Gamma di temperatura di almacenamiento | -20 ℃ ~ + 70 ℃ |
| Umidità relativa | ≤95%, NC |
| Enclosure | IP30 |
| Dimensione di u foru di muntatura | Φ5mm |
Nota: When a lead-acid battery is used, the controller has no low temperature protection. Max PV open circuit voltage is at minimum operating environment temperature. At 25℃ environment temperature. When a lithium-ion battery is used, the system voltage ùn pò esse identificatu automaticamente.

9. Opzioni di cunnessione
The Tracer3210AN controller offers various connectivity options for monitoring and control:
- MT50 Remote Meter: Displays operating data and fault information. Easy to operate with a numeric display.
- Software PC: Connect via USB to RS485 cable (CC-USB-RS485-150U) for monitoring and parameter modification using Solar Station PC software.
- App mobile: Connect via OTG cable (OTG-12CM) or optional WiFi/Bluetooth adapters (eBox-WiFi-01, eBox-BLE-01) for real-time monitoring and parameter modification via mobile app.
- Logger: eLOG01 logger can record operating data of the controller for later review.
10. Garanzia è Support
For warranty information, technical support, or service inquiries, please refer to the warranty card included in your product packaging or visit the official EPEVER websitu. Assicuratevi d'avè u mudellu di u vostru pruduttu è u numeru di serie dispunibili quandu cuntattate l'assistenza.
Per risorse supplementari è FAQ, pudete visità u Negoziu EPEVER nant'à Amazon.


