1. Introduzione
This manual provides detailed instructions for the installation, operation, and maintenance of the SINOTIMER TM919A-2 LCD Digital Programmable Timer Switch. This device is designed for automatic control of electrical appliances based on programmed time schedules, offering daily and weekly programming options.
2. Caratteristiche di u produttu
- Weekly 7-day programmable digital time switch.
- Vol. multiplitage options (5V, 12V, 24V, 110V, 220V, 85-265V). This specific model is 220V.
- Detachable battery design for backup power.
- 35mm DIN rail mounting for easy installation.
- LCD display for clear time and program viewing.
- 16 ON/OFF programs per day or week.
- Manual override function.
- High capacity 16A switching contact.
3. Informazioni di sicurezza
ATTENZIONE: Risicu di scossa elettrica. L'installazione deve esse effettuata solu da un elettricista qualificatu o da una persona cumpetente.
- Assicuratevi chì a putenza hè scollegata prima di a stallazione o di mantenimentu.
- Ùn superate micca a capacità di carica massima di 16A.
- Verificate u voltage supply for the specific model (220V for TM919A-2).
- Mantene u dispusitivu luntanu da l'umidità è da e temperature estreme.
4. Produttu Finituview è cumpunenti
The SINOTIMER TM919A-2 features an LCD display, control buttons, and wiring terminals for power input and load control.

Figura 4.1: Fronte view of the SINOTIMER TM919A-2 Digital Timer Switch, showing the LCD display, control buttons (P, D+, H+, M+, RESET, MANUAL), and wiring terminals.

Figura 4.2: The timer switch with its transparent protective cover opened, revealing the control buttons for programming and manual operation.
Buttuni di cuntrollu:
- P (Prugramma): Entra in u modu di cunfigurazione di u prugramma.
- D+ (Day): Adjusts day of the week or program day.
- H+ (Hour): Adjusts hour or program hour.
- M+ (Minute): Adjusts minute or program minute.
- RESET: Resetta tutti i paràmetri à i valori predeterminati di fabbrica.
- MANUALE: Toggles output ON/AUTO/OFF.
5. Setup è Installazione
5.1 Schema di cablaggio
Refer to the wiring diagram on the side of the device and the illustration below for correct connection. Ensure all connections are secure.

Figura 5.1: Latu view of the timer switch displaying the wiring diagram. Terminals 1 and 2 are for power input (L and N). Terminals 3, 4, and 5 are for the relay output (Common, Normally Open, Normally Closed).
- Terminals 1 & 2 (L, N): Connect to the main power supply (220V AC for this model).
- Terminal 3 (NO - Normally Open): Connects to the load when the timer is ON.
- Terminal 4 (COM - Common): Connects to one side of the load and the power supply.
- Terminal 5 (NC - Normally Closed): Connects to the load when the timer is OFF (less common for typical applications).
5.2 Initial Power-up and Reset
Upon first power-up or after a long period without power, the LCD display may be blank. The internal battery provides backup for settings. If the display is unresponsive or shows garbled characters, press the RESET button using a pointed object (e.g., a pen tip). This will clear all settings and restore the timer to its default state.
5.3 Impostazione di l'ora è di u ghjornu attuali
- Press u P button once. The display will show the current time setting.
- Press D+ per stabilisce u ghjornu attuale di a settimana.
- Press H+ per stabilisce l'ora attuale.
- Press M+ per stabilisce u minutu attuale.
- Press u P button again to exit time setting mode and return to normal operation.
6. Operating Instructions
6.1 Programming ON/OFF Cycles
U timer supporta finu à 16 prugrammi ON/OFF. Ogni prugramma hè custituitu da un tempu ON è un tempu OFF.
- Press u P button repeatedly until "1 ON" appears on the display. This is the first ON program.
- Press D+ per selezziunà u(i) ghjornu(i) per questu prugramma. L'opzioni includenu ghjorni individuali, ghjorni di a settimana, fine di settimana, o tutti i 7 ghjorni.
- Press H+ to set the desired hour for the "ON" event.
- Press M+ to set the desired minute for the "ON" event.
- Press P again. "1 OFF" will appear. This is the first OFF program.
- Repeat steps 2-4 to set the day(s), hour, and minute for the "OFF" event.
- Cuntinuà pressendu P to cycle through "2 ON", "2 OFF", up to "16 ON", "16 OFF". If you do not need all 16 programs, simply press P until the display returns to the current time.
- To save and exit programming mode, press the P button until the current time is displayed.
6.2 Override manuale
U MANUALE button allows you to override the programmed settings temporarily or permanently.
- Press MANUALE once: Toggles between ON/AUTO/OFF modes.
- ON: The output is continuously ON, ignoring programs.
- OFF: The output is continuously OFF, ignoring programs.
- AUTO: The timer operates according to the programmed ON/OFF cycles. This is the standard operating mode.
7. Mantenimentu
7.1 Sustituzione di batterie
The timer includes a detachable CR2032 lithium battery to maintain time and program settings during power outages. If the display becomes dim or resets frequently, the battery may need replacement.

Figura 7.1: The timer switch shown with its battery compartment open and a CR2032 lithium battery, indicating the detachable battery design.
- Disconnect power to the timer before attempting battery replacement.
- Truvate u compartimentu di a batteria, tipicamente nantu à u latu o u spinu di l'unità.
- Eliminate cù cura a vechja batteria CR2032.
- Insert a new CR2032 battery, ensuring correct polarity (+ side up).
- Chiude u compartimentu di a bateria.
- Reconnect power and reset the current time and day if necessary.
8. Risoluzione di prublemi
- A visualizazione hè in biancu:
- Check power supply connections (Terminals 1 & 2).
- Ensure the internal battery is charged or replaced if old.
- Press u RESET buttone.
- I prugrammi ùn sò micca in esecuzione:
- Assicuratevi chì u timer sia in AUTO mode (check the display for "AUTO"). Press MANUALE à i modi di ciclu.
- Verificate chì l'ora è u ghjornu attuali sò impostati currettamente.
- Check that the ON/OFF programs are correctly entered and enabled for the desired days.
- Confirm wiring to the load (Terminals 3, 4, 5) is correct.
- Timer resets unexpectedly:
- The internal battery may be low or depleted. Replace the CR2032 battery.
- Ensure stable power supply to the unit.
9. Specificazioni
| Feature | Specificazione |
|---|---|
| Mudellu | TM919A-2 |
| Alimentazione elettrica | 220V AC (as per model) |
| Cunsumu d'energia | 4.5 VA (MAX) |
| Gamma di temperatura | -20 °C à +50 °C |
| Mostra | LCD |
| Switching Contact | 1 commutatore |
| Programmi | 16 ON/OFF per day or week |
| Isteresi | 2 sec/day (at 25°C) |
| Capacità | 16A |
| Gamma di timer | 1 minutu à 168 ore |
| Intervallu minimu | 1 minutu |
| Black-out Memory | 60 days (with internal battery) |
| Pesu di l'articulu | 0.15 kg (5.3 ounces) |
| Muntà | Binariu DIN 35mm |
| Size Screen | 1.2 inch |
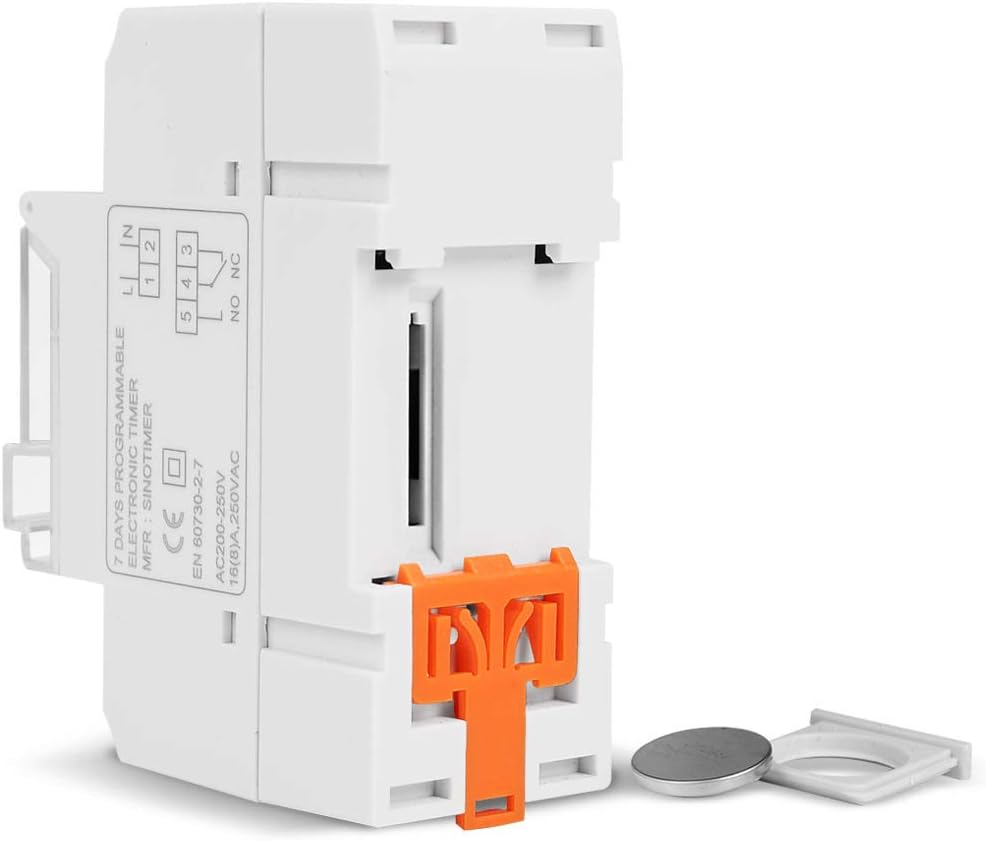
Figura 9.1: Dimensional drawing of the SINOTIMER TM919A-2, showing measurements in centimeters for height, width, and depth.
10. Garanzia è Support
Specific warranty information for the SINOTIMER TM919A-2 is not provided in the product details. For warranty claims or technical support, please contact your retailer or the manufacturer directly. Keep your purchase receipt as proof of purchase.


