1. Introduzione
Thank you for choosing the Inkbird BBQGO BG-CT2D Digital Food Thermometer. This device is designed to help you achieve perfectly cooked meals by accurately monitoring food temperatures. Featuring dual probes, a touch screen, and preset temperature options, it is ideal for use with ovens, grills, smokers, and various cooking methods. Please read this manual thoroughly before use to ensure proper operation and longevity of your thermometer.
2. Produttu Finituview
2.1 Funzioni chjave
- Sonde Doppie: Monitor two different foods or two parts of the same food simultaneously. Probes are 40 inches (100cm) long and heat-resistant.
- Gamma larga di temperatura: Measures from -20℃ to 250℃ (-4°F to 482°F) with an accuracy of ±2℃/±2°F.
- Menu preimpostati: Includes factory-preset temperatures and doneness levels for 8 types of meat (Beef, Lamb, Veal, Hamburger, Pork, Turkey, Chick, Fish).
- Disegnu cunvene: Features two magnets for attachment to metal surfaces and a back stand for tabletop use. Silicone cover provides protection.
- Touch Screen & LCD Backlight: Easy-to-read large LCD with sensitive touch controls and backlight for clear visibility in any lighting condition.
- Built-in Timer & Alarm: Set cooking times from 59 seconds to 99 minutes. An alarm sounds when the set temperature is reached or time expires, preventing overcooking.
2.2 Cumpunenti
The Inkbird BBQGO BG-CT2D thermometer consists of the main unit and two temperature probes.

Image: The main thermometer unit with its two temperature probes, showing approximate dimensions.

Image: A detailed diagram illustrating the various parts and buttons of the thermometer, including probe channels, display areas, and control buttons.
- 1. Magnet: For attaching to metal surfaces.
- 2. Interruttore di putenza: Accende/spegne l'apparecchiu.
- 3. Struttura di Supportu: Per piazzamentu in tavula.
- 4. Probe Jack: Cunnetta e sonde di temperatura.
- 5. Scompartimentu di a batteria: Holds 2 AAA batteries (not included).
- 6. Preset Meat Type: Displays the selected meat type.
- 7. Probe Channel: Indicates which probe (1 or 2) is active.
- 8. Doneness Level: Shows the selected doneness (e.g., RARE, MEDIUM).
- 9. Alarm Temperature: Displays the target temperature for the alarm.
- 10. Current Temperature: Shows the real-time temperature from the probe.
- Pulsante M: Changes preset mode or turns on the alarm.
- Pulsante T: Selects doneness level or switches between °C/°F.
- Pulsante CH: Selects probe channel or sets an alarm.
3. Setup
3.1 Installazione di batterie
- Truvate u compartimentu di a batteria nant'à u spinu di l'unità di termometru.
- Aprite a tappa di a bateria.
- Insert 2 AAA batteries (not included), ensuring correct polarity (+/-).
- Chiudete a tappa di a bateria in modu sicuru.

Image: The rear of the thermometer unit with the battery compartment open, indicating where to insert 2 AAA batteries.
3.2 Connecting Probes
- Ensure the thermometer unit is powered off.
- Insert the stainless steel probes into the probe jacks located on the sides of the main unit. Ensure they are fully inserted for a secure connection.
Image: The thermometer unit with both probes correctly connected to the side jacks.
3.3 Power On/Off
- To power on, slide the power switch on the back of the unit to the "ON" position.
- Per spegne, fate scorrere l'interruttore di alimentazione in a pusizione "OFF".

Imagine: Un primu pianu view of the power switch located on the side of the thermometer unit.
4. Operating Instructions
4.1 Selezzione di l'unità di temperatura (°C/°F)
Per cambià trà Celsius (°C) è Fahrenheit (°F), appughjà u buttone T button on the touch screen. The display will update accordingly.

Image: The thermometer display indicating the option to select between Celsius and Fahrenheit temperature units.
4.2 Selecting Probe Channel
Press u CH button to switch between Probe 1 and Probe 2. The selected channel will be highlighted on the display.
4.3 Using Preset Temperatures
- Press u M button to cycle through the 8 preset meat types (BEEF, LAMB, VEAL, HAMBURGER, PORK, TURKEY, CHICK, FISH).
- Una volta sceltu u tipu di carne, appughjà u buttone T button to choose the desired doneness level (e.g., RARE, MED RARE, MEDIUM, WELL). The target temperature will adjust automatically.
- Inserite a sonda in a parte più spessa di l'alimentu, evitendu l'ossu o a cartilagine.
- The thermometer will display the current temperature and the set alarm temperature. An alarm will sound when the food reaches the target temperature.
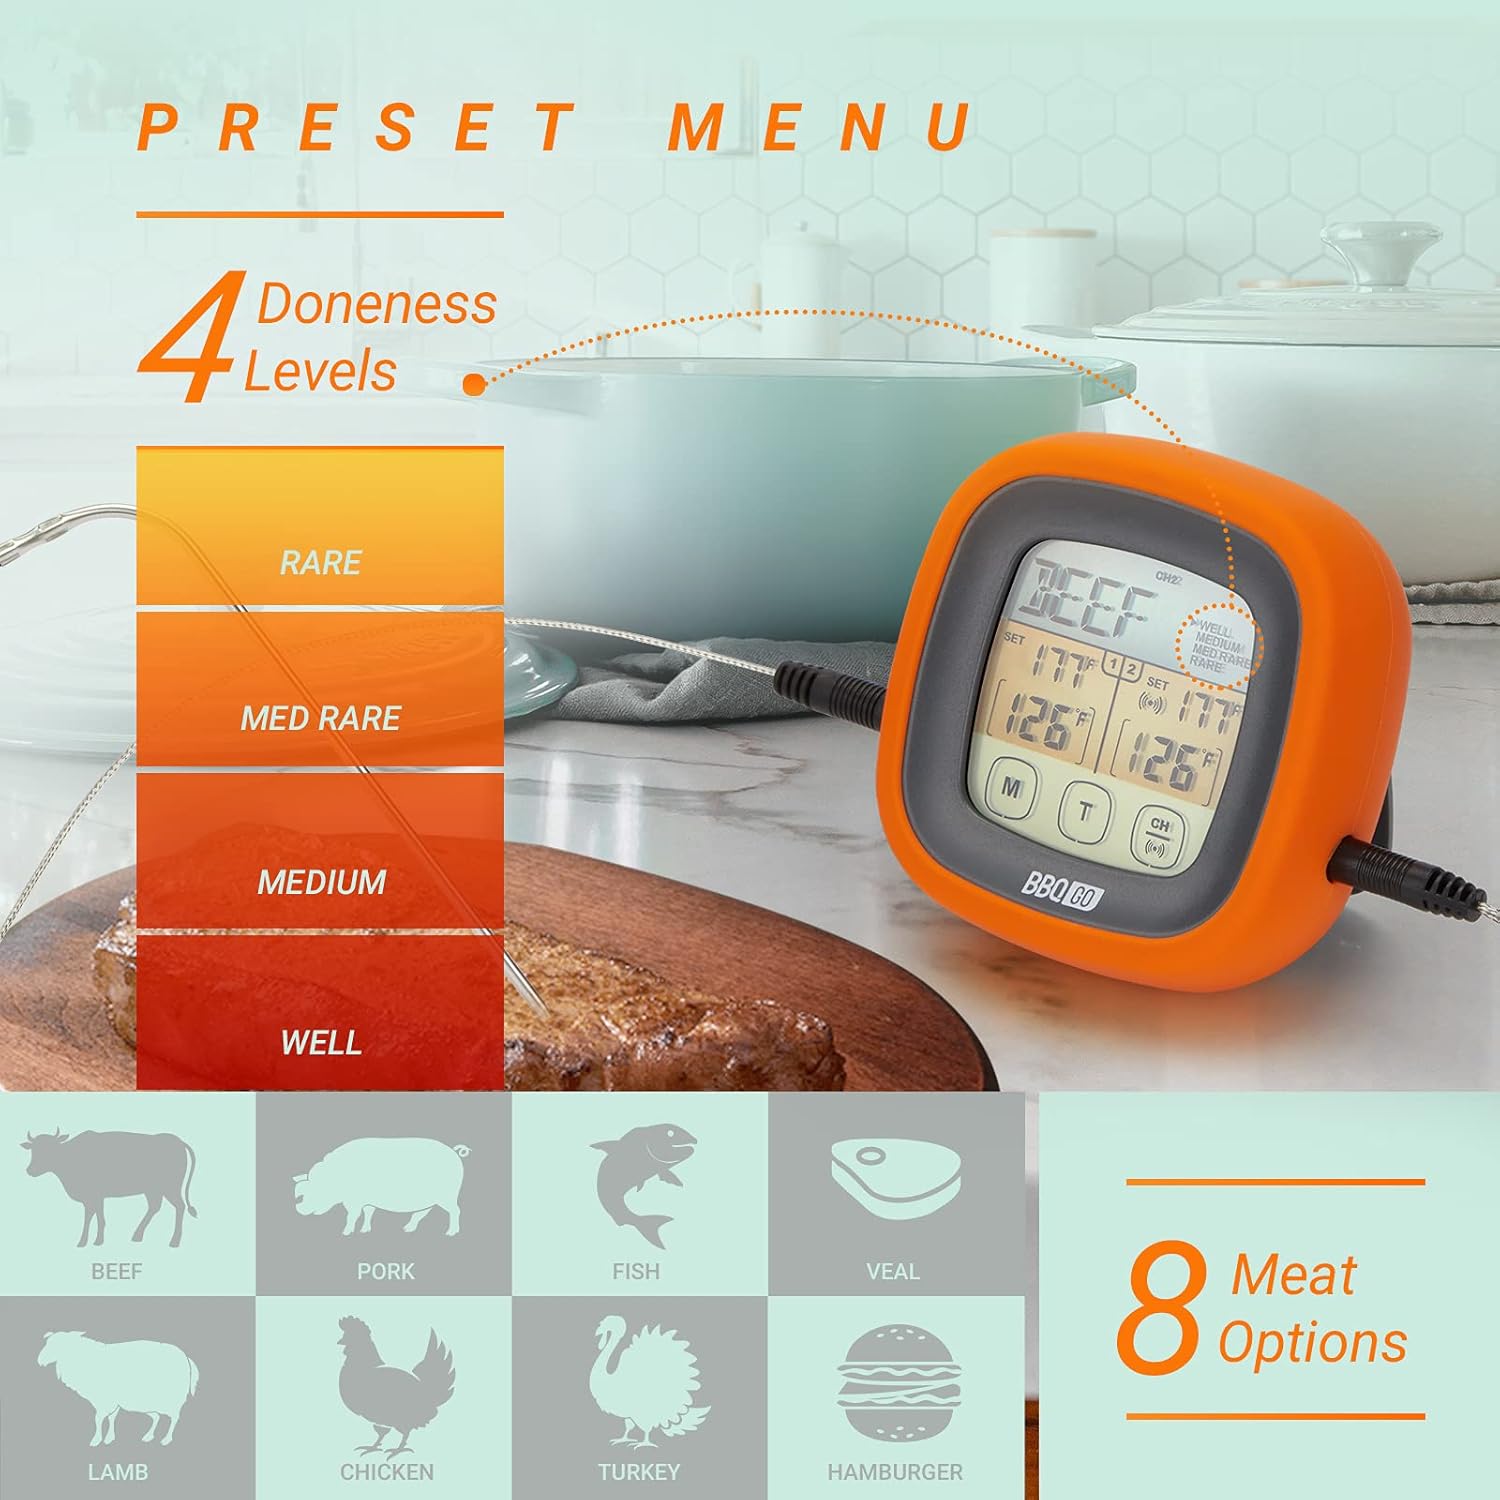
Image: The thermometer display illustrating the selection of various meat types and their corresponding doneness levels.
4.4 Setting Custom Temperatures
If you prefer a specific temperature not covered by the presets:
- Select the desired probe channel using the CH buttone.
- Appughjà è tene premutu CH button until the alarm temperature starts flashing.
- Aduprà u M è T buttons to adjust the target temperature up or down.
- Press CH di novu per cunfirmà u paràmetru.
4.5 Funzione Timer
The thermometer includes a built-in timer:
- To activate the timer, press and hold the M button until the timer digits appear.
- Aduprà u M è T buttons to set the desired time (up to 99 minutes, 59 seconds).
- Press CH per inizià o mette in pausa u timer.
- Un alarme sunerà quandu u timer ghjunghjerà à zeru.
4.6 Controlu di retroilluminazione
The LCD backlight can be activated for better visibility:
- Press any button to momentarily activate the backlight.
- The backlight will automatically turn off after a short period of inactivity to conserve battery.

Image: The thermometer display illuminated by its backlight, demonstrating clear readability in low-light conditions.
5. Mantenimentu
5.1 Pulizia
- Unità di Termometru: Asciugà l'unità principale cù l'annunziuamp pannu. Ùn immergete micca l'unità in acqua è ùn a mette micca sottu à l'acqua corrente.
- Sonde: Wash the stainless steel probes with warm soapy water after each use. Rinse thoroughly and dry completely before storage. The probe wires are heat-resistant but should not be submerged in water.
5.2 Storage
- Conservate u termometru è e sonde in un locu pulitu è asciuttu quandu ùn sò micca in usu.
- Evite u almacenamentu in temperature estreme o alta umidità.
5.3 Sustituzione di batterie
Replace batteries when the display becomes dim or the unit fails to power on. Follow the battery installation steps in Section 3.1.
6. Risoluzione di prublemi
| Prublemu | Causa Possibile | Soluzione |
|---|---|---|
| U display hè viotu o scuru. | Batterie basse o scariche; installazione incorretta di a batteria. | Rimpiazzà e batterie cù batterie AAA nove, assicurendu a polarità curretta. |
| Lettura di temperatura imprecisa. | Probe not fully inserted; probe tip touching bone/gristle; probe damaged. | Ensure probe is fully inserted into the food's thickest part, away from bone. If problem persists, the probe may need replacement. |
| L'alarma ùn sona micca. | Alarm function not activated; volume too low (if applicable); unit malfunction. | Ensure alarm temperature is set. Check if the unit has a volume setting (this model does not, so this is a general troubleshooting tip). Contact support if issue persists. |
| U schermu tattile ùn risponde micca. | Unit frozen; temporary software glitch. | Remove and reinsert batteries to reset the unit. |
7. Specificazioni
| Feature | Detail |
|---|---|
| Nome di mudellu | BG-CT2D |
| Marca | Inkbird |
| Gamma di temperatura | -20 ℃ à 250 ℃ (-4 ° F à 482 ° F) |
| Accuratezza | ±2℃/±2°F |
| Prughjettu Lunghezza | 40 inches (100 cm) |
| Tipu di visualizazione | LCD cun retroilluminazione |
| Fonte d'energia | 2 x Batterie AAA (micca incluse) |
| Funzioni spiciali | Fast Reading System, Dual Probes, Touch Screen, Preset Menus, Timer, Magnetic Back, Stand, Silicone Cover |
| Materiale Esternu | Acrylonitrile Butadiene Styrene, Silicon |
| Cura di u pruduttu | Oven Safe (probes only), Wipe Clean (main unit) |
8. Garanzia è Support
Inkbird products are designed for reliability and performance. For specific warranty information regarding your Inkbird BBQGO BG-CT2D Digital Food Thermometer, please refer to the warranty card included in your product packaging or visit the official Inkbird websitu.
If you encounter any issues or have questions about your product, please contact Inkbird customer support through their official website or the retailer where you purchased the product. Please have your model number (BG-CT2D) and purchase details ready when contacting support.
You can visit the Inkbird store for more information: Inkbird Official Store


