1. Introduzione
Thank you for choosing an Indesit appliance. This user manual provides essential information for the safe and efficient operation, installation, and maintenance of your Indesit TWE 71252 S EU front-loading washing machine. Please read these instructions carefully before using the appliance and keep them for future reference. Proper use and maintenance will ensure optimal performance and extend the lifespan of your washing machine.
2. Informazioni di sicurezza
Sicurezza generale:
- Stu apparecchiu hè destinatu solu à l'usu domesticu.
- Do not allow children to play with the appliance. Supervise children to ensure they do not climb into the drum.
- Scollegate sempre l'apparecchiu prima di pulisce o di fà qualsiasi manutenzione.
- Do not operate the washing machine if the power cord or plug is damaged, or if the appliance itself is faulty. Contact qualified service personnel.
- S'assurer que l'appareil soit correctement mis à la terre.
Sicurezza di l'installazione:
- Remove all transit bolts and packaging materials before use. Failure to do so can cause severe damage.
- Install the appliance on a firm, level floor. Adjust the feet to ensure stability.
- Assicuratevi una ventilazione adatta intornu à l'apparechju.
- Cunnette u tubu d'entrata di l'acqua à un rubinettu d'acqua fredda. Assicuratevi chì tutti i raccordi sianu stretti per impedisce perdite.
- The drain hose must be securely fixed to prevent displacement during operation.
3. Produttu Finituview
Your Indesit TWE 71252 S EU washing machine features a user-friendly design with essential components for efficient laundry care.

Figura 3.1: Fronte view of the Indesit TWE 71252 S EU washing machine. This image shows the overall design, including the control panel at the top, the detergent dispenser on the left, and the main loading door in the center.
Cumpunenti chjave:
- Pannellu di cuntrollu: Located at the top, featuring digital touch controls, push buttons, and a rotary knob for program selection.
- Distributore di detergente: A pull-out drawer for adding detergent and fabric softener.
- Porta di Caricamentu: Front-loading door for adding and removing laundry.
- Tamburu: Stainless steel interior where laundry is washed.
- Filtru di scaricu: Situatu in fondu frontale, accessibile per a pulizia.

Figura 3.2: Close-up of the detergent dispenser and control panel. This view highlights the various compartments within the dispenser for pre-wash, main wash, and softener, along with the program selection knob and digital display.

Figura 3.3: Internu view of the stainless steel drum. This image shows the perforated surface of the drum, designed for effective washing and rinsing, and the agitator paddles.
4. Installazione è Setup
Una stallazione curretta hè cruciale per u rendimentu è a longevità di a vostra lavatrice.
4.1 Déballage :
- Eliminate cù cura tutti i materiali di imballaggio, cumprese a basa di polistirene è qualsiasi pellicola protettiva.
- Remove the transit bolts located at the rear of the machine. These bolts secure the drum during transport and must be removed before operation. Keep them for future transport if needed.
4.2 Posizionamentu:
- Place the washing machine on a flat, stable surface, away from direct sunlight or heat sources.
- Adjust the adjustable feet at the bottom of the machine to ensure it is perfectly level. Use a spirit level to verify.
- Ensure there is sufficient space around the machine for ventilation and ease of access.
4.3 Cunnessione d'acqua:
- Connect the supplied water inlet hose to the cold water tap. Hand-tighten the connection, then use a wrench for a quarter turn.
- Connect the other end of the inlet hose to the water inlet valve at the back of the washing machine.
- Position the drain hose into a standpipe or over the edge of a sink, ensuring it is securely fixed to prevent it from falling out during draining. The height of the drain point should be between 65 cm and 100 cm from the floor.
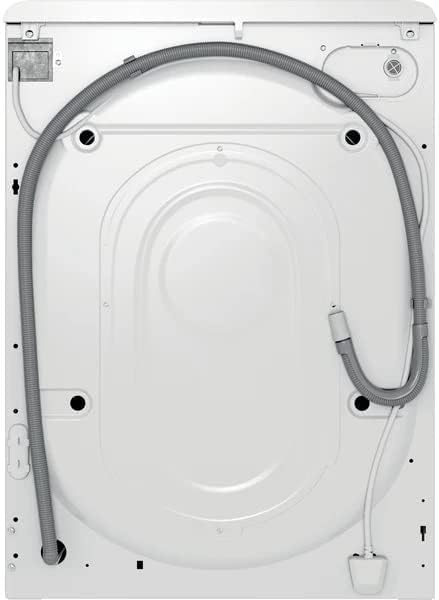
Figura 4.1: daretu view of the washing machine. This image illustrates the connections for the water inlet hose (typically blue or white) and the drain hose, along with the power cable.
4.4 Cunnessione elettrica:
- Plug the power cord into a properly earthed electrical socket.
- Ùn aduprate micca prolunghe o prese multiple.
4.5 First Wash Cycle:
- Before washing clothes, run an empty wash cycle to clean the drum and remove any manufacturing residues.
- Aghjunghjite una piccula quantità di detergente in u compartimentu di lavaggiu principale.
- Select a short, hot wash program (e.g., 60°C cotton cycle) and start the machine.
5. Operating Instructions
Segui sti passi per un funziunamentu efficace è sicuru di a vostra lavatrice.
5.1 Loading Laundry:
- Aprite a porta di carica.
- Classificate a lavanderia per tipu di tela, culore è gradu di sporcizia.
- Load laundry loosely into the drum, ensuring not to overload. The 7kg capacity refers to dry laundry weight.
- Chjude bè a porta finu à ch'ella si chjude cù un clic.
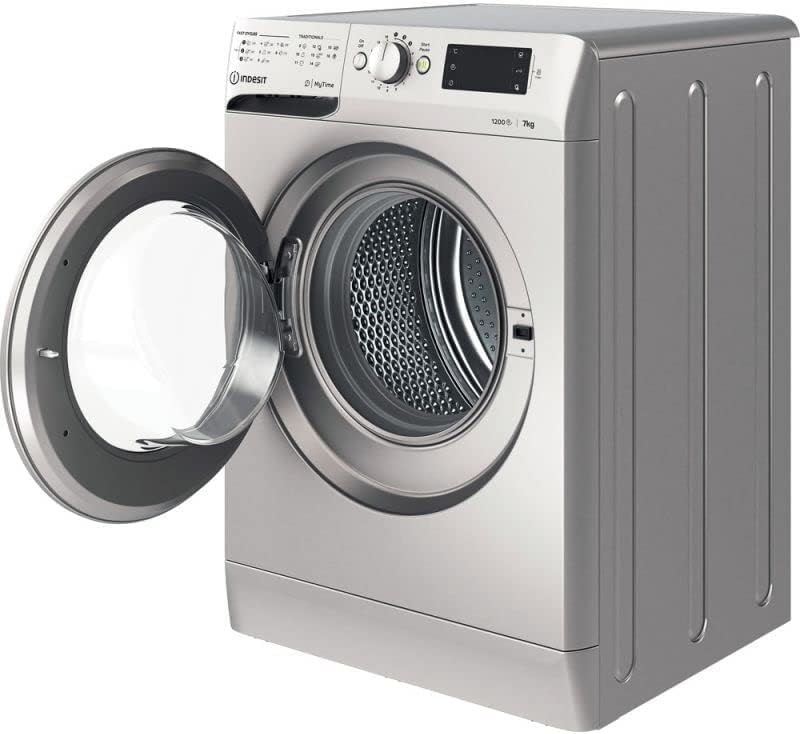
Figura 5.1: Fronte view of the washing machine with the door open. This image shows the wide opening for easy loading and unloading of laundry into the drum.
5.2 Adding Detergent and Additives:
- Tira u cassetto di u dispenser detergente.
- Add the appropriate amount of detergent to the main wash compartment (usually marked 'II' or 'Main Wash').
- If using fabric softener, pour it into the designated compartment (usually marked with a flower symbol or 'Softener'). Do not exceed the 'MAX' level.
- Chiudere delicatamente u dispenser drawer.
5.3 Selecting a Program:
- Turn the rotary knob on the control panel to select the desired wash program. The machine offers various programs for different fabric types and soil levels, including a 'Quick Wash' option.
- Use the digital touch controls and push buttons to adjust additional settings such as temperature, spin speed (up to 1200 RPM), or delay start, if available for the selected program.
5.4 Starting a Cycle:
- Appughjà u buttone "Start/Pause" per inizià u ciclu di lavaggio. A luce indicatrice s'illuminerà.
5.5 Pausing/Canceling a Cycle:
- To pause a cycle, press the 'Start/Pause' button. The indicator light will flash.
- To cancel a cycle, press and hold the 'Start/Pause' button for a few seconds, or turn the program selector knob to 'Off' and then back to a new program.
5.6 End of Cycle:
- The machine will signal the end of the cycle (e.g., with an audible alert or a specific display message).
- Open the door and remove the laundry promptly to prevent creasing and odors.
- Lasciate a porta ligeramente aperta per permette à u tamburu di asciugà à l'aria.
6. Mantenimentu è Pulizia
Una manutenzione regulare garantisce prestazioni è igiene ottimali.
6.1 Cleaning the Detergent Dispenser:
- Tirate fora cumpletamente u cassettu di u distributore.
- Eliminate tutte e parti amovibili è sciacquatele sottu à l'acqua corrente.
- Pulite l'alloghju di u cassettu cù una spazzola.
- Riassemblate è inserite di novu u cassettu.
6.2 Cleaning the Drum:
- Run a maintenance wash cycle (e.g., a hot cycle with a drum cleaning agent or white vinegar) every few months to prevent odor and residue buildup.
6.3 Cleaning the Door Seal:
- Wipe the rubber door seal after each wash to remove lint, dirt, and moisture. This prevents mold and odors.
6.4 Cleaning the Drain Filter:
- Periodically clean the drain filter to prevent blockages and ensure proper drainage.
- Open the cover at the bottom front of the machine.
- Pone un cuntainer pocu prufondu sottu per raccoglie l'acqua residuale.
- Svitate pianu pianu u filtru, permettendu à l'acqua di scorrere.
- Remove any lint, coins, or foreign objects from the filter and its housing.
- Rinse the filter under running water and screw it back in firmly. Close the cover.

Figura 6.1: Close-up of the drain filter access. This image shows the removable cap that covers the drain filter, which needs to be regularly cleaned to prevent blockages.
6.5 External Cleaning:
- Asciugà l'esterno di a macchina cun un soffiu, damp tela. Ùn aduprate micca detergenti abrasivi o solventi.
7. Risoluzione di prublemi
Before contacting customer service, try these simple solutions for common issues.
| Prublemu | Causa Possibile | Soluzione |
|---|---|---|
| A macchina ùn principia micca | Nisuna alimentazione; Porta micca chjusa; Prugramma micca sceltu; Buttone Start/Pausa micca premutu. | Verificate l'alimentazione elettrica; Assicuratevi chì a porta sia bè chjusa; Selezziunate un prugramma; Appughjà Start/Pause. |
| L'acqua ùn si riempie micca | Rubinettu d'acqua chjusu; Tubu d'entrata piegatu; Pressione di l'acqua troppu bassa. | Apri u rubinettu di l'acqua; Raddrizza u tubu; Verificate a pressione di l'acqua di a casa. |
| L'acqua ùn scorri micca | U tubu di scaricu hè piegatu o bluccatu; U filtru di scaricu hè bluccatu. | Straighten or clear drain hose; Clean the drain filter (see Section 6.4). |
| Vibrazione / rumore eccessivu | Bulloni di trasportu micca rimossi; Macchina micca livellata; Caricu irregulare. | Remove transit bolts (if not already); Adjust feet to level machine; Redistribute laundry evenly. |
| Residui di detergente nantu à i vestiti | Too much detergent; Detergent dispenser blocked; Insufficient rinse. | Reduce detergent amount; Clean dispenser; Select an extra rinse option if available. |
8. Specificazioni
Detailed technical specifications for the Indesit TWE 71252 S EU washing machine.
| Feature | Specificazione |
|---|---|
| Mudellu | TWE 71252 S EU |
| Marca | Indesit |
| Capacità | 7 kg |
| Velocità massima di spin | 1200 RPM |
| Dimensioni (H x L x P) | 85 cm x 59.5 cm x 54 cm |
| Pesu | 66.5 kg |
| Efficienza energetica | A+++ 90% |
| Materiale di tamburinu | Inossidabile |
| Tipu di cuntrollu | Digital Touch, Push Button, Rotary Knob |
| Tipu di stallazione | Autunisimu |
| Culore | Argentu |
| Funzioni spiciali | Durable, Quick Wash Option |
| Cumpunenti inclusi | Macchina à lavà |
9. Garanzia è Support
For warranty information, please refer to the warranty card provided with your appliance or contact your retailer. Keep your proof of purchase (receipt or invoice) as it will be required for any warranty claims.
If you encounter issues that cannot be resolved using the troubleshooting guide, please contact Indesit customer service or an authorized service center. Do not attempt to repair the appliance yourself, as this may void your warranty and pose safety risks.


