1. Introduzione
This manual provides comprehensive instructions for the WD 20TB Elements Desktop External Hard Drive (Model WDBWLG0200HBK-NESN). This device offers high-capacity, reliable storage for your digital files, featuring fast data transfer rates via USB 3.0 and universal compatibility with USB 3.0 and USB 2.0 devices. It is designed for plug-and-play use with Windows PCs and can be reformatted for use with macOS.

Image 1.1: Front view of the WD Elements Desktop External Hard Drive.
2. Ciò chì hè in a scatula
Verificate chì tutti i cumpunenti sò presenti in l'imballu:
- discu duru WD Elements
- Cavu USB 3.0
- adattatore AC
- Guida d'installazione rapida
3. Setup
Follow these steps to set up your WD Elements Desktop External Hard Drive:
- Cunnette l'adattatore AC: Plug the AC adapter into the power port on the back of the WD Elements drive. Connect the other end of the AC adapter to a power outlet.
- Cunnette u cable USB: Connect one end of the included USB 3.0 cable to the USB port on the back of the WD Elements drive. Connect the other end of the USB cable to an available USB 3.0 or USB 2.0 port on your computer.
- Power On: The drive will typically power on automatically when connected. The LED indicator on the front of the drive will illuminate.
- Riconoscimentu iniziale: For Windows PCs, the drive is pre-formatted and ready for immediate use. It should appear as a new drive in 'This PC' or 'My Computer'. For macOS, reformatting is required. Refer to your macOS documentation for instructions on how to format an external drive using Disk Utility.

Image 3.1: Posteriore view of the drive, highlighting the power and USB 3.0 ports.
4. Operating Instructions
The WD Elements Desktop External Hard Drive is designed for simple plug-and-play operation.
- Accessu à u Drive: Once connected and recognized by your computer, the drive will appear as a removable storage device. You can access it like any other drive on your system.
- Trasferendu Files: Drag and drop files or folders to and from the WD Elements drive. You can also use copy and paste functions. The USB 3.0 interface ensures fast data transfers for large files.
- Rimozione sicura: Always safely eject the drive before disconnecting it from your computer to prevent data corruption.
- Windows: Click the 'Safely Remove Hardware and Eject Media' icon in the system tray, then select your WD Elements drive.
- macOS: Drag the drive icon from your desktop to the Trash, or right-click (Control-click) the drive icon and select 'Eject'.

Image 4.1: The WD Elements drive integrated into a typical desktop setup.
5. Mantenimentu
Una manutenzione adatta assicura a longevità è e prestazioni ottimali di u vostru discu duru esternu:
- Cura fisica: Keep the drive in a stable, well-ventilated area. Avoid exposing it to extreme temperatures, direct sunlight, or moisture. Do not block the ventilation slots.
- Pulizia: Use a soft, dry cloth to clean the exterior of the drive. Do not use liquid cleaners or aerosols.
- Backup di dati: While the WD Elements drive provides reliable storage, it is recommended to maintain backups of critical data on multiple devices or cloud services to prevent data loss from unforeseen circumstances.
- Actualizazioni di firmware: Periodically check the official WD support website for any available firmware updates for your drive model. Updates can improve performance and stability.
6. Risoluzione di prublemi
If you encounter issues with your WD Elements drive, try the following solutions:
- Unità micca rilevata:
- Ensure the AC adapter is securely connected to both the drive and a working power outlet.
- Verify the USB cable is firmly connected to both the drive and your computer.
- Pruvate à cunnette u discu à un altru portu USB di u vostru urdinatore.
- Pruvate cù un altru cavu USB s'ellu hè dispunibule.
- Restart u vostru urdinatore.
- Velocità di trasferimentu lente:
- Ensure you are connected to a USB 3.0 port on your computer for optimal performance. USB 2.0 ports will result in slower speeds.
- Evitate di eseguisce parechje applicazioni esigenti durante grandi periodi file trasferimenti.
- Check your computer's drivers for USB ports are up to date.
- Drive Making Unusual Noises:
- A slight hum or whirring is normal for a mechanical hard drive. However, if you hear clicking, grinding, or loud scraping sounds, safely disconnect the drive immediately and contact WD support.
- Drive Requires Formatting (Windows): If your Windows PC prompts you to format the drive, it may indicate a file system issue. If you have data on the drive, do not proceed with formatting without attempting data recovery first. If it's a new drive and you intend to use it with macOS, proceed with macOS formatting.
For further assistance, visit the official WD support websitu.
7. Specificazioni
| Feature | Detail |
|---|---|
| Numero di mudellu | WDBWLG0200HBK-NESN |
| Capacità di almacenamiento digitale | 20 TB (20000 GB) |
| Tipu di discu duru | Discu duru meccanicu |
| Interfaccia di u discu duru | USB 3.0 |
| Tecnulugia di cunnessione | USB |
| Piattaforma Hardware | PC, Mac (reformatting required for macOS) |
| Pesu di l'articulu | 1.98 liri |
| Dimensioni di u produttu (LxWxH) | 5.31 x 1.89 x 6.53 inch |
| Culore | Neru |
| U fabricatore | Western Digital Technologies, Inc. |
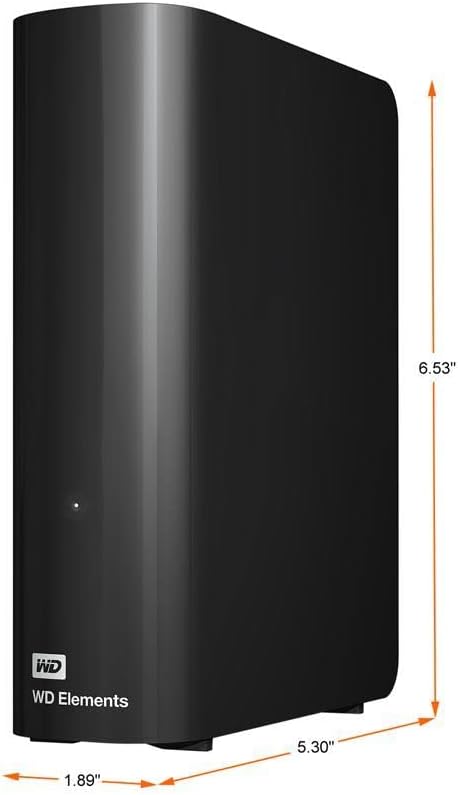
Image 7.1: Product dimensions of the WD Elements Desktop External Hard Drive.
8. Garanzia è Support
Your WD Elements Desktop External Hard Drive is covered by a limited warranty. For specific warranty terms, conditions, and duration, please refer to the warranty information included with your product or visit the official Western Digital websitu. Per assistenza tecnica, registrazione di u produttu è risorse supplementari, visitate support.wdc.com.