Introduzione
This manual provides detailed instructions for the setup, operation, and maintenance of your Amazon Basics Projection Alarm Clock. Please read this manual thoroughly before using the product to ensure proper function and to prevent damage.

Image: The Amazon Basics Projection Alarm Clock, showing its digital display and projection lens.
Istruzzioni di sicurità
- Ùn espone micca l'unità à temperature estreme, luce solare diretta, polvere o umidità.
- Assicuratevi chì l'adattatore di corrente sia cumpatibile cù a vostra rete elettrica lucale.
- Mantene l'unità luntanu da l'acqua o altri liquidi.
- Ùn pruvate micca di smuntà o mudificà l'unità. Questu annullerà a garanzia.
- Clean the unit only with a soft, dry cloth. Do not use liquid cleaners.
- Eliminate e batterie bè in cunfurmità cù i regulamenti lucali.
Cuntenutu di u pacchettu
- Amazon Basics Projection Alarm Clock
- Adattatore di alimentazione AC
- Manuale d'usu
Funzioni di u produttu
- Projection of time onto a wall or ceiling.
- FM Radio with automatic/manual scan and up to 15 preset stations.
- USB port for charging mobile phones or tablets.
- 7-inch high-definition LED display with adjustable brightness.
- Dual alarms for separate wake-up times.
- Snooze function with adjustable duration (2 to 60 minutes).
- Sleep timer for automatic radio shut-off (5 to 90 minutes).
- DST button for Daylight Saving Time adjustment.
- Battery backup (requires 2 AAA batteries, not included) to maintain time settings during power outages.

Imagine: Più diview of key features including sleep timer, radio presets, and snooze function.
Cuntrolli è Mustrà
Familiarize yourself with the buttons and ports on your alarm clock for optimal use.

Imagine: Latu view illustrating the location of controls, USB charging port, and projection lens.
- Buttone di impostazione di l'ora: Adupratu per stabilisce l'ora attuale.
- Pulsanti di l'allarme 1/2: Used to set and activate Alarm 1 and Alarm 2.
- Pulsante Snooze/Dimmer: Activates snooze during an alarm; adjusts display brightness when not alarming.
- Radio/Sleep Button: Turns FM radio on/off; sets sleep timer.
- Volume/Tune Dial: Adjusts radio volume and tunes FM frequencies.
- Projection On/Off/Flip Button: Controls the projection feature and flips the projected time.
- Projection Focus Wheel: Adjusts the clarity of the projected time.
- Projection Angle Adjuster: Changes the angle of the projected time.
- Portu di Ricarica USB: Per caricare dispositivi esterni.
- Buttone DST: Toggles Daylight Saving Time.
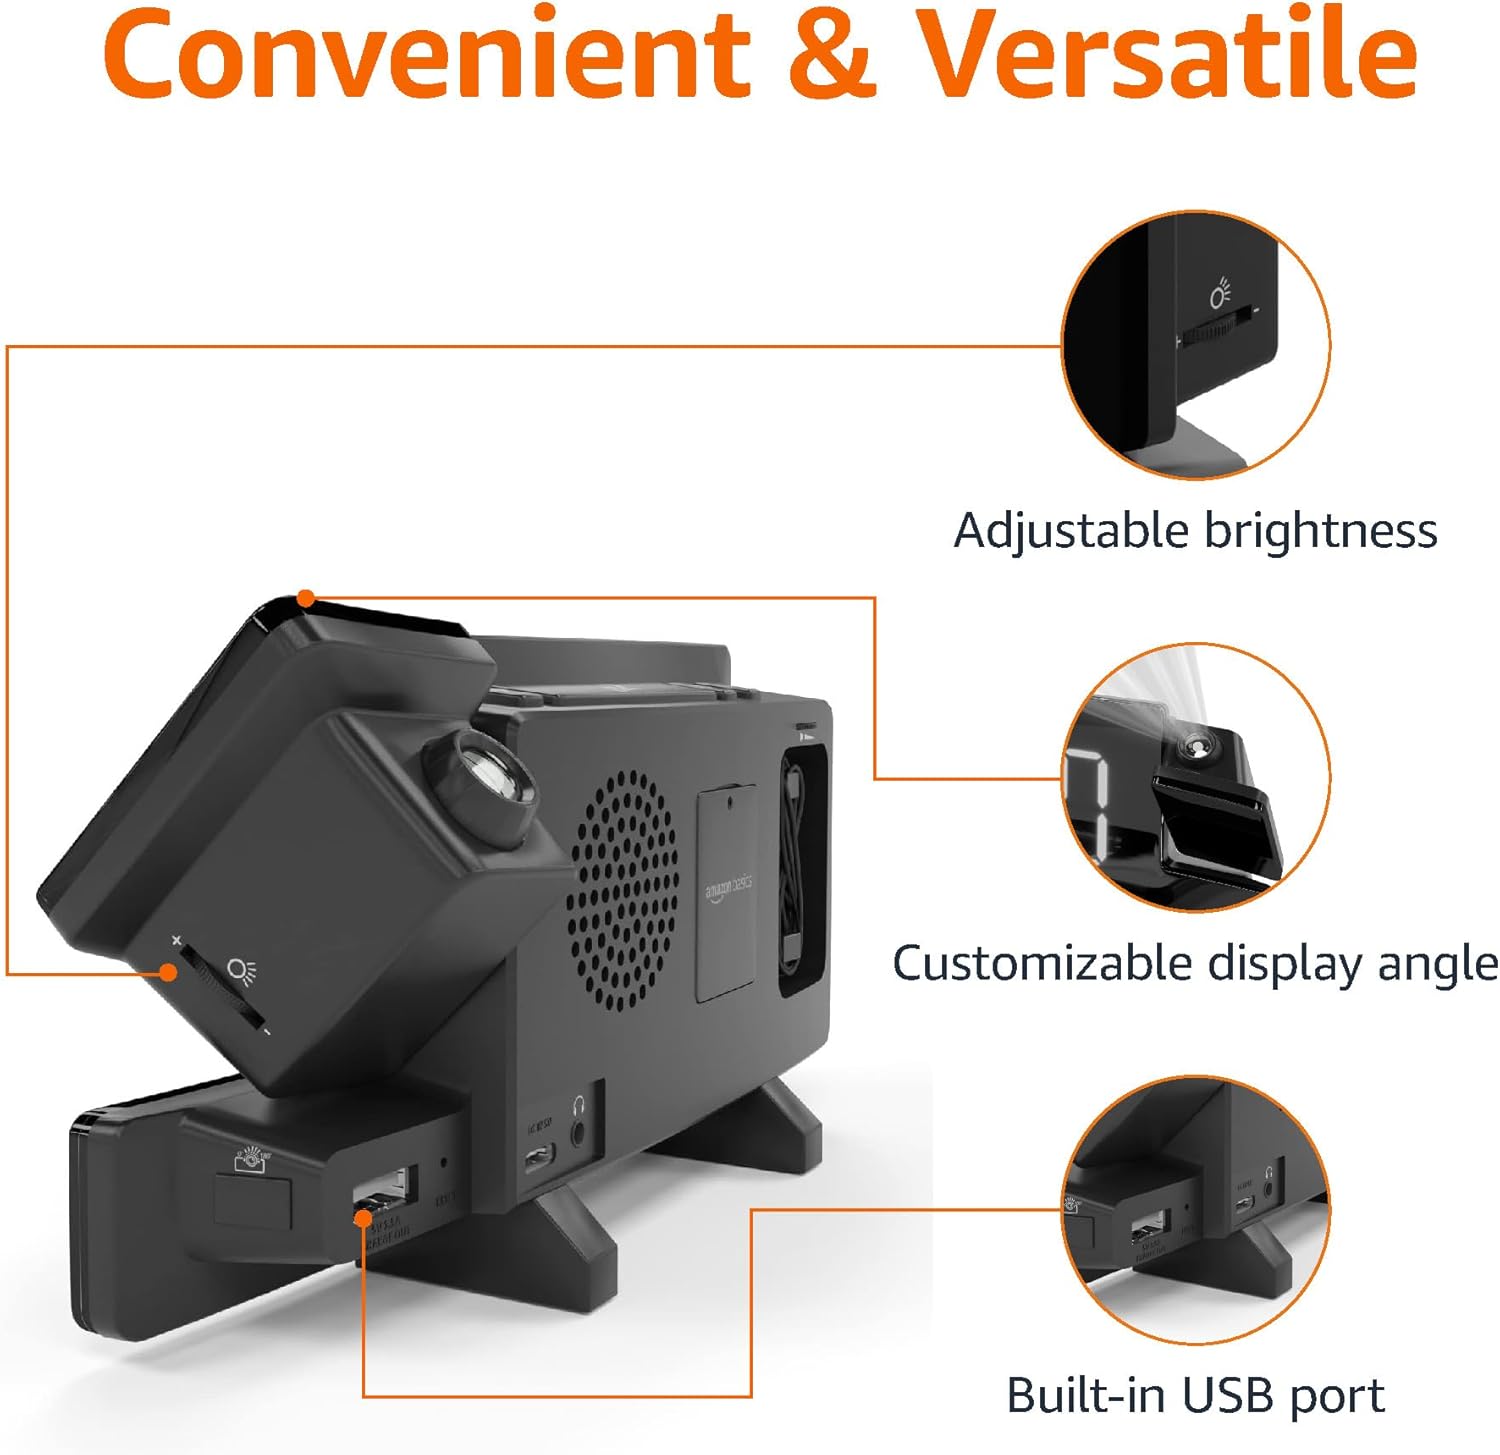
Image: Diagram highlighting the adjustable brightness, customizable projection angle, and USB charging port.
Istituisci
1. Connection Power
Connect the AC power adapter to the DC IN port on the back of the alarm clock and plug it into a standard wall outlet. The display will light up.
2. Battery Backup Installazione
For battery backup, open the battery compartment on the bottom of the unit. Insert 2 AAA batteries (not included), ensuring correct polarity (+/-). Close the compartment. The battery backup maintains time settings during power outages but does not power the display or alarm functions.
3. Impostazione di l'ora iniziale
- Appughjà è tene premutu U tempu stabilitu buttone. I numeri di l'ora lampanu.
- Aduprà u Volume/Tune Dial per aghjustà l'ora. Stampa U tempu stabilitu di novu per cunfirmà.
- I cifri di i minuti lampeggeranu. Aduprate u Volume/Tune Dial per aghjustà i minuti. Stampa U tempu stabilitu di novu per cunfirmà.
- The time format (12H/24H) will flash. Use the Volume/Tune Dial to select your preferred format. Press U tempu stabilitu per cunfirmà è sorte da a modalità di impostazione di l'ora.
4. Ora d'estate (DST)
Press u DST button to toggle Daylight Saving Time on or off. The DST indicator will appear or disappear on the display.
Istruzzioni di funziunamentu
1. Impostazione di l'allarmi (Allarme 1 è Allarme 2)
- Appughjà è tene premutu Alarma 1 or Alarma 2 buttone. I cifri di l'ora di a sveglia lampeggeranu.
- Aduprà u Volume/Tune Dial to adjust the alarm hour. Press the respective Alarma buttone di novu per cunfirmà.
- The alarm minute digits will flash. Use the Volume/Tune Dial to adjust the alarm minutes. Press the respective Alarma buttone di novu per cunfirmà.
- The alarm source (FM radio or buzzer) will flash. Use the Volume/Tune Dial to select your preference. Press the respective Alarma buttone per cunfirmà è attivà l'alarma. Un'icona d'alarma apparirà nantu à u display.
- To deactivate an alarm, press the respective Alarma button once. The alarm icon will disappear.
2. Using Snooze
Quandu sona una alarma, appughjà u buttone Snooze / Dimmer button to temporarily silence the alarm. The alarm will sound again after the set snooze duration. The default snooze duration is 9 minutes. To adjust the snooze duration, press and hold the Snooze / Dimmer buttone, poi aduprate u Volume/Tune Dial to select a duration between 2 and 60 minutes. Press Snooze / Dimmer di novu per cunfirmà.
3. Operazione Radio FM
- Accende / Off: Press u Radio/Sleep button to turn the FM radio on or off.
- Stazioni di sintonizazione: Aduprà u Volume/Tune Dial to manually tune to a desired FM frequency.
- Scansione Automatica: Appughjà è tene premutu Radio/Sleep button to automatically scan and save available FM stations as presets.
- Selezziunà Presets: Once stations are saved, short press the Radio/Sleep button to cycle through the preset stations.
- Ajuste u voluminu: Girate u Volume/Tune Dial per aghjustà u vulume di a radio.
4. Timer di sonnu
While the FM radio is playing, press the Radio/Sleep button repeatedly to set the sleep timer. Options typically range from 5 to 90 minutes. The radio will automatically turn off after the selected duration.
5. Funzione di pruiezione

Image: The alarm clock projecting the time onto a bedroom ceiling.
- Attiva / Disattiva: Press u Projection On/Off/Flip buttone per attivà o disattivà a pruiezione di u tempu.
- Ajuste l'angolo: Manually adjust the projection arm to direct the time onto your desired surface (wall or ceiling).
- Focus: Girate u Projection Focus Wheel to achieve a clear image.
- Flip Display: Press u Projection On/Off/Flip button repeatedly to rotate the projected time 180 degrees, ensuring correct orientation.

Image: The alarm clock on a nightstand, projecting the time onto a wall, demonstrating its use in a bedroom setting.
6. Ricarica USB
Connect your mobile phone or tablet's USB charging cable to the Portu di carica USB on the back of the alarm clock. The device will begin charging. This port is for charging only and does not support data transfer.
7. Ajustamentu di a luminosità di a visualizazione
Press u Snooze / Dimmer button (when no alarm is sounding) to cycle through different brightness levels for the main LED display.
Mantenimentu
1. Pulizia
Wipe the unit with a soft, dry, lint-free cloth. Do not use abrasive cleaners, waxes, or solvents as they may damage the surface.
2. Sustituzione di batterie
If the battery backup is not functioning correctly (e.g., time resets after a power outage), replace the 2 AAA batteries in the battery compartment, ensuring correct polarity.
Risoluzione di prublemi
| Prublemu | Causa Possibile | Soluzione |
|---|---|---|
| A visualizazione hè in biancu. | Nisuna cunnessione di putenza. | Assicuratevi chì l'adattatore CA sia ben cunnessu à l'unità è à una presa murale funzionale. |
| L'alarma ùn sona micca. | L'alarma ùn hè micca attivata o u vulume hè troppu bassu. | Check if the alarm icon is visible on the display. Re-set the alarm if necessary. Increase radio volume if FM is selected as alarm source. |
| U tempu prughjettatu hè sfocatu. | Projection focus is not adjusted. | Girate u Projection Focus Wheel finu à chì l'imaghjini hè chjaru. |
| Projected time is not visible. | Projection is off or room is too bright. | Press u Projection On/Off/Flip button to activate. The projection is best viewed in a dark room. |
| A ricezione di a radio hè scarsa. | Posizione di l'antenna o interferenza. | Adjust the position of the FM antenna wire. Move the unit away from other electronic devices that may cause interference. |
| A carica USB ùn funziona micca. | Prublema di cavu o incompatibilità di u dispusitivu. | Ensure the USB cable is functional and properly connected. Try a different cable or device. |
Specificazioni
- Mudellu: MET8831-US
- Input di putenza: Adattatore AC (inclusu)
- Salvà a Batteria: 2 x batterie AAA (micca incluse)
- Display: LED 7-inch
- Frequenza Radio: FM
- Uscita USB: 5V, 1A (for charging)
- Dimensioni (L x W x H): 7.1 x 1.6 x 3.7 inch (18.03 x 4.06 x 9.4 cm)
- Pesu: Circa 0.59 lbs (267.62 g)

Image: Product dimensions for the Amazon Basics Projection Alarm Clock.
Infurmazioni di Garanzia
This product is covered by the Amazon Basics warranty. For detailed information regarding warranty terms and conditions, please refer to the official Amazon Basics websitu o cuntattate l'assistenza clienti.
Assistenza Clienti
For further assistance, troubleshooting, or product inquiries, please contact Amazon Basics customer support through the Amazon website or your purchase platform. Have your product model number (MET8831-US) and purchase details ready.


