1. Introduzione
This manual provides detailed instructions for the safe and effective use of your OMMO 16 Lines Green Laser Level. This tool is designed for precise leveling and alignment tasks, featuring two 360° horizontal lines and two 360° vertical lines, providing comprehensive coverage for various applications. Please read this manual thoroughly before operating the device and retain it for future reference.
2. Informazioni di sicurezza
ATTENZIONE: This is a Class II laser product. Avoid direct eye exposure to the laser beam. Staring directly into the laser beam can cause eye injury.
- Ùn fighjate micca in u fasciu laser.
- Ùn puntate micca u fasciu laser à persone o animali.
- Ùn aduprate micca l'apparechju in atmosfere esplosive, cum'è in presenza di liquidi, gas o polveri inflammabili.
- Mantene u dispusitivu fora di a portata di i zitelli.
- Aduprate solu batterie è caricabatterie specificati.
- Ùn pruvate micca di mudificà o smuntà u livellu laser.
3. Cuntenutu di u pacchettu
Verificate chì tutti l'articuli elencati quì sottu sò inclusi in u vostru pacchettu:
- 1 x OMMO 16 Lines Green Laser Level
- 2 x Batterie Li-ion ricaricabili
- 1 x Control remoto
- 1 x Magnetic Wall Bracket
- 1 x Base di Sollevamentu
- 1 x 1/4" Mounting Screw
- 1 x Power Adapter/Charger
- 1 x Bracket Patch (Metal Plate)
- 1 x Custodia di trasportu
- 1 x Manuale d'usu (stu documentu)
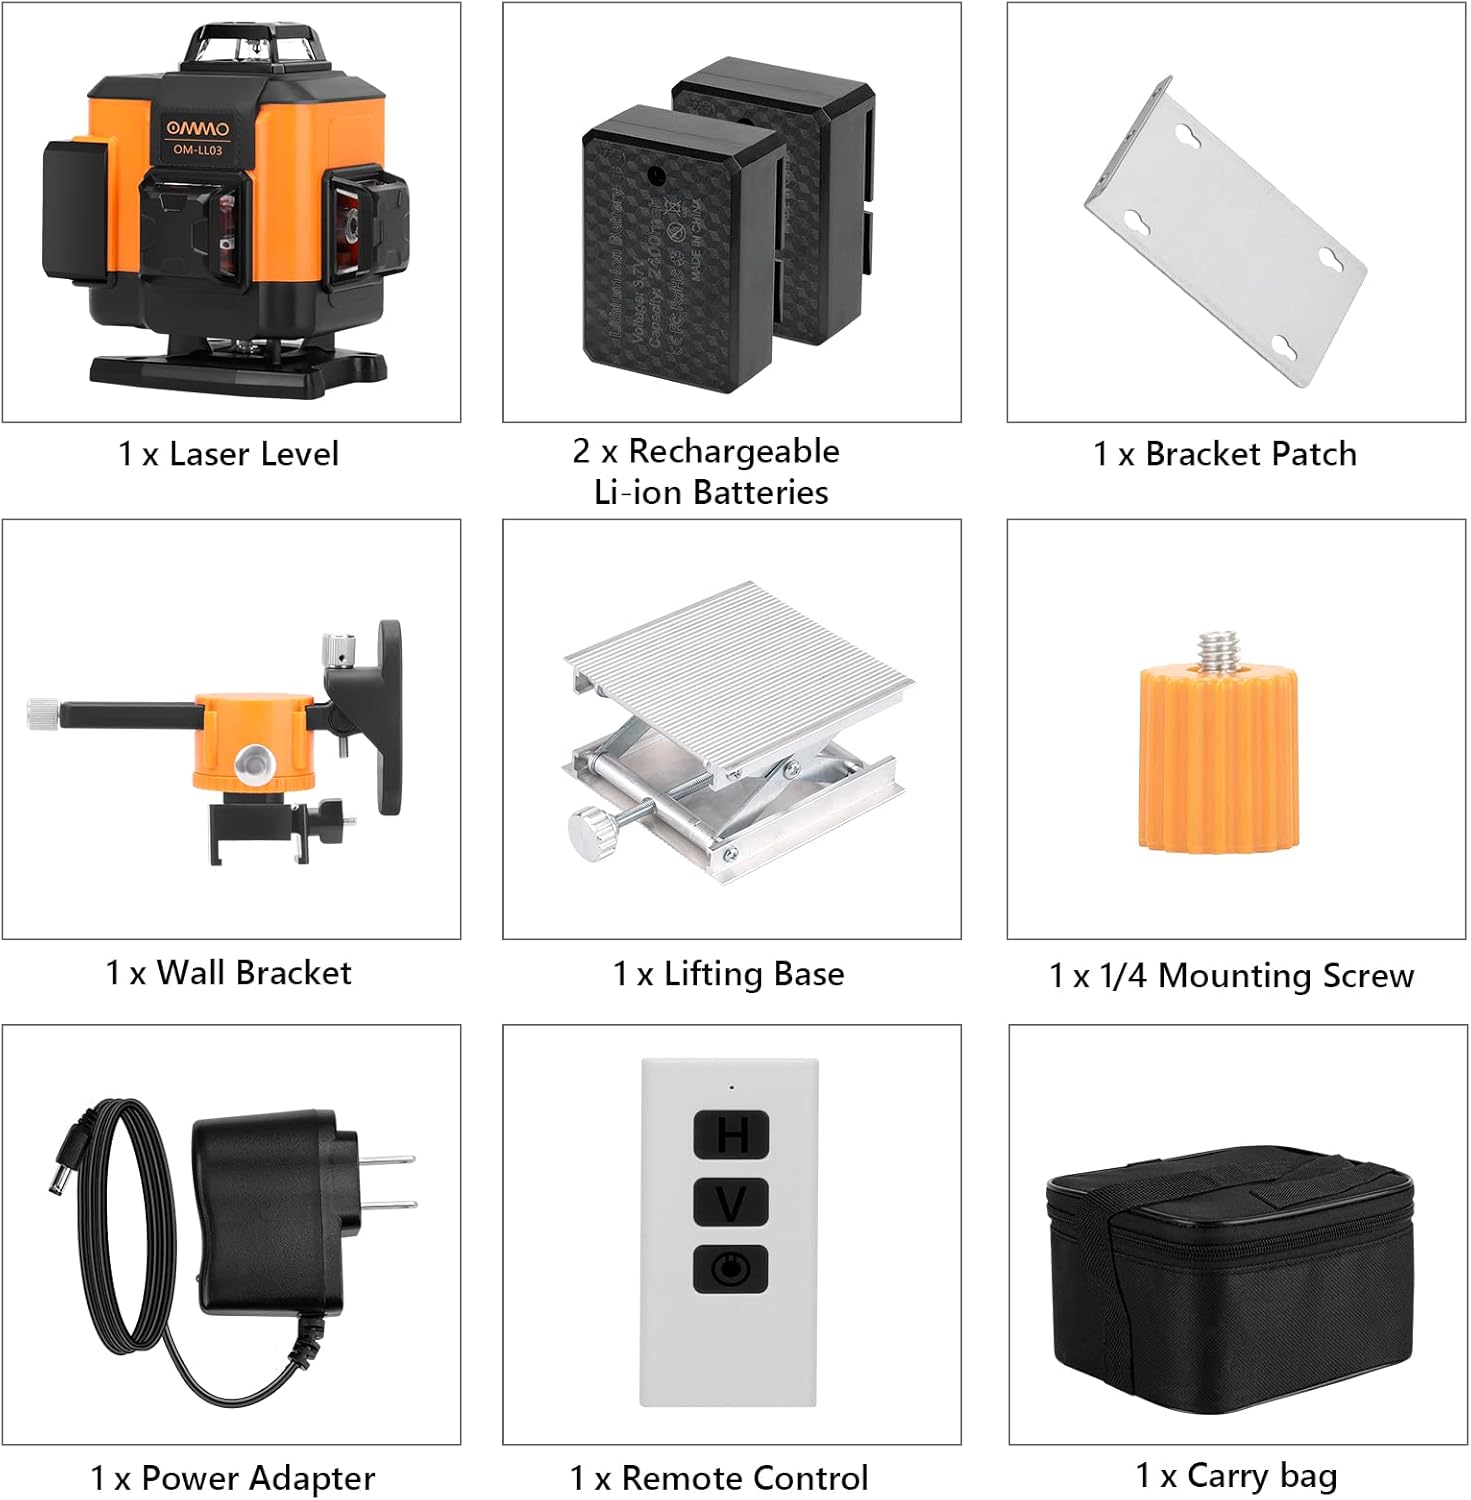
Figure 1: Contents of the OMMO 16 Lines Green Laser Level package, including the laser level, batteries, remote, various mounts, charger, and carrying case.
4. Produttu Finituview
Familiarize yourself with the components of your laser level:

Figure 2: Key components of the OMMO 16 Lines Green Laser Level.
- Pulsante Power ON / OFF: Located on the top panel.
- Horizontal Line Button (H): Activates/deactivates horizontal laser lines.
- Vertical Line Button (V): Activates/deactivates vertical laser lines.
- Compartimentu di batterie: Contene a batteria Li-ion ricaricabile.
- 1/4" Mounting Thread: Per attaccà à treppiedi o altri accessori di montaggio.
- Pendulum Lock Switch: Located on the side, controls self-leveling and manual modes.
5. Setup
5.1 Installazione è carica di a batteria
- Open the battery compartment cover on the side of the laser level.
- Insert the rechargeable Li-ion battery, ensuring correct polarity.
- Chiudere in modu sicuru u coperchiu di u compartimentu di a batteria.
- To charge, connect the power adapter to the charging port on the device and plug it into a power outlet. The indicator light will show charging status.

Figure 3: Battery installation and charging port location.
5.2 Muntatura di u livellu laser
The laser level can be mounted using various accessories:
- Montaggio di u tripode: Attach the laser level to a standard tripod using the 1/4" mounting thread at the bottom.
- Magnetic Wall Bracket: Use the magnetic wall bracket to attach the device to metal surfaces. The bracket also allows for height and angle adjustments.
- Base di sollevamentu: The included lifting base provides fine height adjustment for precise positioning on flat surfaces.

Figure 4: Different installation methods for the laser level.
6. Operating Instructions
6.1 Modu d'autolivellamentu
- Slide the pendulum lock switch to the "ON" (unlocked) position.
- Press u buttone Power ON / OFF per accende u dispusitivu.
- The laser level will automatically self-level within a range of ±3°. If the device is outside this range, the laser lines will flash and an audible alarm will sound, indicating it is not level. Adjust the device's position until it is within the self-leveling range.
- Use the "H" button to activate/deactivate horizontal lines and the "V" button to activate/deactivate vertical lines.

Figure 5: Self-leveling mode operation.
6.2 Modu Manuale (Modu Bloccatu)
- Slide the pendulum lock switch to the "OFF" (locked) position.
- Press and hold the Power ON/OFF button for 3 seconds to turn on the device.
- In manual mode, the self-leveling function is disabled, allowing you to project laser lines at any desired angle. The laser lines will not flash or beep in this mode.
- Use the "H" and "V" buttons to control the laser lines.

Figure 6: Manual mode operation for angled projections.
6.3 Utilizà u Control Remote
U telecomando permette un funziunamentu còmode da una distanza.
- The remote has buttons corresponding to the laser level's functions (Power ON/OFF, Horizontal Line, Vertical Line).
- Ensure the remote is pointed towards the laser level for optimal signal reception.

Figure 7: Remote control in use for different applications.
7. Mantenimentu
- Pulizia: Asciugà u dispusitivu cù un soft, damp tela. Ùn aduprate micca detergenti abrasivi o solventi.
- Conservazione: When not in use, store the laser level in its carrying case in a dry, cool place, away from direct sunlight. Ensure the pendulum lock switch is in the "OFF" (locked) position to protect the pendulum mechanism.
- Cura di a batteria: Eliminate e batterie se u dispusitivu ùn serà micca usatu per un periudu prolongatu.

Figure 8: The laser level is designed to be dustproof and shockproof (IP54 rated).
8. Risoluzione di prublemi
| Prublemu | Causa Possibile | Soluzione |
|---|---|---|
| E linee laser lampeghjanu è emettenu un bip in modalità di autolivellamentu. | L'apparechju hè fora di a so gamma di autolivellamentu di ±3°. | Place the device on a more level surface or adjust its position until it is within the self-leveling range. |
| E linee laser sò debuli o micca visibili. | Low battery; Bright ambient light. | Charge the battery; Use the device in lower light conditions or closer to the working surface. |
| U dispositivu ùn accende micca. | Battery is dead or incorrectly installed; Pendulum lock switch is in "OFF" position and power button not held for 3s for manual mode. | Charge or reinstall the battery; Ensure pendulum lock is "ON" for self-leveling or hold power button for 3s for manual mode. |
| U cuntrollu remoto ùn funziona micca. | Remote battery is dead; Obstruction between remote and device. | Replace remote battery; Ensure clear line of sight to the laser level. |
9. Specificazioni
| Marca | OMMO |
| Numero di mudellu | OM0893 |
| Linee laser | 16 Lines (2x360° Horizontal, 2x360° Vertical) |
| Laser Color | Verde |
| Gamma di visibilità | Finu à 150 piedi |
| Range Autonivellante | ± 3 ° |
| Materiale | Acrilonitrile Butadiene Stirene (ABS) |
| Fonte d'energia | Alimentatu da batterie (2 batterie à ioni di litiu incluse) |
| Pesu di l'articulu | 3.56 liri |
| Classificazione di prutezzione | IP54 (Resistente à a polvere è à l'acqua) |
10. Garanzia è Support
For warranty information or technical support, please refer to the contact details provided with your purchase or visit the official OMMO websitu. Conservate a vostra ricevuta d'acquistu cum'è prova d'acquistu per e richieste di garanzia.
OMMO Official Store: Visit OMMO Store on Amazon