1. Introduzione
This manual provides comprehensive instructions for the setup, operation, and maintenance of your Tibuta 15.6 Inch WiFi Digital Photo Frame. Please read this manual thoroughly before using the device to ensure proper functionality and to maximize your user experience.

Image 1.1: Tibuta 15.6 Inch WiFi Digital Photo Frame in use, showing its touchscreen capabilities and companion app integration.
2. Informazioni di sicurezza
Observe the following safety precautions to prevent damage to the device or personal injury:
- Ùn espone micca u dispusitivu à l'acqua o à l'umidità eccessiva.
- Evitate di mette u dispusitivu vicinu à fonti di calore o in luce diretta di u sole per periodi prolungati.
- Aduprate solu l'adattatore di alimentazione furnitu.
- Ùn pruvate micca di disassemble o riparà u dispusitivu sè stessu. Cuntattate l'assistenza clienti per l'assistenza.
- Mantene u dispusitivu luntanu da i zitelli è animali.
3. Cuntenutu di u pacchettu
Verificate chì tutti l'articuli sò presenti in u pacchettu:
- Tibuta 15.6 Inch WiFi Digital Photo Frame
- Adattatore di putenza
- Manuale d'uso (stu documentu)
- Stand
4. Produttu Finituview
Familiarize yourself with the components of your digital photo frame.
4.1 Davanti View

Image 4.1: Front view and key features of the Tibuta 15.6 Inch Digital Photo Frame.
- 15.6 Inch HD Touch Screen: High-definition display with 1280x800 resolution and IPS technology for wide viewl'anguli.
- Interfaccia touchscreen: Allows for direct interaction with the frame's menus and settings.
4.2 A parte posteriore View è i porti

Image 4.2: Posteriore view of the Tibuta Digital Photo Frame with labeled ports and features.
- Switch di Potenza: Accende o spegne u dispusitivu.
- Montatu à u muru: Mounting points for wall installation.
- Amplificatori: Integrated speakers for audio playback.
- Slot per Schede Micro SD: Supporta carte Micro SD finu à 128 GB per un almacenamentu allargatu.
- Cuffie Jack: Per cunnette i dispositi audio esterni.
- Porta USB di tipu A: For connecting USB drives or other peripherals.
- Mini portu USB: For data transfer (if applicable).
- Portu DC Power: Cunnette à l'adattatore di alimentazione.
- Stand: Attachable stand for desktop placement.
5. Setup
5.1 Accensione iniziale
- Attach the stand to the back of the photo frame for stable placement on a flat surface.
- Cunnette l'adattatore di alimentazione à u portu di alimentazione CC situatu daretu à u quadru.
- Inserite l'adattatore di corrente in una presa murale.
- Press the Power Switch to turn on the device.
- Segui l'istruzzioni nantu à u screnu per selezziunà a vostra lingua, u fusu orariu è cunnette vi à una rete Wi-Fi.
5.2 Cunnessione à Wi-Fi
- From the main menu, navigate to "Settings" and then "Wi-Fi".
- Selezziunate a rete Wi-Fi desiderata da a lista.
- Inserite a password Wi-Fi cù a tastiera in schermu.
- Tap "Connect". Once connected, a Wi-Fi icon will appear on the screen.
5.3 Installazione di l'applicazione Cumpagnia
To share photos and videos remotely, download the dedicated companion app.

Image 5.1: Download the Uhale App from Google Play or the App Store.
- On your smartphone or tablet, open the Google Play Store (for Android devices) or the Apple App Store (for iOS devices).
- Cerca "Uhale App" (or the specified app name in your frame's instructions).
- Scaricate è installate l'app.
- Follow the in-app instructions to pair your device with the digital photo frame. This typically involves entering a unique code displayed on your photo frame.
6. Operating Instructions
6.1 Sharing Photos and Videos via App
Once the frame is connected to Wi-Fi and paired with the app:
- Apertura l'app compagna nantu à u vostru smartphone.
- Select the photos or videos you wish to share.
- Tap the "Send" or "Share" button within the app.
- The selected media will be transferred to your digital photo frame and displayed.
The frame supports various display modes, including timing, zooming, and cropping, which can often be adjusted via the app or directly on the frame's settings.
6.2 Using External Storage (Micro SD Card)
The frame has 16GB of built-in storage and supports Micro SD cards up to 128GB.
- Insert a Micro SD card into the designated slot on the back of the frame.
- The frame will automatically detect the card.
- Navigate to the "Gallery" or "Files" section on the frame to access content from the Micro SD card.
- Pudete copià files from the Micro SD card to the internal storage or play them directly.
6.3 Automatic Rotation (Gravity Sensing)
The frame features gravity sensing for automatic rotation, adjusting the display orientation based on how the frame is positioned (landscape or portrait).
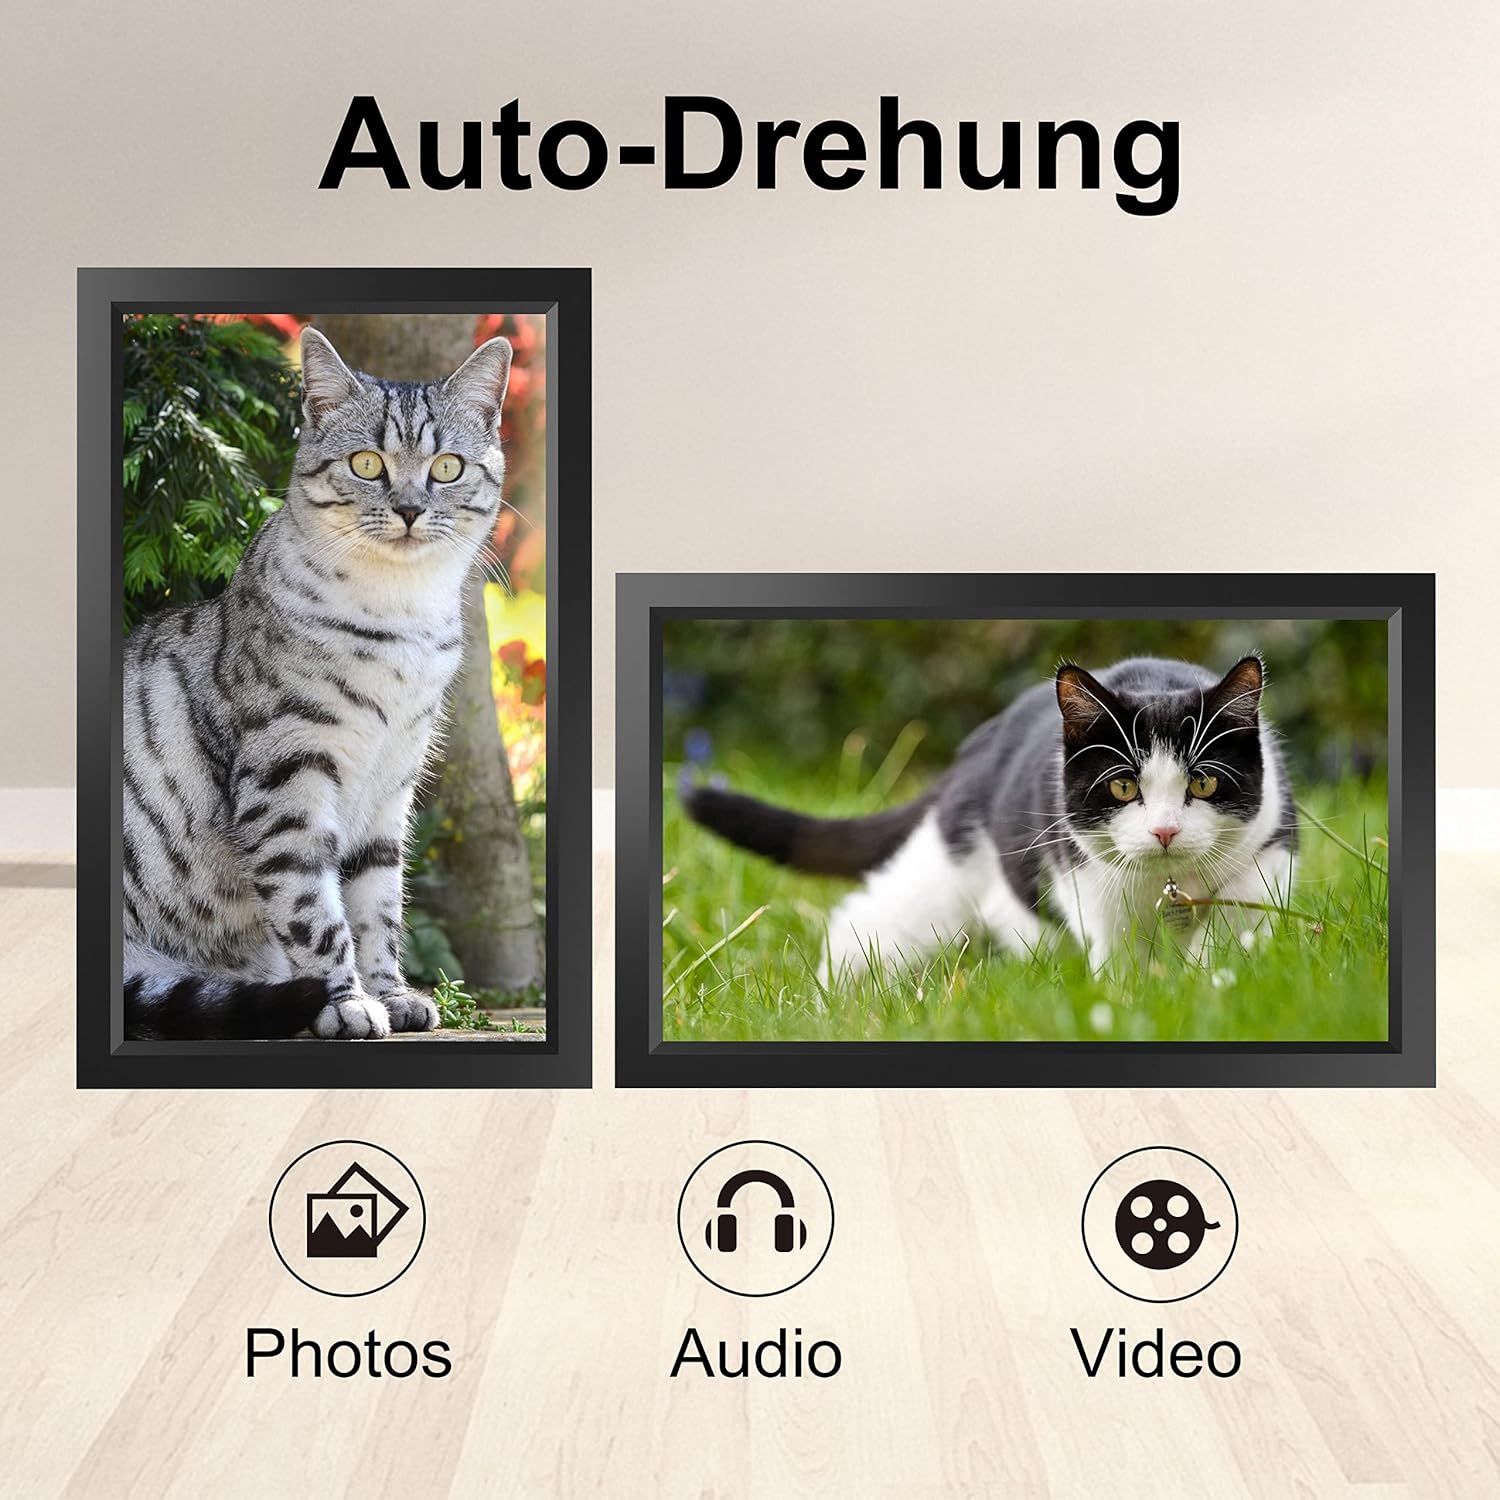
Image 6.1: Automatic display rotation based on frame orientation.
Ensure the gravity sensing feature is enabled in the frame's settings if you wish to utilize this functionality.
6.4 Paràmetri di visualizazione
Personalizà u vostru viewing experience through the frame's settings menu:
- Intervallu di presentazione: Adjust how long each photo is displayed.
- Effetti di transizione: Choose different effects between photos.
- Luminosità: Aghjustate a luminosità di u screnu.
- Modu di sonnu/Timer: Set schedules for the frame to turn on/off automatically.
- Zoom/Crop: Options to adjust how photos fit the screen.
7. Mantenimentu
7.1 Pulizia di u schermu
Per pulisce u schermu tattile, asciugallu delicatamente cù un pannu dolce è senza pelu. Per e macchie ostinate, asciugate leggermente.ampSciacquate u pannu cù acqua o una suluzione di pulizia di schermi. Evitate l'usu di prudutti chimichi aggressivi o materiali abrasivi.
7.2 Cura Generale
- Keep the frame in a dry environment.
- Protect it from dust by occasionally wiping the frame's body with a soft cloth.
- Evitate di abbandunà u dispusitivu o di sottumessu à forti impatti.
8. Risoluzione di prublemi
| Prublemu | Causa Possibile | Soluzione |
|---|---|---|
| U quadru ùn s'accende micca. | L'adattatore di corrente ùn hè micca cunnessu o hè difettuosu. | Assicuratevi chì l'adattatore di corrente sia cunnessu currettamente à u quadru è à una presa di corrente funzionante. Pruvate una presa diversa. |
| Ùn pò micca cunnette à Wi-Fi. | Password sbagliata, fora di portata, o prublema di rete. | Verify the Wi-Fi password. Move the frame closer to the router. Restart your router. |
| E foto/video ùn cumpariscenu micca. | App not paired, incorrect file format, or storage issue. | Ensure the app is correctly paired. Check if the media files are in a supported format. Verify sufficient storage space on the frame or SD card. |
| U schermu tattile ùn risponde micca. | Errore di software tempurale. | Restart the frame by holding the power button or unplugging and replugging the power adapter. |
| Automatic rotation not working. | Feature disabled or sensor issue. | Check the frame's settings to ensure gravity sensing/auto-rotation is enabled. |
9. Specificazioni
| Feature | Detail |
|---|---|
| Numero di mudellu | TID15.6 |
| Size Screen | 15.6 inch |
| Tipu di visualizazione | IPS Touch Screen |
| Risoluzione | 1280x800 |
| Storage internu | 16 GB (circa 80 000 foto) |
| Storage Esterni | Carta Micro SD finu à 128 GB |
| Connettività | Wi-Fi |
| Funzioni spiciali | Gravity Sensing Automatic Rotation, Touchscreen |
| Dimensioni (L x W x H) | 39.12 x 24.64 x 2.51 cm |
| Pesu | 1.48 kg |
| Fonte d'energia | Battery Powered (includes 1 Lithium Ion battery) |
Nota: e specificazioni sò sottumessi à cambià senza avvisu previ.
10. Garanzia è Support
10.1 Garanzia di u Produttu
The Tibuta Digital Photo Frame comes with a one-year product warranty. This warranty covers manufacturing defects and operational issues arising from normal use. If any issues arise during this period, please contact our after-sales support team for assistance.
10.2 Assistenza Clienti
For technical support, warranty claims, or any other inquiries, please refer to the contact information provided on the Tibuta official website or your purchase documentation. When contacting support, please have your model number (TID15.6) and purchase date available.


