1. Introduzione
This manual provides comprehensive instructions for the assembly, operation, and maintenance of your Relaxdays Valet Stand, Model 10046888. Please read this manual thoroughly before assembly and use to ensure proper function and longevity of the product. Keep this manual for future reference.
2. Istruzzioni di sicurità
- Assicuratevi chì tutte e parte sianu presenti è intatte prima di u montaggio. Ùn aduprate micca se qualchì parte manca o hè rotta.
- Assemble the valet stand on a soft, clean surface to prevent scratches.
- Stringhje bè tutte e viti è i dispositivi di fissaggio, ma ùn stringhje micca troppu.
- Do not exceed the maximum load capacity of 8 kg (17.6 lbs) to prevent tipping or damage.
- Tenite e piccule parti è i materiali d'imballaggio luntanu da i zitelli è l'animali domestici per evità periculi di soffocamentu.
- Place the valet stand on a flat, stable surface to ensure stability.
- Stu pruduttu hè pensatu solu per l'usu interni.
3. Cuntenutu di u pacchettu
Verificate chì tutti i cumpunenti elencati quì sottu sò inclusi in u vostru pacchettu:
- 1x Valet Stand (in individual parts)
- Assembly Materials (screws, wrench, etc.)
- Manuale d'istruzzioni (stu documentu)
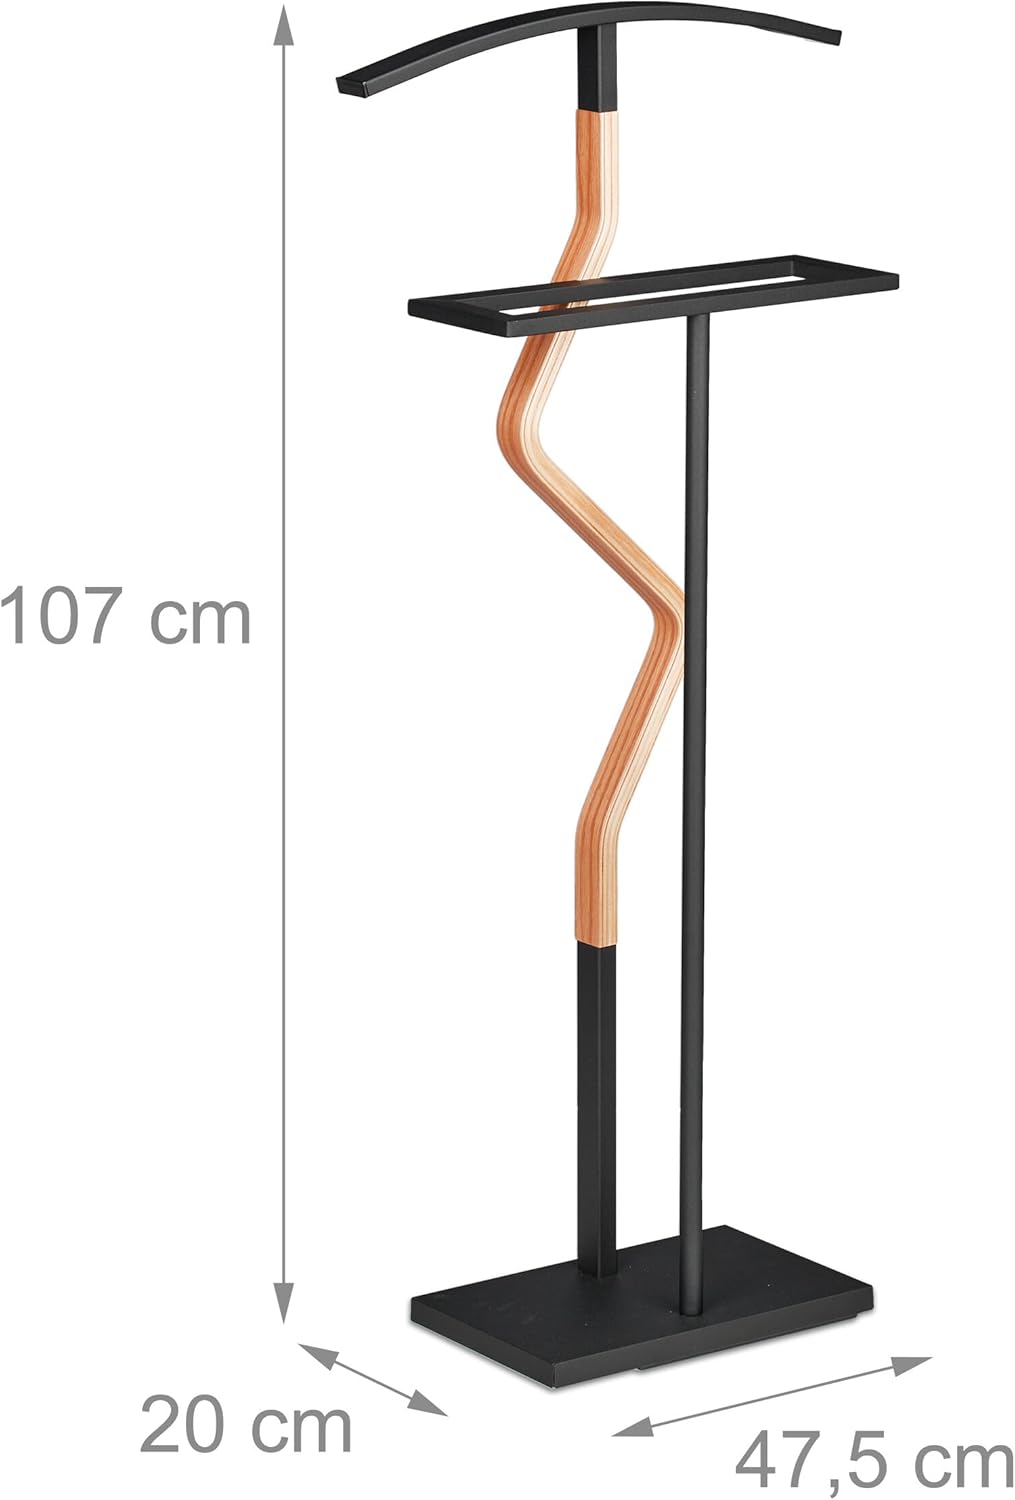
Figura 3.1: Exploded view of the valet stand components and overall dimensions.
4. Installazione è assemblaggio
Follow these steps to assemble your Relaxdays Valet Stand:
- Unpack Components: Eliminate cù cura tutte e parte da l'imballu è mettitele nantu à una superficia pulita è morbida per impedisce danni.
- Attaccà a basa: Identify the base plate and the main vertical support pole. Securely attach the main support pole to the base using the provided screws and tools. Ensure it is firmly connected and stable.
- Install Trouser Rail: Locate the horizontal trouser rail. Attach it to the main vertical support at the designated height using the appropriate fasteners.
- Mount Jacket Hanger: Position the curved jacket hanger at the top of the main vertical support. Secure it in place with the remaining screws.
- Verificazione finale: Once all components are assembled, gently shake the stand to ensure all connections are secure and the stand is stable. Retighten any loose fasteners if necessary.

Figure 4.1: Detail of the joint, illustrating the secure connection points for assembly.
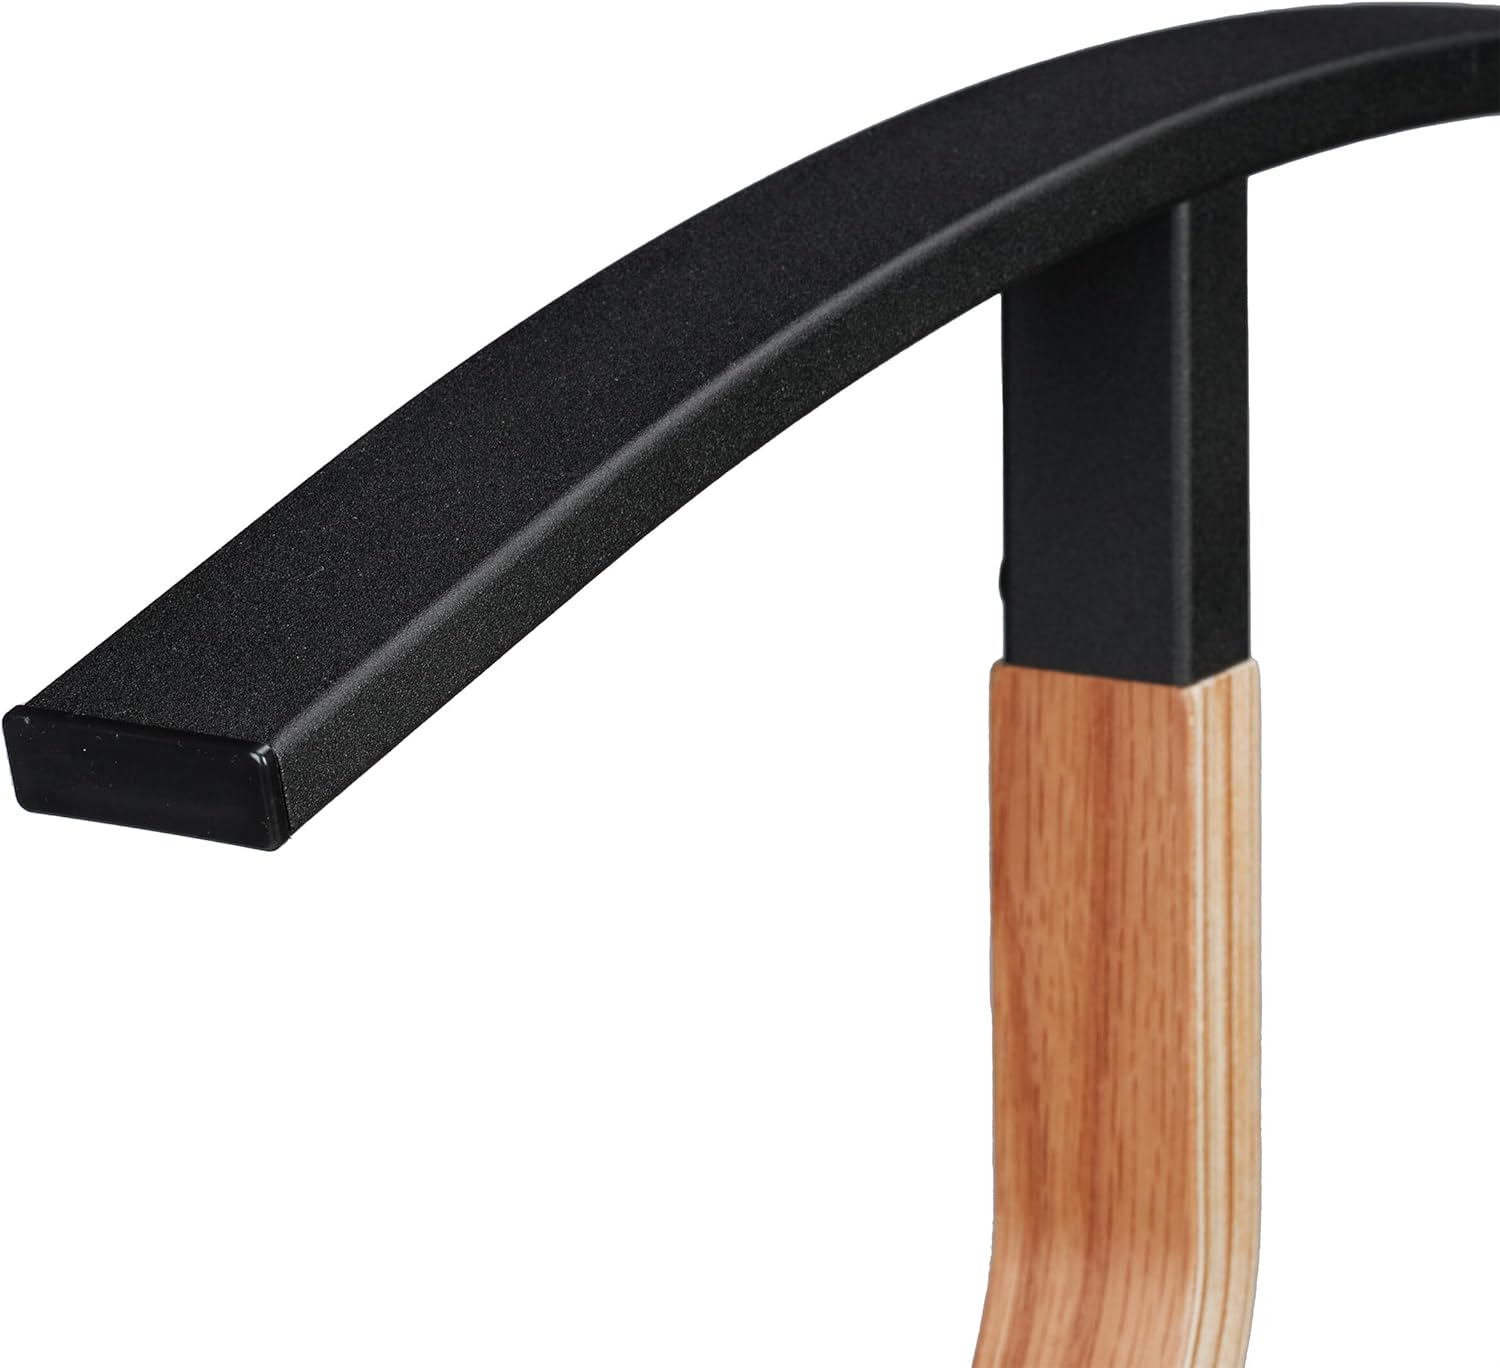
Figure 4.2: The wide, curved hanger designed to support jackets and coats without creasing.
5. Operating Instructions
The Relaxdays Valet Stand is designed to keep your garments organized and wrinkle-free. Follow these guidelines for optimal use:
- Jacket/Coat Hanger: Use the wide, curved top hanger for jackets, coats, shirts, or blouses. The design helps maintain the garment's shape and prevents shoulder bumps.
- Trouser Rail: Drape trousers, skirts, or scarves over the horizontal rail. Ensure garments are evenly distributed to prevent slipping and maintain balance.
- Capacità di carica: Do not exceed the maximum load capacity of 8 kg (17.6 lbs). Overloading can compromise the stand's stability and lead to damage.
- Placement: Position the valet stand in your bedroom, dressing room, or hallway for convenient access. Ensure it is placed on a level surface.

Figure 5.1: The valet stand in use, demonstrating its function in an organized living space.

Figura 5.2: Un altru view of the valet stand in a bedroom, showcasing its practical use for daily garments.
6. Mantenimentu
Proper care will ensure the longevity and appearance of your valet stand:
- Pulizia: Wipe the metal and MDF surfaces with a soft, damp pannu. Evitate detergenti abrasivi o chimichi aggressivi, postu chì questi ponu dannà a finitura.
- Spolverazione: Regularly dust the stand to prevent buildup.
- Verificate i dispositivi di fissaggio: Verificate periodicamente tutte e viti è e cunnessione per assicurassi ch'elle restinu strette. Stringhjite di novu se necessariu.
- Evita l'umidità: Do not expose the valet stand to excessive moisture or direct sunlight, which can cause warping or discoloration of the MDF components.
7. Risoluzione di prublemi
If you encounter any issues with your valet stand, refer to the following common problems and solutions:
| Prublemu | Causa Possibile | Soluzione |
|---|---|---|
| U supportu hè traballante o instabile. | Elementi di fissaggio allentati o superficie irregulare. | Ensure all screws are tightened. Move the stand to a flat, level surface. |
| I pezzi ùn si mettenu micca inseme. | Orientazione incorretta o difettu di fabricazione. | Review assembly instructions carefully. If parts are defective, contact customer support. |
| Garments slip off the hanger/rail. | Smooth fabric or uneven weight distribution. | Distribute weight evenly. Consider using hangers with non-slip surfaces if needed. |
8. Specificazioni
| Feature | Detail |
|---|---|
| Numero di mudellu | 10046888 |
| Marca | Ghjorni di rilassamentu |
| Dimensioni (H x L x P) | 107 x 47.5 x 20 cm (42.13" H x 18.7" W x 7.87" D) |
| Trouser Rail Dimensions (H x W x D) | Approx. 85 x 39 x 13 cm (from product description) |
| Materiale | 60% Steel, 40% Fibreboard (MDF) |
| Culore | Black/Natural |
| Capacità di carica | Max. 8 kg (17.6 lbs) |
| Pesu di l'articulu | 3.91 kg (8.6 lbs) |
| Tipu di stallazione | Free Standing |
| Assemblea Necessaria | Iè |

Figure 8.1: Detail of the curved MDF element, highlighting the material and finish.
9. Assistenza è Garanzia
For any questions, missing parts, or issues not covered in this manual, please contact Relaxdays customer support. Please have your model number (10046888) ready when contacting support.
L'infurmazioni riguardanti i termini è e cundizioni di garanzia specifichi ponu esse truvate tipicamente nantu à u situ ufficiale di u fabricatore. websitu o per mezu di u vostru puntu di compra.


