Introduzione
Thank you for choosing the ZIPRO Adult Magnetic Fitness Bike. This manual provides essential information for the safe assembly, operation, and maintenance of your new fitness equipment. Please read this manual thoroughly before first use and keep it for future reference.

Figure 1: ZIPRO Adult Magnetic Fitness Bike
Informazioni di sicurezza
A vostra sicurità hè di primura. Rispettate e seguenti linee guida:
- Cunsultate un duttore prima di inizià ogni prugramma di eserciziu.
- Assicuratevi chì tutte e parte sianu fissate bè prima di ogni usu.
- Mantene i zitelli è l'animali alluntanati da l'equipaggiu durante l'operazione.
- Pone a bicicletta nantu à una superficia piana è stabile.
- Ùn superate micca u pesu massimu di l'utilizatore di 110 kg (242 lbs).
- Smette subitu di fà eserciziu s'è vo vi sentite svenimentu, vertigini o avete dolore.
- Portate vestiti è scarpe adatti per l'eserciziu.
Cuntenutu di u pacchettu
Verificate chì tutti i cumpunenti sò presenti prima di l'assemblea:
- Quadru principale (1)
- Handlebar Assembly with Console (1)
- Seat Post and Saddle (1)
- Pedali (Manca è Destra)
- Front and Rear Stabilizers (2)
- Hardware Kit (Bolts, Washers, Nuts, Tools)
- Porta bottiglia d'acqua (1)
- Manuale d'uso (Stu documentu)
Istruzzioni di Assemblea
Segui questi passi per l'assemblea curretta:
- Attaccate i stabilizzatori: Secure the front and rear stabilizers to the main frame using the provided bolts and nuts. Ensure they are firmly tightened for stability.
- Installa i Pedali: Identify the Left (L) and Right (R) pedals. The left pedal screws counter-clockwise, and the right pedal screws clockwise. Thread them carefully into the crank arms and tighten securely.

Figure 2: Securely attach pedals.
- Muntà u reggisella è a sella: Insert the seat post into the main frame. Adjust the height to your preference and secure it with the locking knob. Attach the saddle to the seat post.

Figure 3: Adjusting seat height for comfort.
- Attaccà u gruppu di manubriu: Connect the handlebar assembly to the main frame. Ensure all cables are properly routed and not pinched. Secure with the designated bolts.
- Install Water Bottle Holder: Attach the water bottle holder to the designated location on the main frame.
Istituisci
Before your first workout, ensure the bike is set up correctly for your body:
- Altezza di u sediu: Adjust the seat height so that your leg is almost fully extended at the bottom of the pedal stroke, with a slight bend in the knee.
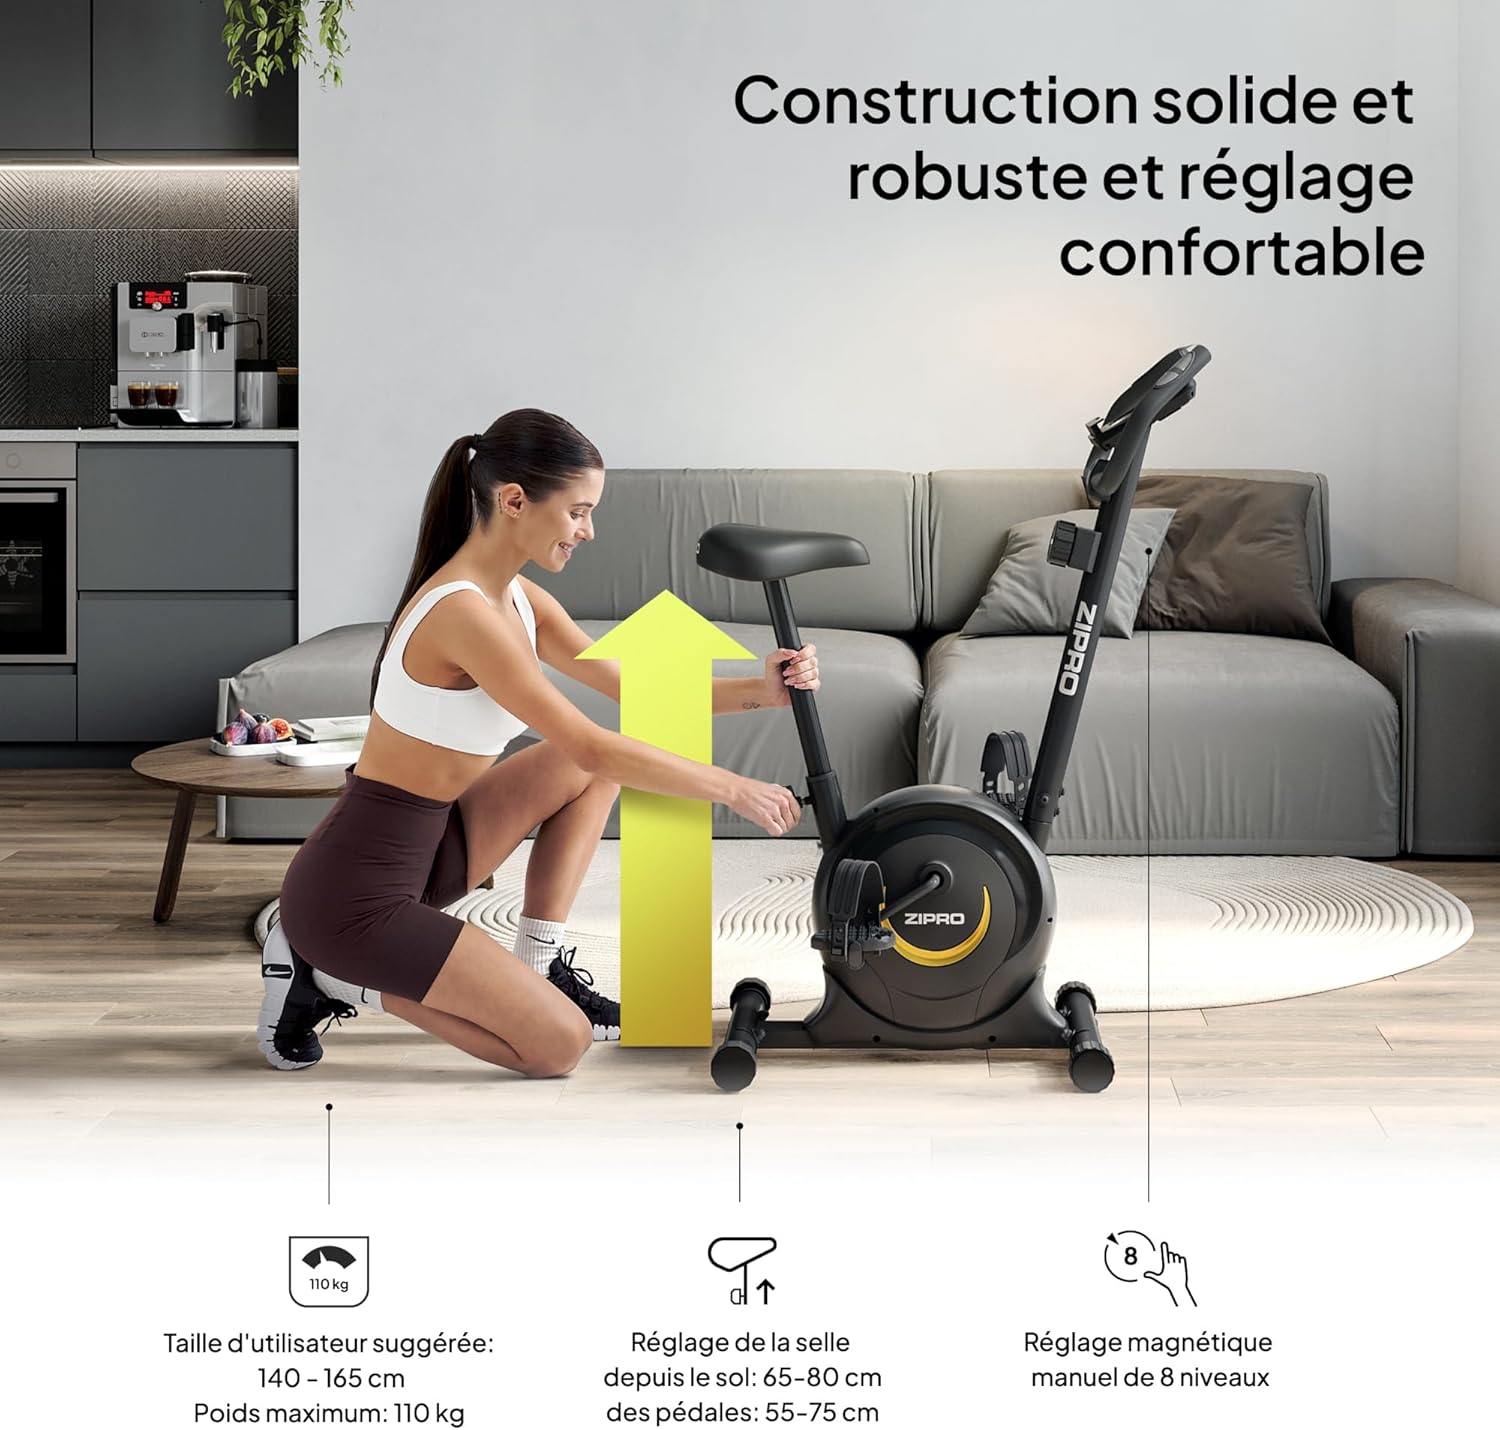
Figure 4: Proper seat height ensures comfort and efficiency.
- Posizione del manubrio: The handlebars can be adjusted for height to provide a comfortable riding posture. Ensure you can reach them without straining.
- Livellu di resistenza: The magnetic resistance system offers 8 levels. Start with a lower level (1-2) and gradually increase as your fitness improves. The resistance knob is located below the console.

Figure 5: Adjusting the 8-level magnetic resistance.
Istruzzioni di funziunamentu
Your fitness bike features an intuitive console to track your workout data:
Funzioni di a cunsola:

Figure 6: Console display showing Time, Speed, Calories, Pulse, and Distance.
- Pulsante MODE: Press to cycle through display functions: Time, Speed, Distance, Calories, Pulse, and Odometer (ODO). Hold to reset values.
- Pulsante SET: Used to set target values for Time, Distance, or Calories.
- Pulsante RESET: Appughjà per sguassà i dati di l'allenamentu attuali.
- Funzione SCAN: Automatically cycles through all display functions every few seconds.
- Sensori d'impulsi: Grip the metal plates on the handlebars to measure your heart rate. Your pulse will be displayed on the console.
Cumincià un allenamentu:
- Sit on the saddle and place your feet securely in the pedal straps.
- Adjust the resistance to your desired level using the tension control knob.
- Begin pedaling. The console will automatically activate and start tracking your workout.
- Aduprà u buttone MODE per view different metrics or the SCAN function for automatic cycling.
- To measure pulse, firmly grip the pulse sensors on the handlebars.

Figure 7: Integrated mobile device holder for convenience.
Mantenimentu
Regular maintenance ensures the longevity and safe operation of your fitness bike:
- Pulizia: Asciugà a bicicletta cù l'annunziuamp pannu dopu ogni usu per caccià u sudore è a polvera. Ùn aduprate micca detergenti abrasivi.
- Ispezioni: Verificate periodicamente tutti i bulloni, i dadi è e parti mobili per a so tenuta. Stringhjite tutti i cumpunenti allentati.
- Lubrificazione: The magnetic resistance system is generally maintenance-free. However, if you notice any squeaking from moving parts, apply a small amount of silicone-based lubricant.
- Conservazione: Store the bike in a dry, cool place away from direct sunlight and extreme temperatures. The integrated transport wheels allow for easy relocation.

Figure 8: Transport wheels for easy movement and storage.
Risoluzione di prublemi
| Prublemu | Causa Possibile | Soluzione |
|---|---|---|
| A cunsola ùn mostra micca i dati. | Batteries are dead or incorrectly installed. Loose connection. | Replace batteries (2x AAA). Check all cable connections to the console. |
| Rumore di scricchiolio o stridore. | Loose bolts. Parts need lubrication. | Tighten all visible bolts. Apply silicone lubricant to moving joints if necessary. |
| A resistenza ùn cambia micca. | Cavu di resistenza scollegatu o dannighjatu. | Check the connection of the resistance cable to the knob and the main unit. Contact support if damaged. |
| Unstable during use. | Bike not on a level surface. Stabilizer caps not adjusted. | Ensure the bike is on a flat surface. Adjust the leveling caps on the stabilizers until stable. |
Specificazioni
| Feature | Detail |
|---|---|
| Marca | ZIPRO |
| Nome di mudellu | zipro (Model Number: 5941659) |
| Meccanismu di resistenza | Magneticu |
| Numeru di Livelli di Resistenza | 8 |
| Cunsigliu Massimu di Pesu | 110 kg (242 lbs) |
| Dimensioni di u produttu (P x L x A) | 35.04" x 17.32" x 43.31" (89cm D x 44cm W x 110cm H) |
| Pesu di l'articulu | 16.5 kg (36.3 lbs) |
| Materiale | Steel Carbon |
| Fonte d'energia | Alimentatu da batteria (per a cunsola) |
| Usu cunsigliatu | Internu |
| Funzioni spiciali | Distance Travelled Monitor |
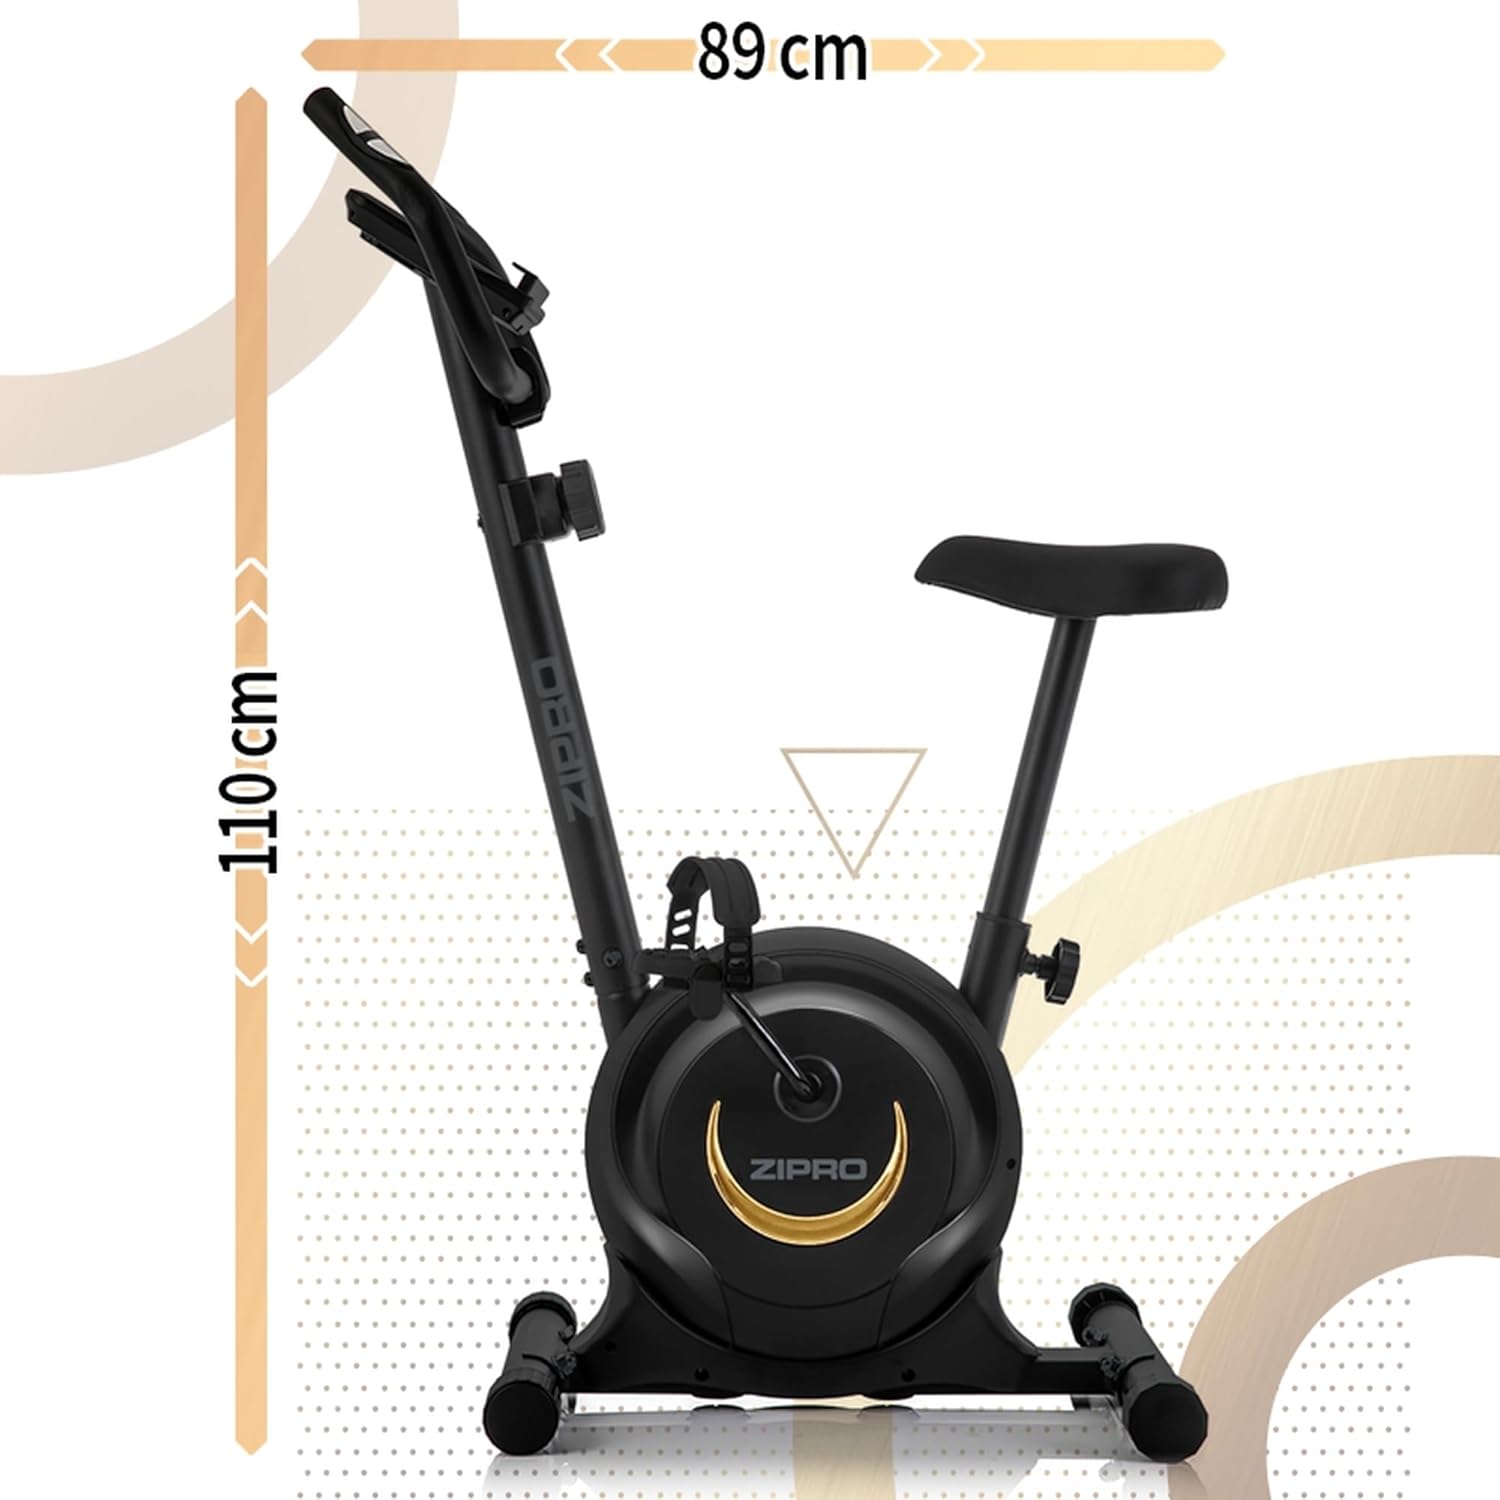
Figure 9: Product dimensions for space planning.
Garanzia è Supportu
For warranty information, technical support, or to order replacement parts, please refer to the warranty card included with your product or visit the official ZIPRO websitu. Conservate a vostra ricevuta di compra cum'è prova di compra.