1. Introduzione
Thank you for choosing the Conentool 21V Cordless Impact Drill/Driver Kit. This tool is designed for various drilling and screwdriving tasks in wood, metal, plastics, and masonry. Please read this manual carefully before operating the tool to ensure safe and efficient use. Keep this manual for future reference.

Image 1.1: The Conentool 21V Cordless Impact Drill/Driver Kit, including the drill, two 2500mAh batteries, charger, and a variety of drill bits and accessories in a carrying case.
2. Istruzzioni Generali di Sicurezza
AVVERTENZA: Leghjite tutte l'avvertimenti di sicurezza, l'istruzzioni, l'illustrazioni è e specificazioni furnite cù stu strumentu d'alimentazione. A mancanza di seguità tutte l'istruzzioni elencate quì sottu pò causà scossa elettrica, focu è / o ferite seriu.
2.1 Sicurezza di l'area di travagliu
- Mantene a zona di travagliu pulita è ben illuminata. I spazii scuri o scuri invitanu à l'accidenti.
- Ùn operate micca l'utensili elettrichi in atmosfere splusive, cum'è in presenza di liquidi inflammabili, gasi o polveri. L'attrezzi elettrici creanu scintille chì ponu accende a polvera o i fumi.
- Mantene i zitelli è i passanti alluntanati mentre operanu un strumentu di putenza. E distrazioni ponu fà perdiri u cuntrollu.
2.2 Sicurezza elettrica
- I tappi di l'utensili elettrici deve esse cumpatibili cù a presa. Ùn mai mudificà u plug in ogni modu.
- Evite u cuntattu di u corpu cù e superfici messe à a terra o in terra, cum'è tubi, radiatori, ranges è frigoriferi. Ci hè un risicu aumentatu di scossa elettrica se u vostru corpu hè in terra o in terra.
- Ùn espone micca l'utensili elettrichi à a pioggia o à e cundizioni umidi. L'acqua chì entra in un strumentu elettricu aumenterà u risicu di scossa elettrica.
2.3 Sicurezza persunale
- Portate sempre una prutezzione per l'ochji. Aduprate occhiali di sicurezza, occhiali di prutezzione o una visiera.
- Portate una prutezzione per l'uditu quandu aduprate l'utensile per periodi prolungati.
- Vestite bè. Ùn portate micca vistimenti o gioielli. Mantene i vostri capelli è vestiti luntanu da e parti in muvimentu.
- Stà attenti, fighjate ciò chì fate, è aduprate u sensu cumunu quandu operanu un strumentu di putenza.
3. Cuntenutu di u pacchettu
Verificate chì tutti l'articuli elencati quì sottu sò inclusi in u vostru pacchettu. Sè qualchì articulu manca o hè dannighjatu, cuntattate l'assistenza clienti.
- 1 x Conentool 21V Cordless Impact Drill/Driver
- 2 batterie à ioni di litiu da 2500 mAh
- 1 x Caricatore di Batteria
- 1 x Flexible Shaft Extension
- Various Drill Bits (for wood, metal, masonry)
- Various Screwdriver Bits
- Adattatori Socket
- Custodia di trasportu
- Manuale d'usu

Image 3.1: A complete overview of the kit contents, including the drill, two batteries, charger, flexible shaft, various drill bits, screwdriver bits, and socket adapters, all neatly arranged.
4. Produttu Finituview
Familiarize yourself with the main components of your drill/driver:
- chuck: Holds drill bits and screwdriver bits.
- Anellu di regulazione di coppia: Selects the desired torque setting.
- Anellu di selezzione di modu: Cambia trà i modi di avvitatura, perforazione è perforazione à impattu.
- Interruttore di selezzione di velocità: Changes between high and low-speed gears.
- Trigger Switch: Activates the tool and controls speed (variable speed).
- Selettore avanti/indietro: Cambia a direzzione di rotazione.
- Luce di travagliu LED: Illumina a zona di travagliu.
- Batteria: Fornisce putenza à u strumentu.
- Pulsante di liberazione di a batteria: Per sguassà a bateria.
- Mancu: Impugnatura ergonomica per un usu cunfurtevule.

Imagine 4.1: Un internu view highlighting the brushless motor, which provides increased power, efficiency, and a quieter operation with no sparks.
5. Setup
5.1 Caricà a Batteria
The battery pack is not fully charged at the time of purchase. It is recommended to fully charge the battery before first use.
- Cunnette u caricatore à una presa di corrente standard.
- Slide the battery pack onto the charger base. Ensure it clicks into place.
- The charger indicator light will show the charging status. A red light typically indicates charging, and a green light indicates a full charge.
- Una volta completamente carica, disconnect the charger from the power outlet and remove the battery.

Image 5.1: The battery charger connected to a wall outlet, with a battery pack inserted for charging. The red light indicates charging, and the green light indicates a completed charge.
5.2 Installazione è Rimuovere a Batteria
- Per installà: Align the battery pack with the base of the tool handle and slide it in until it clicks securely into place.
- Per sguassà: Press the battery release button (usually located at the front of the battery) and slide the battery pack out of the tool.

Imagine 5.2: Un tagliu view of the 2500mAh battery pack, illustrating its internal lithium-ion cells and power management system, designed for up to 90 minutes of use per battery.
5.3 Installing and Removing Drill/Screwdriver Bits
- Per installà: Rotate the chuck counter-clockwise to open the jaws. Insert the desired bit into the chuck as far as it will go. Rotate the chuck clockwise to tighten the jaws firmly around the bit.
- Per sguassà: Girate u mandrinu in sensu antiorariu per allentà e ganasce è tirà fora a punta.
Ensure the bit is securely fastened to prevent it from slipping during operation.
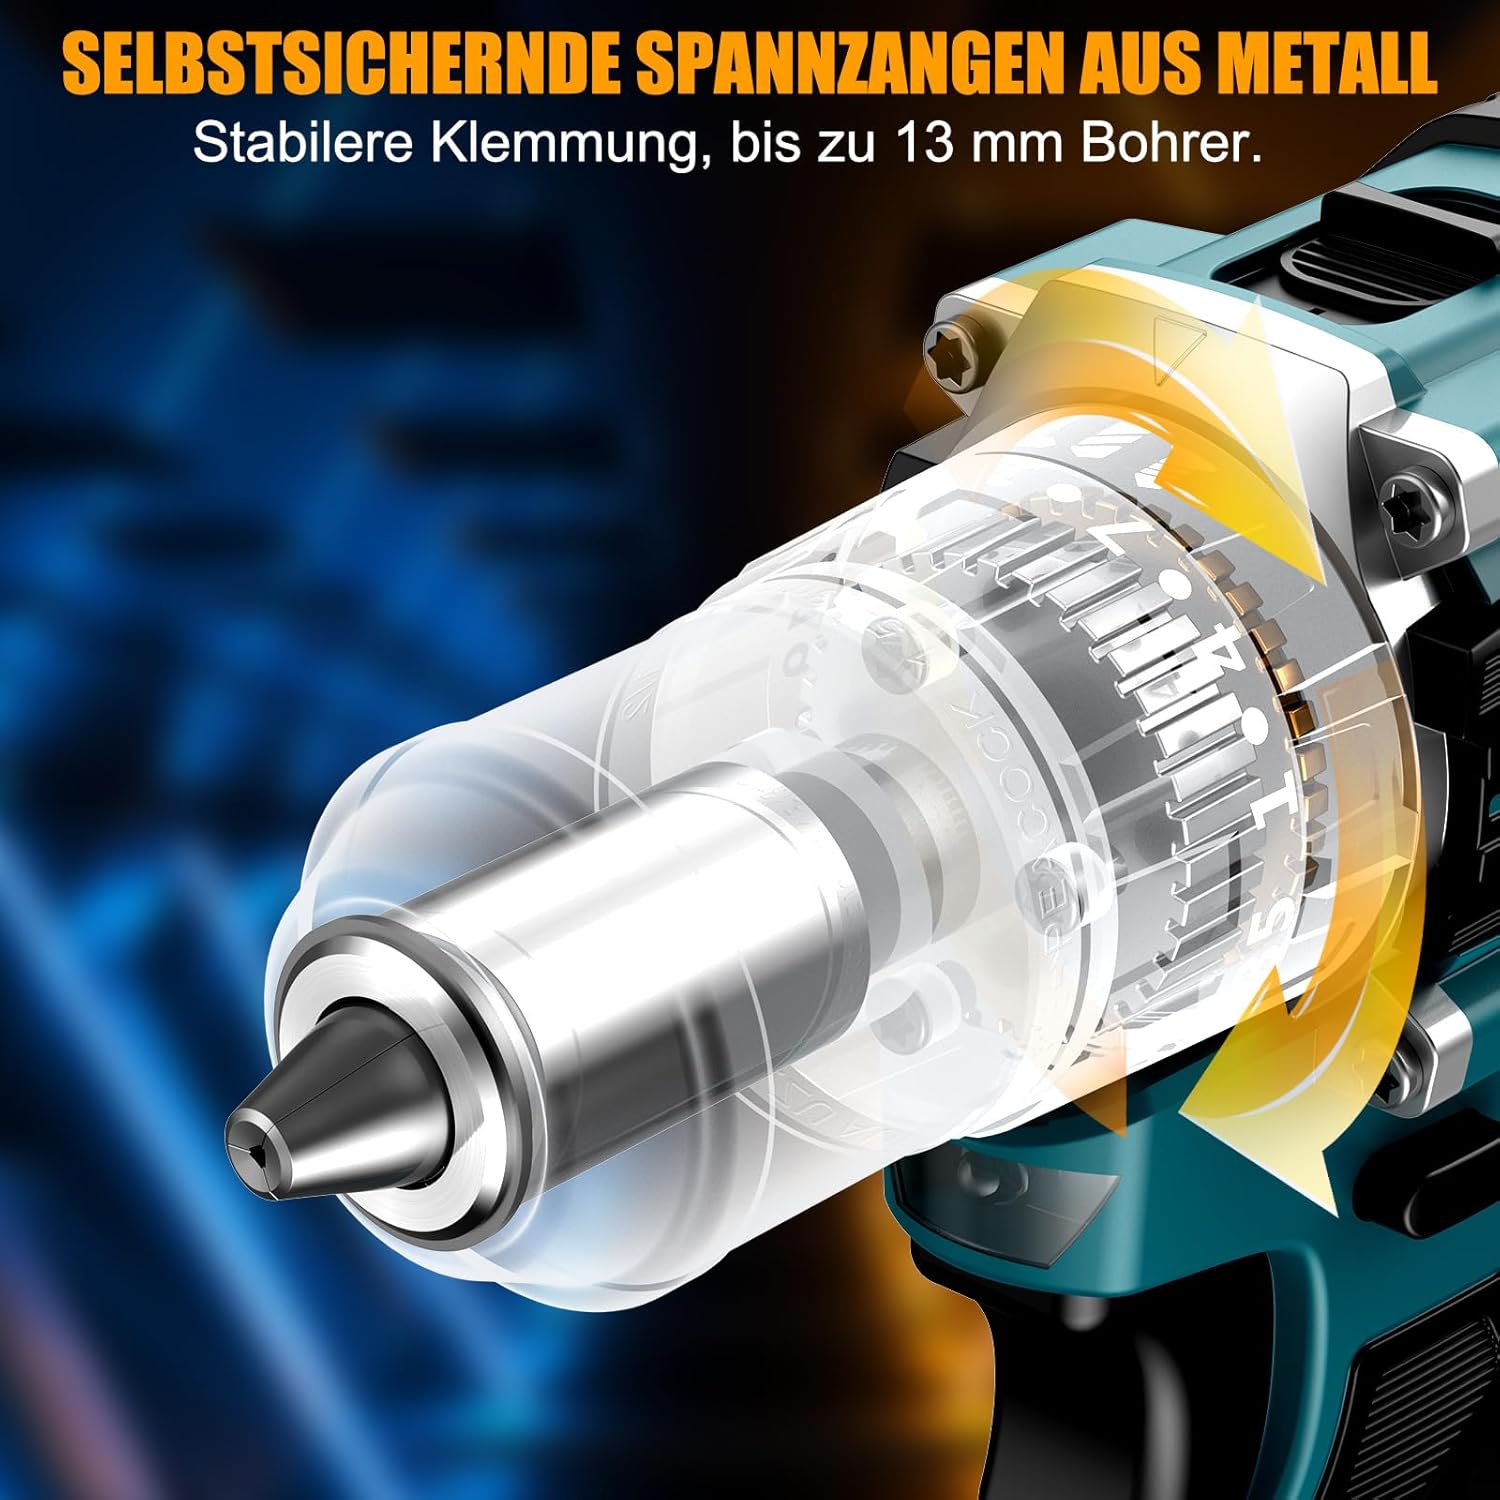
Imagine 5.3: Una dettagliata view of the self-locking metal chuck, demonstrating its stable clamping mechanism capable of holding drill bits up to 13mm securely.
6. Operating Instructions
6.1 Accensione/Spegnimentu è Cuntrollu di Velocità
- To turn the tool ON, press the trigger switch. The speed is variable; press the trigger further for higher speed.
- To turn the tool OFF, release the trigger switch.
- The integrated LED work light will illuminate when the trigger is pressed, providing visibility in dimly lit areas.
6.2 Rotazione avanti/indietro
The forward/reverse selector switch is located above the trigger. Push it to the left for forward rotation (for screwdriving and drilling) and to the right for reverse rotation (for removing screws or freeing jammed bits). Ensure the tool is stopped before changing direction.
6.3 Speed Gear Selection
The drill features a 2-speed gear selector switch on top of the tool:
- Gear 1 (Low Speed, 0-650 RPM): Ideal for high-torque applications like driving large screws or drilling large holes.
- Gear 2 (High Speed, 0-1850 RPM): Suitable for fast drilling in softer materials and smaller diameter holes.
Always select the appropriate gear for the task. Change gears only when the tool is completely stopped.
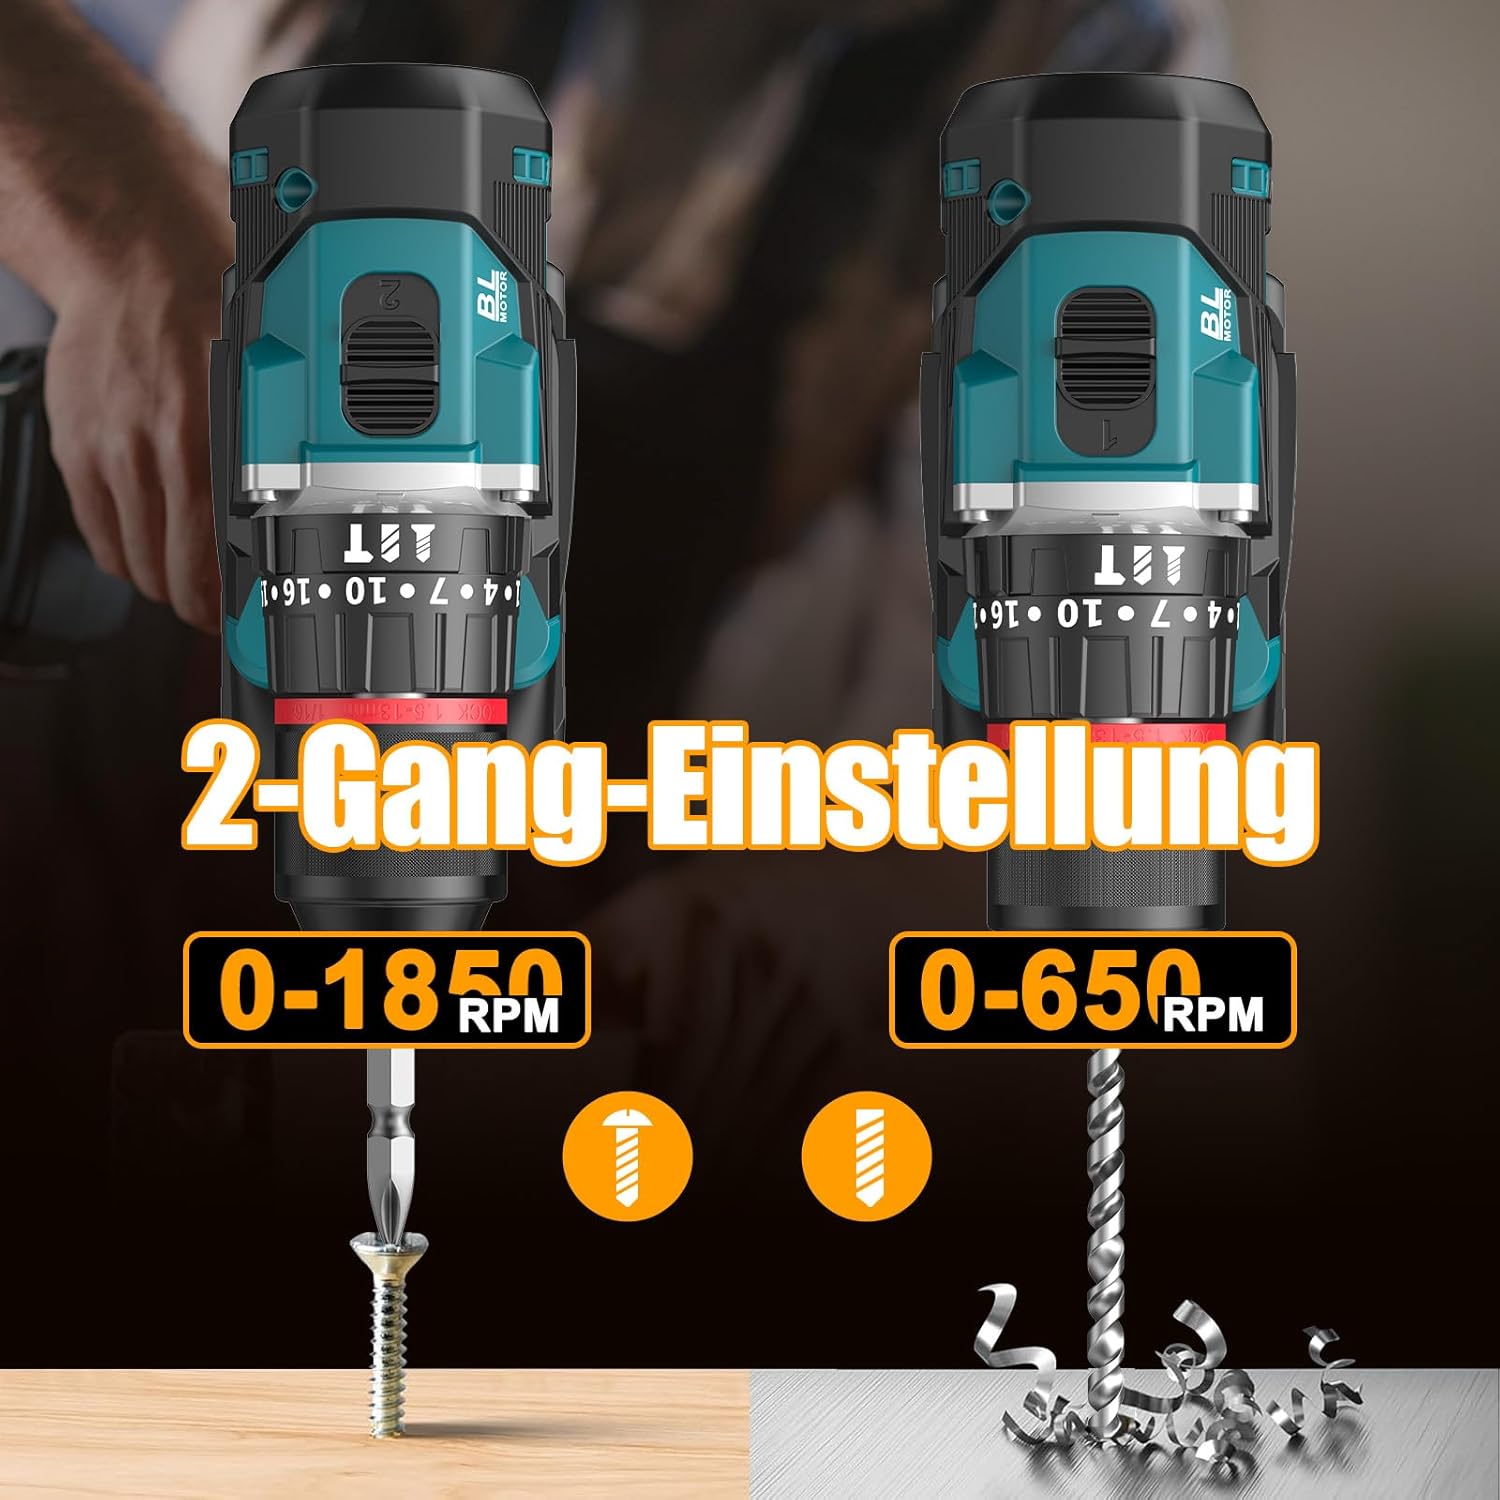
Image 6.1: An illustration demonstrating the two-speed gear settings: Gear 1 (0-650 RPM) for screwdriving and Gear 2 (0-1850 RPM) for drilling, allowing for optimal performance based on the application.
6.4 Ajustamentu di a coppia è selezzione di a modalità
The torque adjustment ring allows you to set the desired torque for screwdriving applications, preventing overtightening or stripping screws. The mode selector ring allows you to switch between different operating modes.
- Screwdriving Mode (Torque Settings 1-35): Use these settings to match the torque to the screw size and material. Lower numbers for smaller screws/softer materials, higher numbers for larger screws/harder materials.
- Modu di perforazione (Icona di a punta di trapano): For general drilling without impact. The clutch is disengaged, providing maximum torque.
- Modu di perforazione à impattu (Icona di martellatu): For drilling into masonry or concrete, providing a hammering action in addition to rotation.
The drill offers 35+3 settings, including 35 torque settings for screwdriving and 3 modes (screwdriving, drilling, impact drilling).

Image 6.2: A visual representation of the 35+3 torque and mode settings, indicating precise power control and a maximum torque of 55 N.m, suitable for various materials like wood, brick, plastic, and metal.
7. Mantenimentu
7.1 Pulizia
- Scollegate sempre a batteria prima di fà qualsiasi pulizia o manutenzione.
- Mantene pulite l'aperture di ventilazione di l'utensile per impedisce u surriscaldamentu.
- Aduprà un soft, damp pannu per pulisce l'arnese casing. Ùn aduprate micca prudutti chimichi aggressivi o detergenti abrasivi.
7.2 Storage
- Store the tool and batteries in a cool, dry place, away from direct sunlight and moisture.
- Store the tool in its carrying case to protect it from dust and damage.
- Mantene fora di a portata di i zitelli.

Image 7.1: A person carrying the Conentool drill kit in its durable black carrying case, designed for convenient storage and transport of the tool and its accessories.
7.3 Cura di a batteria
- Do not store batteries in a discharged state. Recharge them regularly, especially if not used for extended periods.
- Evitate d'espone e batterie à temperature estreme.
- Ùn pruvate micca di disassemble o mudificà a batteria.
8. Risoluzione di prublemi
| Prublemu | Causa Possibile | Soluzione |
|---|---|---|
| U strumentu ùn principia micca | Batteria micca carica o installata in modu incorrectu. | Assicuratevi chì a batteria sia cumpletamente carica è inserita currettamente. |
| Putenza o velocità ridutta | A carica di a bateria hè bassa. | Ricaricate a bateria. |
| U bit scivola in u mandrinu | Mandrinu micca strettu abbastanza. | Tighten the chuck firmly around the bit. Ensure the bit shank is clean. |
| Surriscaldamentu | Fessure di ventilazione bluccate; usu intensu cuntinuu. | Pulite e fessure di ventilazione. Lasciate chì l'utensile si raffreddi durante un usu prolongatu. |
9. Specificazioni
| Feature | Specificazione |
|---|---|
| Numero di mudellu | ebvc-sd-de |
| Voltage | 21 Volts |
| Tipu di batterie | Lithium-ion |
| Capacità batterie | 2500 mAh (ognuna) |
| Max Torque | 55 Nm |
| Impostazioni di coppia | 35 + 3 Modes (Screwdriving, Drilling, Impact Drilling) |
| Velocità à vuoto (marcia 1) | 0-650 RPM |
| Velocità à vuoto (marcia 2) | 0-1850 RPM |
| Dimensione Chuck | 13 mm (3/8 inch) Keyless |
| Dimensioni di u produttu | 35 x 31 x 10 cm |
| Pesu (cù a bateria) | 1.5 chilògrammi |
10. Garanzia è Support
Conentool products are manufactured to high-quality standards. In the unlikely event of a defect due to material or manufacturing fault, please contact your retailer or Conentool customer service. Please retain your proof of purchase for warranty claims.
For further assistance, technical support, or to inquire about spare parts, please refer to the contact information provided with your purchase or visit the official Conentool websitu.


