1. Introduzione
Thank you for choosing the ADE CK2310 Digital Radio Alarm Clock. This device offers precise timekeeping via DCF radio signal, dual alarm settings, temperature and humidity display, and a convenient backlight function. Its compact design makes it suitable for both home use and travel. Please read this manual carefully to ensure proper use and optimal performance of your new alarm clock.

Image 1.1: The ADE CK2310 Digital Radio Alarm Clock is designed for portability, making it an ideal travel companion.
2. Informazioni di sicurezza
- Mantene u dispusitivu luntanu da l'acqua è alta umidità.
- Ne pas exposer l'appareil à des températures extrêmes ou à la lumière directe du soleil.
- Evitate di abbandunà u dispusitivu o di sottumessu à forti impatti.
- Ùn pruvate micca di smuntà o riparà u dispusitivu da per voi. Cuntattate u persunale di serviziu qualificatu.
- Eliminate e batterie usate secondu a regulazione lucali.
- Mantene e batterie fora di a portata di i zitelli.
3. Cuntenutu di u pacchettu
Verificate u cuntenutu di u pacchettu quandu u spacchettate:
- ADE CK2310 Digital Radio Alarm Clock
- 2 x batterie AAA
- Manuale d'istruzzioni

Image 3.1: The package includes the ADE CK2310 alarm clock and two AAA batteries.
4. Produttu Finituview
Familiarize yourself with the various components and display elements of your alarm clock.
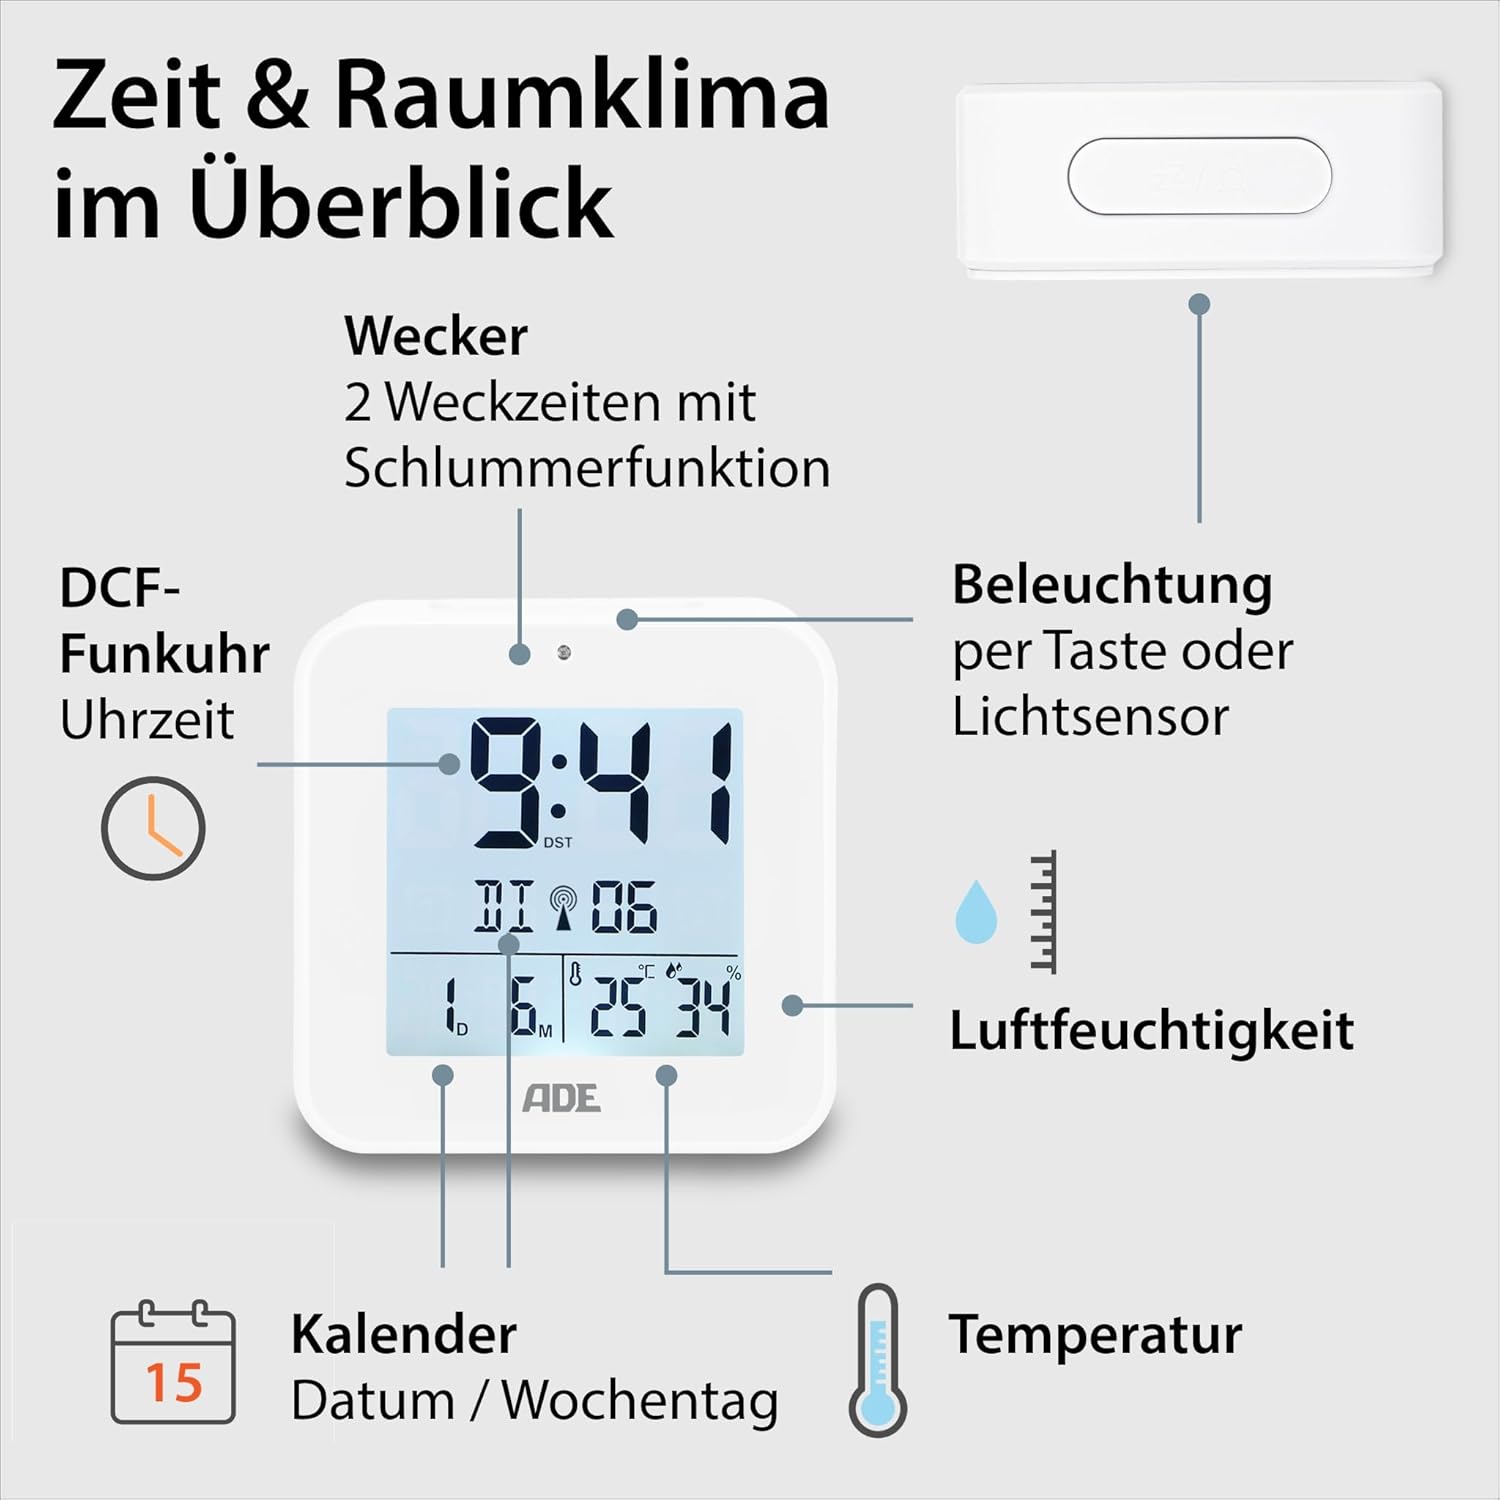
Image 4.1: Front display and key features of the ADE CK2310.
- Display di u tempu: Shows current time (hours, minutes).
- DCF Signal Indicator: Indicates successful reception of the radio time signal.
- Indicatori d'alarme: Shows if Alarm 1 or Alarm 2 is active.
- Date and Day of Week: Displays the current date and day.
- Mustrà di a Temperatura: Shows ambient temperature in Celsius or Fahrenheit.
- Display di umidità: Shows ambient relative humidity.
- Pulsante Snooze/Luce: Activates snooze during an alarm or backlight manually.
- Pulsanti di funzione: Buttons for setting time, alarms, and other functions (located on the back/side).
- Sensore di luce: Automatically activates backlight in dark environments.

Image 4.2: Posteriore view with controls and battery compartment.
The compact dimensions of the alarm clock are approximately 7.2 x 3.8 x 7.2 cm (width x depth x height).

Image 4.3: Dimensions of the ADE CK2310 alarm clock.
5. Setup
5.1. Installazione di batterie
- Open the battery compartment cover on the back of the alarm clock (refer to Image 4.2).
- Inserite e duie batterie AAA, assicurendu a polarità curretta (+ è -).
- Chiudere in modu sicuru u coperchiu di u compartimentu di a batteria.
The alarm clock will power on automatically and begin searching for the DCF radio signal.
5.2. DCF Radio Signal Reception
Upon initial power-on or after battery replacement, the alarm clock will automatically attempt to receive the DCF radio time signal. This process can take several minutes. During reception, a signal icon may flash on the display. Once the signal is successfully received, the time will be set automatically, and the signal icon will appear steadily. For best reception, place the alarm clock near a window and away from electronic devices that may cause interference.
The DCF signal also ensures automatic adjustment for daylight saving time (summer/winter time).
5.3. Manual Time Setting (Optional)
If the DCF signal is not available or you prefer to set the time manually:
- Press and hold the "SET" button (or equivalent, refer to specific button labels on your device) for a few seconds until the time display starts flashing.
- Use the "+" or "-" buttons to adjust the hours.
- Press "SET" again to confirm the hours and move to minutes.
- Use the "+" or "-" buttons to adjust the minutes.
- Press "SET" to confirm and exit manual setting mode.
- Repeat similar steps to set the date and year if necessary.
6. Operating Instructions
6.1. Impostazione di l'allarmi (Allarme 1 è Allarme 2)
The ADE CK2310 features two independent alarm times. This is useful for different wake-up times on weekdays and weekends.

Image 6.1: The alarm clock supports two independent alarm times.
- Press the "ALARM 1" or "ALARM 2" button (usually located on the side or back) once to display the current alarm time.
- Press and hold the respective "ALARM" button until the alarm time starts flashing.
- Use the "+" or "-" buttons to adjust the alarm hours.
- Press the "ALARM" button again to confirm hours and move to minutes.
- Use the "+" or "-" buttons to adjust the alarm minutes.
- Press the "ALARM" button to confirm and exit alarm setting mode.
- To activate or deactivate an alarm, use the dedicated ON/OFF switch for Alarm 1 and Alarm 2 (refer to Image 6.1 for typical switch location). An alarm icon will appear on the display when active.
6.2. Funzione Snooze
When an alarm sounds, press the large "SNOOZE/LIGHT" button on top of the alarm clock. The alarm will pause for approximately 5 minutes and then sound again. To turn off the alarm completely, press any other button or let it ring for its full duration.
6.3. Visualizzazione di a temperatura è di l'umidità
The alarm clock continuously displays the indoor temperature and relative humidity. You can switch between Celsius (°C) and Fahrenheit (°F) for temperature display by pressing a dedicated button (often labeled "°C/°F" or integrated with another setting button).
6.4. Funzione di retroilluminazione
A retroilluminazione pò esse attivata in dui modi:
- Attivazione manuale: Press the "SNOOZE/LIGHT" button on top. The backlight will illuminate for approximately 8 seconds.
- Automatic Activation (Light Sensor): Slide the "AUTO LIGHT" switch on the back of the device to the "ON" position (refer to Image 4.2). The built-in light sensor will detect low ambient light conditions and automatically activate a soft backlight, making the display visible in the dark. Slide the switch to "OFF" to disable this feature.
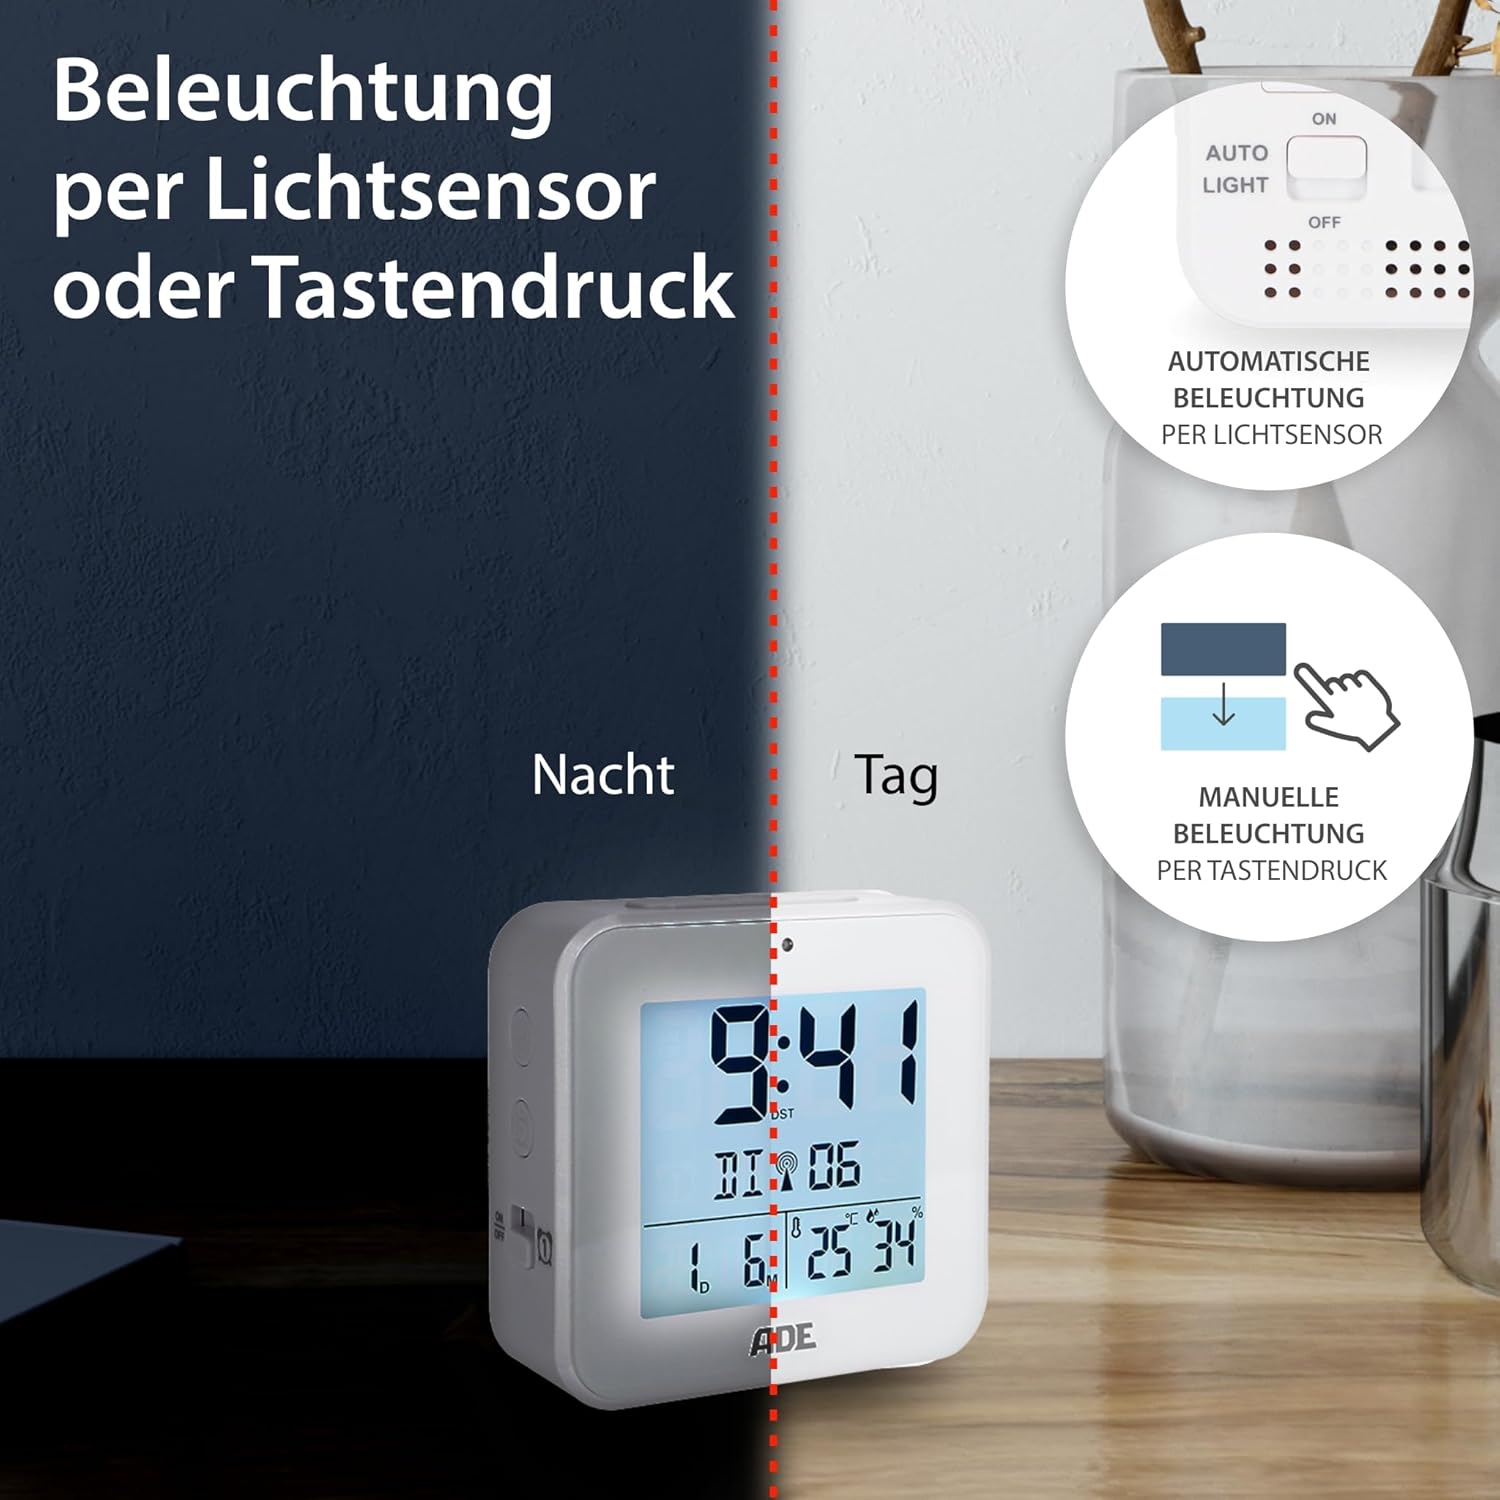
Image 6.2: Backlight can be activated manually or automatically via the light sensor.
7. Mantenimentu
- Pulizia: Asciugate l'apparechju cù un pannu dolce è asciuttu. Ùn aduprate micca detergenti abrasivi o solventi.
- Sustituzione di batterie: When the display becomes dim or functions are erratic, replace both AAA batteries. Ensure correct polarity. If the device will not be used for an extended period, remove the batteries to prevent leakage.
8. Risoluzione di prublemi
| Prublemu | Causa Possibile | Soluzione |
|---|---|---|
| U display hè viotu o scuru. | E batterie sò scariche o inserite in modu incorrectu. | Sustituite e batterie cù novi, assicurendu a polarità curretta. |
| L'ora hè sbagliata o ùn hè micca impostata automaticamente. | Ricezione di u signale DCF debule o interferenza. | Move the alarm clock to a location with better reception (e.g., near a window, away from electronics). Allow time for signal acquisition. Manually set the time if necessary. |
| L'alarma ùn sona micca. | L'alarma ùn hè micca attivata o hè impostata in modu incorrectu. | Ensure the alarm is switched "ON" and the alarm time is set correctly. Check for the alarm icon on the display. |
| A retroilluminazione ùn funziona micca. | AUTO LIGHT switch is OFF, or batteries are low. | Check if the "AUTO LIGHT" switch is in the "ON" position. Press the SNOOZE/LIGHT button manually. Replace batteries if needed. |
9. Specificazioni
- Mudellu: CK2310
- Dimensioni: 8 x 3.81 x 8 cm (approx. W x D x H)
- Pesu: 100 g
- Fonte di energia: 2 x batterie AAA (incluse)
- Tipu di visualizazione: Digitale
- Materiale: Plastica ABS
- Funzioni speciali: DCF Radio Signal, 2 Alarm Times, Snooze Function, Temperature Display (°C/°F), Humidity Display, Calendar Display, Automatic Backlight (Light Sensor), Manual Backlight.
- Usu à l'internu / à l'esternu: Internu
10. Garanzia è Supportu
ADE products are manufactured with quality and reliability in mind. For information regarding warranty terms and conditions, please refer to the warranty card included with your purchase or visit the official ADE website. For technical support or service inquiries, please contact your retailer or the ADE customer service department.
Produttore: ADE


