1. Introduzione
Thank you for choosing the Zapco ST-4XP-SQ-III 4-Channel Class AB 800W RMS Sound Quality Amplificatore. Stu manuale furnisce l'infurmazioni essenziali per a curretta installazione, funziunamentu è manutenzione di u vostru amplifier. Please read this manual thoroughly before attempting to install or operate the unit to ensure optimal performance and safety.
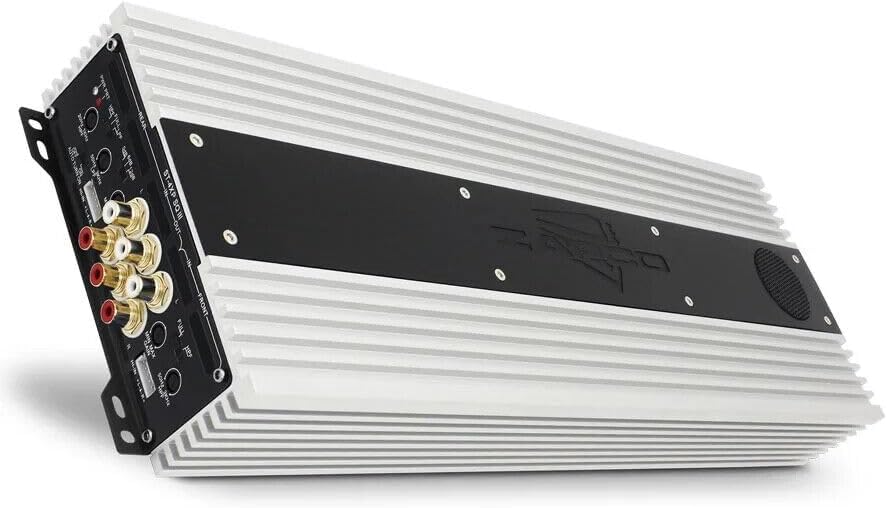
This image displays the Zapco ST-4XP-SQ-III ampvivificatore, mostraasing its sleek design and heat sink fins. The main body is silver with a black central panel featuring the Zapco logo.
2. Informazioni di sicurezza
Osservate sempre e seguenti precauzioni di sicurezza durante l'installazione è u funziunamentu:
- Disconnect the vehicle's negative battery terminal before any wiring.
- Assicuratevi chì tutti i cavi sianu currettamente posti è fissati per impedisce danni o cortocircuiti.
- Aduprate un cablaggio di calibru adattatu per e cunnessione di l'alimentazione, di a terra è di l'altoparlanti cum'è specificatu.
- Munti lu ampu lifer in modu sicuru in un locu chì permette una ventilazione adatta è hè prutettu da l'umidità è da u calore eccessivu.
- Ùn operate micca amplificatore s'ellu hè dannighjatu o malfunzionante. Riferitevi à a sezzione di risoluzione di i prublemi o cuntattate l'assistenza.
3. Produttu Finituview
The Zapco ST-4XP-SQ-III is a high-performance 4-channel Class AB amplifier designed for superior sound quality in automotive applications. Key features include:
- 4-Channel, Full Range, Class A/B operation
- Tiffany style Panel Mount RCA connectors
- Speaker Level Inputs with Auto-on functionality
- Cuntrollu di guadagnu d'entrata variabile
- Variable electronic crossover (HPF/LPF)
- Cuntrolla variabile di l'aumentu di i bassi
- Robust new aluminum chassis for efficient heat dissipation
Disposizione di u pannellu di cuntrollu

This image shows the input and control panel of the Zapco ST-4XP-SQ-III amplifier. Visible controls include gain adjustments, high-pass filter (HPF), low-pass filter (LPF), bass boost, and RCA input jacks for front and rear channels. Speaker level inputs and an auto-on switch are also present.
The control panel provides access to input connections and sound tuning adjustments. This includes RCA inputs, speaker level inputs, gain controls, and crossover frequency adjustments for both front and rear channels.
Power and Speaker Output Terminals

This image details the power and speaker output terminals of the Zapco ST-4XP-SQ-III amplifier. It includes connections for Ground (GND), Remote (REM), +12V Battery (Bat), and speaker outputs for front and rear channels, with bridging options indicated.
The power and speaker output panel features robust terminals for secure connections. These include connections for the main power supply (+12V Bat), ground (GND), remote turn-on (REM), and speaker outputs for the front and rear channels, with clear markings for bridging configurations.
4. Setup è Installazione
Una stallazione curretta hè cruciale per u rendimentu è a longevità di u vostru ampinstallatore. Sè ùn site micca sicuru di qualchì passu, cunsultate un installatore prufessiunale.
4.1 Muntamentu
- Choose a mounting location that is dry, well-ventilated, and away from direct sunlight or heat sources.
- Assicuratevi un spaziu sufficiente intornu à u amplifier per a circulazione d'aria.
- Secure u amplifier firmly using appropriate hardware to prevent movement during vehicle operation.
4.2 Connessioni Wiring
Refer to the 'Power and Speaker Output Terminals' image for visual guidance.
- Power (BAT +12V): Connect a fused power cable directly from the vehicle's positive battery terminal to the +12V terminal on the amplifier. The fuse should be located within 18 inches of the battery.
- Terra (GND): Connect a ground cable of the same gauge as the power cable to a clean, unpainted metal surface on the vehicle chassis. Ensure a solid electrical connection.
- Remotu (REM): Cunnette un filu d'accensione remota da l'uscita remota di a vostra unità principale à u terminale REM nantu à u amplificatore. Questu face chì u amplifier on and off with your head unit. If using speaker level inputs, the amplifier features an auto-on function.
- Signale di Input:
- Ingressi RCA: Cunnette i cavi RCA da a presa pre-autoradio di a vostra unità principaleamp outputs to the corresponding RCA input jacks (Front IN, Rear IN) on the amppiù vivu.
- Ingressi à livellu di parlante: If your head unit does not have RCA outputs, connect the speaker wires from the head unit to the amplifier's speaker level input terminals. Ensure correct polarity. The amplifier's auto-on feature will activate when a signal is detected.
- Uscite Speaker: Cunnette i vostri parlanti à u amplifier's speaker output terminals (Front L/R, Rear L/R). Observe correct polarity (+ to + and - to -). For bridged operation, refer to the markings on the amplifier for the correct terminals.
5. Operating Instructions
Una volta installatu, aghjustate u ampparàmetri di lifier per una prestazione sonora ottimale.
5.1 Guadagnà u cuntrollu
The variable input gain control (MIN MAX GAIN) matches the ampa sensibilità d'entrata di l'amplificatore à u livellu di uscita di a vostra unità principale. Cuminciate cù u guadagnu impostu à u minimu. Riproduce una traccia familiare à circa u 75% di u vulume massimu di a vostra unità principale. Aumentate pianu pianu u amplifier's gain until you hear slight distortion, then back off slightly. This ensures maximum clean output.
5.2 Impostazioni di Crossover
The ST-4XP-SQ-III features variable electronic crossovers for both High-Pass Filter (HPF) and Low-Pass Filter (LPF).
- HPF (filtru passa-altu): Permette frequenze sopra the set point to pass through. Use this for full-range speakers to prevent them from playing low bass, which can cause distortion and damage.
- LPF (Filtru Passa-Bassu): Permette frequenze sottu the set point to pass through. Use this for subwoofers to ensure they only reproduce bass frequencies.
- FULL: Bypassa u crossover, permettendu u passaghju di tutte e frequenze.
Adjust the HPF and LPF settings according to your speaker types and desired sound. Typical settings for full-range speakers might be an HPF between 80Hz-120Hz. For subwoofers, an LPF between 80Hz-100Hz is common.
5.3 Bass Boost
The variable bass boost control allows you to enhance low-frequency output. Use this feature sparingly, as excessive bass boost can lead to distortion and potential speaker damage. Adjust to taste, ensuring the sound remains clear.
5.4 Auto-on with Speaker Level Inputs
Quandu si utilizanu ingressi di livellu di l'altoparlante, u amplifier can automatically detect an audio signal and power on. Ensure the 'AUTO TURN ON' switch is set to 'ON' if you wish to utilize this feature. If using a remote turn-on wire, set this switch to 'OFF'.
6. Mantenimentu
U Zapco ST-4XP-SQ-III ampU lifer richiede una manutenzione minima per assicurà prestazioni à longu andà.
- Pulizia: Asciugà periodicamente u ampL'esternu di u lifizer cù un pannu dolce è asciuttu per caccià a polvera è a sporcizia. Ùn aduprate micca prudutti chimichi aggressivi o detergenti abrasivi.
- Ispezione: Verificate regularmente tutti i cunnessione di i fili per a tenuta è i segni di corrosione o danni. Assicuratevi chì ampU muntamentu di u lifier ferma sicuru.
- Ventilazione: Assicuratevi chì u amplifier's heat sink fins are not obstructed, allowing for proper airflow and cooling.
7. Risoluzione di prublemi
Sè avete prublemi cù u vostru amplifier, cunsultate a tavula seguente prima di cuntattà l'assistenza.
| Prublemu | Causa Possibile | Soluzione |
|---|---|---|
| Nisuna putenza / Amplifier ùn si accende |
|
|
| Nisuna Output Sound |
|
|
| Sonu distortu |
|
|
| Ampsurriscaldamentu di l'alimentatore |
|
|
8. Specificazioni
The following are the technical specifications for the Zapco ST-4XP-SQ-III amppiù vivu:
- Puissance @ 4Ω: 4 x 150 watt RMS
- Puissance @ 2Ω: 4 x 250 watt RMS
- Puissance pontée @ 4Ω : 2 x 500 W RMS
- THD @ Potenza nominale: <0.1% THD
- Rapportu signal à bruit : > 95 dB
- Separazione di canali: > 60 dB
- Risposta di Frequency: 15 Hz à 30 KHz ± 1 dB
- Sensibilità di input: 0.25v à 5v
- Net Dimensions (W x H x L): 160 mm x 58 mm x 450 mm (6.3 x 2.28 x 17.72 inch)
- Overall Dimensions (W x H x L): 160 mm x 58 mm x 475 mm (6.3 x 2.28 x 18.7 inch)
- Pesu di l'articulu: Circa 10 liri
9. Garanzia è Support
9.1 Garanzia infurmazione
U Zapco ST-4XP-SQ-III amplifier vene cun a 1-Annu di Garanzia from the date of purchase. This warranty covers defects in materials and workmanship under normal use. It does not cover damage caused by improper installation, accident, misuse, abuse, neglect, unauthorized modification, or normal wear and tear. Please retain your proof of purchase for warranty claims.
9.2 Assistenza Clienti
For technical assistance, warranty service, or general inquiries, please visit the official Zapco website or contact your authorized Zapco dealer. You can often find detailed FAQs, additional resources, and contact information on the manufacturer's websitu.
Zapco Official Websitu: Visitate u Zapco Store nant'à Amazon


