![]() HT64
HT64
Manuale d'usu![]()
![]()

PRECAUZIONI E MISURE DI SICUREZZA
L'instrumentu hè statu cuncepitu in cunfurmità cù a direttiva IEC/EN61010-1 pertinente per i strumenti elettronici di misurazione. Per a vostra sicurità è per impediscenu danni à l'instrumentu, seguite attentamente e prucedure descritte in stu manuale è leghje tutte e note precedute da u simbulu. ![]() cù a massima attenzione.
cù a massima attenzione.
Prima è dopu a misurazione, osservate attentamente e seguenti istruzioni:
- Ùn eseguite micca misura in ambienti umidi.
- Ùn eseguite micca misurazioni in casu di gas, materiali splusivi o inflammabili sò presenti, o in ambienti polverosi.
- Evite ogni cuntattu cù u circuitu misuratu se ùn ci hè micca misurazione.
- Evite ogni cuntattu cù parti metalliche esposte, cù sonde di misurazione inutilizate, circuiti, etc.
- Ùn eseguite micca misurazione in casu chì truvate anomalie in l'instrumentu cum'è deformazioni, rotture, perdite di sustanzi, assenza di visualizazione nantu à u screnu, etc.
- Prestate una attenzione particulare quandu si misurà u voltaghè più altu di 20V, postu chì esiste un risicu di scossa elettrica.
In stu manuale, è nant'à u strumentu, i seguenti simboli sò usati:
![]() Attenzione: osserva l'istruzzioni datu in stu manuale; un usu impropriu puderia dannà l'instrumentu o i so cumpunenti.
Attenzione: osserva l'istruzzioni datu in stu manuale; un usu impropriu puderia dannà l'instrumentu o i so cumpunenti.
![]() Misuratore à doppia isolazione
Misuratore à doppia isolazione
![]() AC voltage o attuale
AC voltage o attuale
![]() DC voltage o attuale
DC voltage o attuale
![]() Cunnessione à a terra
Cunnessione à a terra
1.1. ISTRUZIONI PRELIMINARI
- Stu strumentu hè statu cuncepitu per l'usu in ambienti di gradu di contaminazione 2.
- Pò esse usatu per VOLTAGMisure E e CORRENTE su installazioni con CAT IV 600V e CAT III 1000V.
- Ricumandemu di seguità e regule di sicurezza normali cuncepite da e prucedure per a realizazione di l'operazioni nantu à i sistemi in tensione è l'utilizazione di i PPE prescritti per prutege l'utilizatori contr'à i currenti periculosi è l'instrumentu da l'usu sbagliatu.
- In casu a mancanza di indicazione di a prisenza di voltagE pò rapprisintà un periculu per l'operatore, sempre eseguite una misurazione di cuntinuità prima di realizà a misurazione nantu à u sistema live, per cunfirmà a cunnessione curretta è a cundizione di i cavi.
- Solu i fili forniti cù l'instrumentu garantinu u rispettu di e norme di sicurezza. Deve esse in boni cundizioni è esse rimpiazzati cù mudelli idèntici, quandu hè necessariu.
- Ùn pruvà micca i circuiti chì superanu u voltage limiti.
- Ùn eseguite micca prova in cundizioni ambientali chì superanu i limiti indicati in § 6.2.1.
- Verificate chì a bateria hè inserita currettamente.
- Assicuratevi chì u display LCD è l'interruttore rotativu indicanu a stessa funzione.
1.2. DURANTE L'USU
Leghjite attentamente i seguenti cunsiglii è istruzzioni:
![]() ATTENZIONE
ATTENZIONE
A mancata osservanza di e note di prudenza è / o di istruzzioni pò dannà l'instrumentu è / o i so cumpunenti o esse una fonte di periculu per l'operatore.
- Prima di attivà l'interruttore rotativu, scollegate i fili di prova da u circuitu misuratu.
- Quandu l'instrumentu hè cunnessu à u circuitu misuratu, ùn tocca micca alcun terminal inutilizatu.
- Ùn misurate a resistenza in casu di vuluntà esternatages sò prisenti; ancu s'è u strumentu hè prutetta, un vol eccessivutage pò causà malfunzionamenti.
- Durante a misurazione, se u valore o u segnu di a quantità misurata resta invariatu, verificate se a funzione HOLD hè attivata.
1.3. DOPU L'USU
- When measurement is complete, set the rotary switch to OFF to switch off the instrument.
- Se u strumentu ùn deve esse usatu per un bellu pezzu, sguassate e batterie.
1.4. DEFINIZIONE DI MISURA (OVERVOLTAGE) CATEGORIA
Standard "IEC/EN61010-1: Requisiti di sicurezza per l'equipaggiu elettricu per a misurazione, u cuntrollu è l'usu di laboratoriu, Parte 1: Requisiti generali", definisce quale categuria di misurazione, comunmente chjamata overvol.tage category, is. § 6.7.4: Measured circuits, reads: (OMISSIS)
I circuiti sò divisi in e seguenti categurie di misurazione:
- Categoria di misura IV hè per e misurazioni realizate à a fonte di u lowvoltaga stallazione. Esamples sò metri di elettricità è misurazioni nantu à i dispusitivi di prutezzione di sovracorrente primaria è unità di cuntrollu di ripple.
- Categoria di misura III hè per misurazioni eseguite nantu à installazioni in edifici. EsampI sò misurazioni nantu à schede di distribuzione, interruttori di circuiti, cablaggi, cumpresi cavi, sbarre, scatuli di giunzione, interruttori, prese in l'installazione fissa, è attrezzature per l'usu industriale è qualchì altru equipamentu, per ex.ample, mutori stazionari cù cunnessione permanente à a stallazione fissa.
- Categoria di misura II hè per e misurazioni realizate nantu à i circuiti direttamente cunnessi à u low-voltaga stallazione. Esampi sò misurazioni nantu à l'apparecchi domestici, l'arnesi portatili è l'apparecchi simili.
- Categoria di misura I hè per misure realizate nantu à i circuiti micca direttamente cunnessi à RETE. Esamples sò misurazioni nantu à i circuiti micca derivati da RETE, è i circuiti derivati di RETE (interni) prutetti in particulare. In l'ultimu casu, l'estressi transitori sò variabili; per quessa, u standard richiede chì a capacità di resistenza transitoria di l'equipaggiu hè cunnisciuta à l'utilizatori.
DESSCRIPTION GENERAL
L'instrumentu esegue e seguenti misure:
- DC/AC/AC+DC TRMS Voltage
- DC/AC voltage à bassa impedenza (LoZ)
- DC/AC/AC+DC TRMS Current
- DC/AC/AC+DC TRMS Current with transducer clamps
- AC, AC+DC TRMS current
- Display 4-20mA%.
- Test di resistenza è continuità
- Test di diodu
- Capacità
- Frequency
- Duty Cycle
- Temperature cun sonda di tipu K
- Data Logger function and display of graphs of measured data
Ciascuna di sti funzioni pò esse sceltu per mezu di l'interruttore adattatu. L'instrumentu hè ancu equipatu di tasti di funzione (vede § 4.2), bargraph analogicu è display LCD TFT di culore di altu cuntrastu. L'instrumentu hè ancu equipatu di una funzione Auto Power OFF chì spegne automaticamente l'instrumentu dopu un certu tempu di inattività (programmable).
2.1. MISURARE VALORI MEDIA E VALORI TRMS
Strumenti di misurazione di quantità alternate sò spartuti in dui grandi famiglie:
- Metri di VALORE MEDIA : strumenti chì misuranu u valore di a sola onda à a freccia fundamentale (50 o 60 Hz).
- TRMS (True Root Mean Square) VALORE metri: strumenti chì misuranu u valore TRMS di a quantità in prova.
Cù una onda perfettamente sinusoidale, e duie famiglie di strumenti furniscenu risultati identici.
Cù onde distorte, invece, e letture saranu diverse. I metri di valore mediu furnisce u valore RMS di l'unica onda fundamentale; I metri TRSM, invece, furniscenu u valore RMS di l'onda sana, cumprese l'armoniche (in a larghezza di banda di l'instrumenti). Dunque, misurando a stessa quantità cù strumenti di e duie famiglie, i valori ottenuti sò idèntici solu s'è l'onda hè perfettamenti sinusoidale. In casu di distorsioni, i misuratori TRMS furniscenu valori più altu ch'è i valori letti da i metri di valore mediu.
2.2. DEFINIZIONE DI TRUE ROOT MEAN SQUARE VALUE E FACTOR CREST
U valore quadratu mediu di u currente hè definitu cusì: "In un tempu uguale à un periodu, una corrente alternata cù un valore quadratu mediu di intensità 1A, chì circula nantu à una resistenza, dissipa a listessa energia chì, in u stessu tempu, seria dissipata da una corrente diretta cù una intensità di 1A ". Questa definizione si traduce in l'espressione numerica:
![]() U valore quadratu mediu radicale hè indicatu cù l'acronimu RMS.
U valore quadratu mediu radicale hè indicatu cù l'acronimu RMS.
U Factor Crest hè definitu cum'è a relazione trà u Valore Peak di un signalu è u so
Valore RMS: CF![]() Stu valore cambia cù a forma d'onda di u segnu, per un'onda puramente sinusoidale hè
Stu valore cambia cù a forma d'onda di u segnu, per un'onda puramente sinusoidale hè ![]() In casu di distorsione, u Fattore di Cresta assume valori più alti mentre a distorsione d'onda aumenta.
In casu di distorsione, u Fattore di Cresta assume valori più alti mentre a distorsione d'onda aumenta.
PREPARAZIONE PER USU
3.1. VERIFICHE INIZIALI
Prima di u trasportu, l'instrumentu hè statu verificatu da un puntu elettricu è miccanicu view. Tutte e precauzioni pussibuli sò state pigliate per chì l'instrumentu hè furnitu intatta. Tuttavia, ricumandemu in generale di cuntrollà l'instrumentu per detectà eventuali danni subiti durante u trasportu. In casu chì si trovanu anomalie, cuntattate immediatamente l'agente di spedizione. Hè ricumandemu ancu di verificà chì l'imballu cuntene tutti i cumpunenti indicati in § 6.3.1. In casu di discrepanza, cuntattate u Dealer. In casu chì l'instrumentu deve esse restituitu, seguite l'istruzzioni dette in § 7.
3.2. SUMINISTRATORE DI POWER INSTRUMENT
The instrument is powered by 1×7.4V rechargeable Li-ION battery included in the package. When the battery is flat, the symbol “![]() ” appears on the display. For battery recharge, please refer to § 6.1.
” appears on the display. For battery recharge, please refer to § 6.1.
3.3. STOCKAGE
Per assicurà a misurazione precisa, dopu un longu tempu di almacenamentu, aspittà chì l'instrumentu torni à a cundizione normale (vede § 7.1.3).
NOMENCLATURA
4.1. DESSCRIZIONE DI L'STRUMENTU

CAPTION:
- Display LCD
- Tastu di funzione F2
- Tastu di funzione F3
- Tastu di funzione F1
- Tastu di funzione F4
- chjave RANGE
- HOLD/REL key
- Selettore rotativu
- Terminale d'ingressu 10A
- Terminal di ingressu

- Input terminal mAuA
- Input terminal COM
4.2. DESCRIZIONE DI TASTI DI FUNZIONE
4.2.1. HOLD/REL key
Pressing the HOLD/REL key freezes the value of the measured quantity on the display. After pressing this key, the message “Hold” appears on the display. Press the HOLD/REL key again to exit the function. To save the vale on the display, see § 4.3.3. Press and hold the HOLD/REL key for a long time in order to activate/deactivate relative measurement. The instrument zeroes the display and saves the displayed value as a reference value which subsequent measurements will be referred to (see § 4.3.4). The symbol “A” appears on the display. This function is not active in position![]() . Press and hold the HOLD/REL key again to exit the function.
. Press and hold the HOLD/REL key again to exit the function.
4.2.2. chjave RANGE
Press the RANGE key to activate the manual mode and to disable the Autorange function. The message “Manual” appears on the upper left part of the display instead of “AUTO”. In manual mode, press the RANGE key to change measuring range: the relevant decimal point will change its position. The RANGE key is not active in positions![]() Hz%,
Hz%, ![]() . In Autorange mode, the instrument selects the most appropriate ratio for carrying out measurement. If a reading is higher than the maximum measurable value, the indication “O.L” appears on the display. Press and hold the RANGE key for more than 1 second to exit the manual mode and restore the Autorange mode.
. In Autorange mode, the instrument selects the most appropriate ratio for carrying out measurement. If a reading is higher than the maximum measurable value, the indication “O.L” appears on the display. Press and hold the RANGE key for more than 1 second to exit the manual mode and restore the Autorange mode.
4.2.3. Function keys F1, F2, F3, F4
Use keys F1, F2, F3 and F4 to manage the instrument’s internal functions (see § 4.3).
4.2.4. funzione LoZ
Stu modu permette di fà u AC/DC voltagE misurazione cù una bassa impedenza di input in modu per evità e letture sbagliate per via di u voltage in accoppiatu capacitivu.
![]() ATTENZIONE
ATTENZIONE
Inserendu l'instrumentu trà i cunduttori di fase è di terra, i dispositi di prutezzione RCD ponu esse sbattuti durante a prova. Per phase-PE voltage measurement after a RCD device preliminarily connect the test leads between phase and neutral cables at least for 5s, then perform the phase-PE measurement to avoid unexpected trips-out
4.2.5. LEAD message at display
From instrument switch off (OFF), in the ![]() positions a short sound is emitted and a “LEAD” message is shown for a while to indicate an advise of using test leads for the current measurements.
positions a short sound is emitted and a “LEAD” message is shown for a while to indicate an advise of using test leads for the current measurements.
4.3. DESCRIPTION OF INTERNAL FUNCTIONS
4.3.1. Description of the display
 CAPTION:
- Indicazione di u modu automaticu / manuale
- Indicazione di u tempu di u sistema
- Indication of battery charge level and activation/deactivation of key tone (not associated with continuity test)
- Indicazione di unità di misura
- Indicazione di u risultatu di a misura
- Bargraph analogicu
- Indications associated with function keys F1, F2, F3, F4
4.3.2. AC+DC Voltage misurazione attuale
L'instrumentu hè capaci di misurà una pussibuli prisenza di cumpunenti alternanti sovrapposti nantu à un vol genericutage o forma d'onda diretta corrente. Questu pò esse utile per a misurazione di segnali impulsivi tipici di carichi non lineari (per esempiu, saldatrici, forni elettrici, etc.).
- Selezziunà a pusizione
 .
. - Press the F2 key selecting the “
 " " o " ” modes (see Fig. 3)
 - Follow the instructions shown in § 5.1 or § 5.9
 4.3.3. HOLD function and saving

- Press the HOLD/REL key again to freeze the result. The message “Hold” appears onthe display.
- Press the F3 key to save the data in the instrument’s memory.
- Enter the General menu to display the saved result (see § 4.3.7)
4.3.4. Misurazione relativa

- Press and hold the HOLD/REL key to enter relative measurement (see Fig. 5 – right side). The message “REL” and symbol “
 " apparisce nantu à u display.
 - Press the F4 key to enter the General menu, save the measured result and display it (see § 4.3.7).
4.3.5. Saving MIN/MAX/AVERAGE and PEAK values 
- Press the F4 key to enter the measuring mode of MAX, MIN and Average values of the quantity to be measured (see Fig. 6 – central part). The message “MAX MIN” appears on the display.
- The values are automatically updated by the instrument, which emits a short beep whenever the actually displayed values are exceeded (higher for MAX value, lower for MIN value).
- Press the F2 key to stop detecting the values and the F1 key to start measuring again.
- Press the F3 key to save the measured result (see Fig. 6 – right side) and display it (see § 4.3.7).

- Press the F4 key to enter the measuring mode of Peak values of the quantity to be measured (see Fig. 7 – right side). The message “PEAK” appears on the display and the values are updated in the same way as for the MAX/MIN function.
- Press the F2 key to stop detecting the values and the F1 key to start measuring again.
- Press the F3 key to save the result and display it (see § 4.3.7).
4.3.6. Creating and saving graphs of measurements

- Press the F1 key to enter the section for creating a graph of the quantity to be measured (see Fig. 8 – left side).
- Press the F2 (Fast) or F3 (Slow) key to set the sampling interval the instrument will use as a reference when creating the graph. You can choose among the following values: 0.2s, 0.5s, 1.0s, 2.0s, 5.0s, 10s
- Press the F1 key to start creating the graph. The measuring range (automatically inserted by the instrument) and the real-time value are displayed by the instrument (see Fig. 8 – central part).
- Press the F4 key to end the graph.
- Press the F1 key to save the graph in the instrument’s memory or the F4 key to start a new graph (see Fig. 8 – right side).
4.3.7. Instrument general menu
- With a measurement on the display (see Fig. 9 – left side), press function key F3 to enter the instrument’s general menu. The screen (see Fig. 9 – right side) is shown on the display.
 Salvà e misure
 - Press the F1 (ENTER) key to save the measurement.
Recording data (Logger) - Use the F2 or F3 key to select symbol “Record” and press the F1 key (see Fig. 10 – left side).

- Use the F2 or F3 key to select:
➢ Setting of recording duration, from 1min to 23h:59min
➢ Setting of sampling interval from 1s to 59min:59s - Press the F1 key to enable the editing functions and the F2 (+) and F3 (>>) keys to carry out the desired settings.
- Press the F1 (OK) key to confirm the settings or the F4 (CANCEL) key to go back to editing (see Fig. 10 – right side).
- Press the key F4 (CLOSE) to go back to the main screen
- Select the option “Start Recording” and press the F1 key. The following screen appears on the display

- The instrument shows the remaining time and the number of samples taken in real time, and the message “Stopped” at the end of recording (see Fig. 11 – left side). Press the F4 (STOP) key to stop recording at any time.
- Press the F2 key to save recorded data in the internal memory and view it again on the display
- Press the F3 (TREND) key to display the trend of recording (see Fig. 11 – central part).
- Press the F4 (>>) key to move the cursor on the graph and the F2 (+) key to activate the Zoom function of the graph, increasing resolution (symbol “Xy” where y=max zoom dimension appears at the top of the display on the right side) (see Fig. 11 – right side). You can zoom X1 for at least 15 measuring points, X2 for at least 30 measuring points, X3 for at least 60 measuring points and so on for maximum 6 zooming operations.
- Press the F4 (BACK) key to go back to the previous screen. Deleting the instrument’s memory
- Use the F2 or F3 key to select symbol “Delete” and press the F1 key (see Fig. 12 – left side).
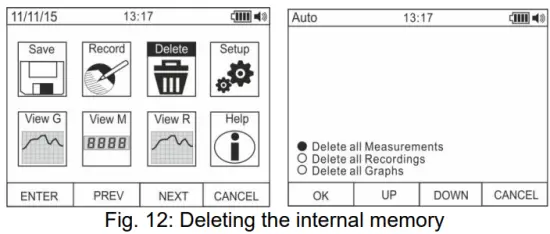
- Use the F2 or F3 key to select the options:
➢ Delete all Measurements → all snapshots (measurements) are deleted
➢ Delete all Recordings → all recordings are deleted
➢ Delete all Graphs → all graphs are deleted. - Press the F1 (OK) key to carry out the selected operation (a confirmation message is shown by the instrument). General settings of the instrument
- Use the F2 or F3 key to select symbol “Setup” and press the F1 key (see Fig. 13 – left side).

- Use the F2 or F3 key to select the options:
➢ Reset → restores the instrument’s default conditions.
➢ Format → allows activating the key tone, setting the format of date/time and of the displayed numbers (decimal comma or point).
➢ General → allows setting the system’s date/time, defining the Auto Power OFF interval, the background colour and the display’s font colour and type, and choosing the system’s language.
➢ Meter Info → provides information on the internal Firmware version and on the memory’s available space. - Press the F1 (ENTER) key to carry out the selected operation or the F4 (CANCEL) key to go back to the measuring screen. General settings of the instrument – Reset

- Press the F1 (OK) key to activate the Reset.
- The Reset operation do not deletes the instrument’s internal memory
General settings of the instrument – Format
- Use the F2 or F3 key to select the options:➢ Key tone → allows activating/deactivating the tone of the function keys.
➢ Numeric Format → allows defining the format of the numbers shown on the display among the options: 0.000 (decimal point) and 0,000 (comma)
➢ Date Format → allows defining the format of the system date between the options: MM/DD/YY and DD/MM/YY
➢ Time Format → allows defining the format of the system time between the options: - OURS and 24 HOURS
- Use the F1 (EDIT) key and the F2 and F3 keys for settings or the F4 key to go back to the previous screen. General settings of the instrument – Display

- Use the F2 or F3 key to select the options:
➢ Set Date → allows setting the system’s date as defined in the Format menu.
➢ Set Time → allows setting the system’s time as defined in the Format menu.
➢ Auto Power OFF → allows defining the instrument’s auto power off interval when idling in the range: 5min 60min with resolution 1min. Set value 00 to disable the function. Press the F3 key to switch on the instrument again after it has automatically switched off.
➢ Foreground → allows defining the display’s background colour and the colour of the font.
➢ Select Font → allows defining the type of font or the display among the available options (0, 1, 2).
➢ Language → allows selecting the system’s language among the options: Italian, English, Spanish, German and French
General settings of the instrument – Instrument Info
- The instrument shows the following information:
➢ Firmware version → internal Firmware version
➢ Free memory → percentage values of the remaining free space in the memory for saving snapshots (SAVE), recordings (REC) and graphs (GRAPH). - Press the F4 key to go back to the previous screen Recalling graphs to the display

- Use the F2 or F3 key to select symbol “View G” and press the F1 key (see Fig. 18 – left side).
- Use the F2 (PREV) or F3 (NEXT) keys to select the desired graph among the ones saved in the instrument’s memory and press key F1 (ENTER) to open the graph (see Fig. 18 – central part).
- Use the F2 (<<) or F3 (>>) keys to move the cursor within the graph in the two directions, observing the corresponding value at the bottom of the display (see Fig. 18 – right side).
- Press the F1 (DELETE) key to delete the selected graph or the F4 (BACK) key to go back to the previous screen. Recalling measured data (snapshots) on the display

- Use the F2 or F3 key to select symbol “View M” and press the F1 key (see Fig. 19 – left side).
- Use the F2 (PREV) or F3 (NEXT) key to select and view the desired measure among the ones saved in the instrument’s memory (see Fig. 19 – right side). The measure reference appears at the bottom of the display on the right side.
- Press the F1 (DELETE) key to delete the selected measure or the F4 (CLOSE) key to go back to main screen Recalling recordings to the display

- Use the F2 or F3 key to select symbol “View R” and press the F1 key (see Fig. 20 – left side).
- Use the F2 (PREV) or F3 (NEXT) key to select the desired recording among the ones saved in the instrument’s memory (see Fig. 20 – central part). The recording reference appears at the bottom of the display.
- Press the F1 (TREND) key to display the trend of recording.
- Press the F3 (>>) key to move the cursor on the graph and observe the corresponding value at the bottom of the display.
- Press the F2 (+) key to activate (if available) the zooming function of the graph.
- Press the F1 (DELETE) key to delete the selected recording or the F4 (BACK) key to go back to the previous screen.
Help on line on the display
- Use the F2 or F3 key to select symbol “Help” and press the F1 key (see Fig. 21).
- Use the F2 (UP) or F3 (DOWN) to browse the pages of the context on-line help.
- Press the F4 (CLOSE) key to go back to the main screen
ISTRUZIONI OPERATIVA
5.1. CC, CA + CC VOLTAGE MISURA
![]() ATTENZIONE
ATTENZIONE
L'input massimu DC voltage hè 1000V. Ùn misurate u voltagsupera i limiti indicati in questo manuale. Superendu u voltagI limiti ponu causà scosse elettriche à l'utilizatori è danni à l'instrumentu.

- Sceglie i posti V Hz% or mV
- Inserite u cable rossu in u terminal di input è u cable neru in u terminal di input COM.
- Posizionate u piombu rossu è u piottu neru rispettivamente in i spots cù u putenziale pusitivu è negativu di u circuitu per esse misuratu (vede Fig. 22). L'afficheur indique la valeur de voltage.
- Se u display mostra u missaghju "OL", selezziunate un intervallu più altu.
- Quandu u simbulu "-" appare nantu à u display di l'instrumentu, significa chì u voltage hà a direzzione cuntraria riguardu à a cunnessione in Fig. 22.
- To use the HOLD, RANGE and REL function, see § 4.2.
- For AC+DC measurement, see § 4.3.2 and to use the internal functions, see § 4.3.
5.2. AC VOLTAGE MISURA
![]() ATTENZIONE
ATTENZIONE
L'input massimu AC voltage hè 1000V. Ùn misurate u voltagsupera i limiti indicati in questo manuale. Superendu u voltagI limiti ponu causà scosse elettriche à l'utilizatori è danni à l'instrumentu.

- Sceglie i posti V Hz% or mV
- In position mV, press the F2 (MODE) key to view symbol “~” on the display.
- Inserite u cable rossu in u terminal di input
 è u cable neru in u terminal di input COM.
 - Pone u piombo rossu è u piottu neru rispettivamente in i spots di u circuitu per esse misuratu (vede Fig. 23). L'afficheur indique la valeur de voltage.
- Se u display mostra u missaghju "OL", selezziunate un intervallu più altu.
- Press the F2 (MODE) key to select measurements “Hz” or “%” in order to display the values of frequency and duty cycle of input voltage. Press the F1(TRIG) key to select the positive or negative half-wave of the function “%”The bargraph is not active in these functions.
- To use the HOLD, RANGE and REL function, see § 4.2.
- To use the internal functions, see § 4.3
5.3. AC/DC VOLTAGMISURA E CU BASSA IMPEDENZA (LOZ)
![]() ATTENZIONE
ATTENZIONE
L'input massimu AC/DC voltage hè 600V. Ùn misurate u voltagsupera i limiti indicati in questo manuale. Superendu u voltagI limiti ponu causà scosse elettriche à l'utilizatori è danni à l'instrumentu.

- Sceglite a pusizione LoZV
 . The “LoZ” and “DC” symbols are shown
 - Press the MODE (F2) key to select possibly the “AC” measurement
- Inserite u cable rossu in u terminal di input è u cable neru in u terminal di input COM
- Posizionate u piombu rossu è u piottu nìvuru rispettivamente in i lochi desiderati di u circuitu per esse misuratu (vede Fig. 24) o in i spots cù u putenziale pusitivu è negativu di u circuitu per esse misuratu (vede Fig. 22). L'afficheur indique la valeur de voltage.
- U missaghju "OL" indica chì u valore di DC voltage supera u valore massimu misurabile.
- Quandu u simbulu "-" appare nantu à u display di l'instrumentu, significa chì u voltage hà a direzzione cuntraria riguardu à a cunnessione in Fig. 22
- To use the HOLD, RANGE and REL function, see § 4.2
- To use the internal functions, see § 4.3
5.4. MISURA DI FREQUENZA E DUTY CYCLE
![]() ATTENZIONE
ATTENZIONE
L'input massimu AC voltage hè 1000V. Ùn misurate u voltagsupera i limiti indicati in questo manuale. Superendu u voltagI limiti ponu causà scosse elettriche à l'utilizatori è danni à l'instrumentu.

1. Selezziunà a pusizione Hz%.
2. Press the F2 (MODE) key to select measurements “Hz” or “%” in order to display the values of frequency and duty cycle of input voltage.
3. Insert the red cable into input terminal![]() è u cable neru in u terminal di input COM.
è u cable neru in u terminal di input COM.
4. Position the red lead and the black lead respectively in the spots of the circuit to be measured (see Fig. 25). The value of frequency (Hz) or of duty cycle (%) is shown on the display. The bargraph is not active in these functions.
5. To use the HOLD and REL function, see § 4.2.
6. Per aduprà e funzioni internu, vede § 4.3
5.5. MISURA DI RESISTENZA E TEST DI CONTINUITÀ
![]() ATTENZIONE
ATTENZIONE
Prima di pruvà ogni misurazione di resistenza, tagliate l'alimentazione da u circuitu per esse misurata è assicuratevi chì tutti i condensatori sò scaricati, se prisenti.

- Selezziunà a pusizione

- Inserite u cable rossu in u terminal di input è u cable neru in u terminal di input COM.
- Posizionate i teste di teste in i punti desiderati di u circuitu per esse misuratu (vede Fig. 26). A visualizazione mostra u valore di a resistenza.
- Se u display mostra u missaghju "OL", selezziunate un intervallu più altu.
- Press the F2 (MODO) key to select measurement )))” relevant to the continuity test, and position the test leads in the desired spots of the circuit to be measured.
- The value of resistance (which is only indicative) is displayed in 2 and the instrument sounds if the value of resistance is <50Ω
- To use the HOLD, RANGE and REL function, see § 4.2.
- To use the internal functions, see § 4.3.
5.6. TEST DIODE
![]() ATTENZIONE
ATTENZIONE
Prima di pruvà ogni misurazione di resistenza, tagliate l'alimentazione da u circuitu per esse misurata è assicuratevi chì tutti i condensatori sò scaricati, se prisenti.

- Selezziunà a pusizione
- Press the F2 (MODE) key to select “+” measurement.
- Inserite u cable rossu in u terminal di input è u cable neru in u terminal di input COM.
- Posizionate i fili à l'estremità di u diodu da pruvà (vede Fig. 27), rispettendu a polarità indicata. U valore di u sogliu polarizatu direttamente voltage s'affiche à l'écran.
- If threshold value is equal to OmV, the P-N junction of the diode is short-circuited.
- Se u display mostra u missaghju "OL", i terminali di u diodu sò invertiti in quantu à l'indicazione data in Fig. 27 o a junction PN di u diodu hè dannata.
- To use the HOLD and REL function, see § 4.2.
- To use the internal functions, see § 4.3.
5.7. MISURA DI CAPACITÀ
![]() ATTENZIONE
ATTENZIONE
Prima di fà e misurazioni di capacità in circuiti o condensatori, tagliate l'alimentazione da u circuitu chì hè pruvatu è lasciate scaricate tutte e capacità in questu. Quandu cunnette u multimetru è a capacità per esse misurata, rispettu a polarità curretta (quandu hè necessariu).

- Selezziunà a pusizione
- Press the F2 (MODE) key until the symbol “nF” is displayed.
- Inserite u cable rossu in u terminal di input è u cable neru in u terminal di input COM.
- Press the REL/A key before carrying out measurements.
- Position the leads at the ends of the capacitor to be tested, respecting, if necessary, the positive (red cable) and negative (black cable) polarity (see Fig. 28). The display shows the value. Depending on the capacitance, the instrument can take about 20s before displaying the correct final value. The bargraph is not active in this function.
- U missaghju "OL" indica chì u valore di a capacità supera u valore massimu misurabile.
- To use the HOLD and REL function, see § 4.2.
- To use the internal functions, see § 4.3.
5.8. MISURA DI TEMPERATURA CON SONDA K-TYPE
![]() ATTENZIONE
ATTENZIONE
Prima di pruvà ogni misurazione di a temperatura, tagliate l'alimentazione da u circuitu per esse misurata è assicuratevi chì tutti i condensatori sò scaricati, se prisenti.

- Selezziunà a pusizione

- Press the F2 (MODE) key until the symbol “°C” or “F” is displayed.
- Inserite l'adattatore furnitu in i terminali di input (polarità +) è COM (polarità -) (vede Fig. 29)
- Connect the provided K-type wire probe or the optional K-type thermocouple (see § 7.2.2) to the instrument by means of the adapter, respecting the positive and negative polarity on it. The display shows the value of temperature. The bargraph is not active in this function.
- U missaghju "OL" indica chì u valore di a temperatura supera u valore massimu misurabile.
- To use the HOLD and REL function, see § 4.2.
- To use the internal functions, see § 4.3.
5.9. DC, AC+DC CURRENT MEASUREMENT AND E 4-20MA% READING
![]() ATTENZIONE
ATTENZIONE
Maximum input DC current is 10A (input 10A) or 600mA (input mAuA). Do not measure currents exceeding the limits given in this manual. Exceeding voltagI limiti ponu causà scosse elettriche à l'utilizatori è danni à l'instrumentu.

- Cut off power supply from the circuit to be measured.
- Select position µA, mA or 10A 20mA for 4-20mA
 reading. to measure DC current or the same position 4-
 - Insert the red cable into input terminal 10A or into input terminal mAµA and the black cable into input terminal COM.
- Cunnette u filu rossu è u filu neru in serie à u circuitu chì u currente vulete misurà, rispettendu a polarità è a direzzione attuale (vede Fig. 30).
- Fornite u circuitu per esse misuratu.
- U valore di u currente DC (vede Fig. 30 - left side) appare nantu à u display.
- The value of reading 4-20mA% (0mA = -25%, 4mA = 0%, 20mA = 100% and 24mA = 125%) (see Fig. 30 right side) appears on the display. The bargraph is not active in this function.
- Se u display mostra u missaghju "OL", u valore massimu misurabile hè statu righjuntu.
- Quandu u simbulu "-" appare nantu à u display di l'instrumentu, significa chì u currente hà a direzzione opposta rispetto à a cunnessione in Fig. 30.
- To use the HOLD, RANGE and REL functions, see § 4.2.
- For AC+DC measurement, see § 4.3.2 and to use the internal functions, see § 4.3
5.10. MISURA DI CORRENTE AC
![]() ATTENZIONE
ATTENZIONE
Maximum input AC current is 10A (input 10A) or 600mA (input mAuA). Do not measure currents exceeding the limits given in this manual. Exceeding voltagI limiti ponu causà scosse elettriche à l'utilizatori è danni à l'instrumentu.

- Cut off power supply from the circuit to be measured.
- Select positions μΑ, mA or 10A
- Press the F2 (MODE) key to select “AC” measurement.
- Insert the red cable into input terminal 10A or into input terminal mAµA and the black cable into input terminal COM.
- Connect the red lead and the black lead in series to the circuit whose current you want to measure (see Fig. 31).
- Fornite u circuitu per esse misuratu. U display mostra u valore di u currente.
- Se u display mostra u missaghju "OL", u valore massimu misurabile hè statu righjuntu.
- To use the HOLD, RANGE and REL functions, see § 4.2.
- To use the internal functions, see § 4.3
5.11. DC, AC, AC+DC CURRENT MEASUREMENT WITH TRANSDUCER CLAMPS
![]() ATTENZIONE
ATTENZIONE
- A misura massima di corrente in questa funzione hè 3000A AC o 1000A DC. Ùn misurate i currenti chì superanu i limiti indicati in stu manuale
- L'instrumentu esegue a misura utilizendu i dui trasduttori flessibili clamp (accessorio opzionale F3000U) e altri standard clamp trasduttori di a famiglia HT. Per trasduttore clamps with HT output connector is necessary the NOCANBA optional adapter in order to perform the connection

- Selezziunà a pusizione

- Press F2(MODE) key to select “AC”, “DC” or “AC+DC” measurement
- Appughjà u tastu RANGE per selezziunà nantu à l'instrumentu a listessa gamma impostata nantu à u trasduttore clamp among the options: 1000mA, 10A, 30A, 40A (only for HT4006) 100A, 300A, 400A (only for HT4006), 1000A, 3000A. The selected range appear in the top left part of the display
- Inserite u cable rossu in u terminal di input and the black cable into input terminal COM. For other standard transducers (see §) with HT connector use the NOCANBA optional accessory. For information about the use of transducer clamps riferite à u manuale d'usu relative
- Inserite u cable in a mandibula (vede Fig. 32). U valore di u currente appare nantu à u display
- Se u display mostra u missaghju "OL", u valore massimu misurabile hè statu righjuntu
- Per utilizà e funzioni HOLD, RANGE è REL, vede § 4.2
- To use the internal functions, see § 4.3
MANTENU
![]() ATTENZIONE
ATTENZIONE
- Solu tecnichi esperti è furmati duveranu fà operazioni di mantenimentu. Prima di fà operazioni di mantenimentu, scollegate tutti i cavi da i terminali di input.
- Ùn aduprate micca l'instrumentu in ambienti cun elevati livelli di umidità o alte temperature. Ùn espone micca à u sole direttu.
- Spegne sempre l'instrumentu dopu l'usu. In casu chì l'instrumentu ùn deve esse usatu per un longu tempu, sguassate a bateria per evità perdite di liquidu chì puderanu dannà i circuiti interni di l'instrumentu.
6.1. RECHARGING THE INTERNAL BATTERY
Quandu l'LCD mostra u simbulu " ![]() ”, it is necessary to recharge the internal battery.
”, it is necessary to recharge the internal battery.

- Posizionate l'interruttore rotativu in OFF è sguassate i cavi da i terminali di input.
- Insert the adaptor of the battery charger power supply into the instrument, into the four input terminals (see Fig. 33).
- Insert the connector of the power supply into the adapter and connect the power supply to the electric mains.
- A blinking symbol of a green battery appears on the display. The recharging process is complete when the symbol is steady.
- Disconnect the battery charger from the instrument when the operation is complete.
 ATTENZIONE
If the charging process does not run, check the integrity of the F800mA/1000V protection fuse (see § 7.1.2) and replace it if necessary (see § 6.2)
6.2. SOSTITUZIONE DI I FUSIBILI INTERNI

- Posizionate l'interruttore rotativu in OFF è sguassate i cavi da i terminali di input.
- Turn the fastening screw of the battery compartment cover from position
 and remove it (see Fig. 34)
 a pusizioni
 - Sguassate u fuse dannatu è inserisci un novu fuse di u listessu tipu (vede § 7.1.2).
- Restore the battery compartment cover into place and turn the fastening screw from position a pusizioni .
6.3. PULIZIA L'STRUMENTU
Aduprate un pannu suave è seccu per pulizziari l'instrumentu. Ùn aduprate mai panni umidi, solventi, acqua, etc.
6.4. FINI DI VITA
![]() ATTENZIONE: Le symbole sur l'instrument indique que l'appareil et ses accessoires doivent être collectés séparément et éliminés correctement.
ATTENZIONE: Le symbole sur l'instrument indique que l'appareil et ses accessoires doivent être collectés séparément et éliminés correctement.
SPECIFICAZIONI TECNICHE
7.1. CARATTERISTICHE TECNICHE
Accuracy calculated as [%reading + (num. digits*resolution)] at 18°C 28°C <75%HR
DC Voltage
| Gamma | Risoluzione | Accuratezza | Impedenza di input | Prutezzione contra overcharge |
| 600.0mV | 0.1mV | ± (0.1% lettura + 5 cifre) | > 10 MW | 1000 VDC/ACrms |
| 6.000V | 0.001V | |||
| 60.00V | 0.01V | |||
| 600.0V | 0.1V | ± (0.2% lettura + 5 cifre) | ||
| 1000V | 1V |
AC TRMS Voltage
| Gamma | Risoluzione | precisione (*) | Prutezzione contra overcharge | |
| (50Hz¸60Hz) | (61Hz¸1kHz) | |||
| 600.0mV | 0.1mV | ± (0.9% lettura + 5 cifre) | ±(3.0% lettura + 5dgt) | 1000 VDC/ACrms |
| 6.000V | 0.001V | |||
| 60.00V | 0.01V | |||
| 600.0V | 0.1V | |||
| 1000V | 1V | |||
(*) Accuracy specified from 10% to 100% of the measuring range, Input impedance: > 9M ;
Accuracy PEAK function: ±(10%rdg + 30dgt), PEAK response time: 1ms
For not sinusoidal waveforms the accuracy is: (10.0%reading + 10dgt)
AC + DC TRMS Voltage
| Gamma | Risoluzione | Accuracy (*) (50Hz¸1kHz) | Impedenza di input | Prutezzione contra overcharge |
| 6.000V | 0.001V | ±(3.0% lettura + 20dgt) | > 10 MW | 1000 VDC/ACrms |
| 60.00V | 0.01V | |||
| 600.0V | 0.1V | |||
| 1000V | 1V |
(*) Précision spécifiée de 10% à 100% de la gamme de mesure
For not sinusoidal waveforms the accuracy is: (10.0%reading + 10dgt)
DC/AC TRMS Voltage à bassa impedenza (LoZ)
| Gamma | Risoluzione | Accuracy (*) (50Hz¸1kHz) | Impedenza di input | Prutezzione contra overcharge |
| 6.000V | 0.001V | ±(3.0% lettura + 40dgt) | circa 3 kW | 600 VDC/ACrms |
| 60.00V | 0.01V | |||
| 600.0V | 0.1V | |||
| 600V | 1V |
(*) Précision spécifiée de 10% à 100% de la gamme de mesure
For not sinusoidal waveforms the accuracy is: (10.0%reading + 10dgt)
Corrente DC
| Gamma | Risoluzione | Accuratezza | Prutezzione contru overcharge |
| 600.0 mA | 0.1 mA | ± (0.9% lettura + 5 cifre) | Fusibile rapidu 800mA/1000V |
| 6000 mA | 1 mA | ||
| 60.00 mA | 0.01 mA | ||
| 600.0 mA | 0.1 mA | ± (0.9% lettura + 8 cifre) | |
| 10.00A | 0.01A | ± (1.5% lettura + 8 cifre) | Fusibile rapidu 10A/1000V |
AC TRMS Current
| Gamma | Risoluzione | Precisione (*) (50 Hz¸1 kHz) | Prutezzione contru overcharge |
| 600.0 mA | 0.1 mA | ± (1.2% lettura + 5 cifre) | Fusibile rapidu 800mA/1000V |
| 6000 mA | 1 mA | ||
| 60.00 mA | 0.01 mA | ||
| 600.0 mA | 0.1 mA | ||
| 10.00A | 0.01A | ± (1.5% lettura + 5 cifre) | Fusibile rapidu 10A/1000V |
(*) Accuracy specified from 5% to 100% of the measuring range; For not sinusoidal waveforms accuracy is: +(10.0%reading + 10dgt)
Accuracy PEAK function: ±(10%rdg+30dgt) , AC+DC TRMS Current: accuracy (50Hz+1kHz): +(3.0%reading + 20dgt)
DC Current cù transducer clamp
| Gamma | Rapportu di output | Risoluzione | precisione (*) | Prutezzione contru overcharge |
| 1000 mA | 1V/1A | 1 mA | ± (1.5% rg + 6 dgt) | 1000 VDC/ACrms |
| 10A | 100mV / 1A | 0.01A | ||
| 30A | ||||
| 40 A (**) | 10mV / 1A | ±(1.5%rdg.+26dgt) (***) | ||
| 100A |
0.1A |
± (1.5% rg + 6 dgt) | ||
| 300A | ||||
| 400 A (**) | 1mV / 1A | ±(1.5%rdg.+26dgt) (***) | ||
| 1000A | 1mV / 1A | 1A | ± (1.5% rdg + 6dgt) | |
| 3000A |
(*) Accuracy referred to only instrument without transducer ; (**) With HT4006 transducer clamp ; (***) Accuracy instrument + clamp
AC TRMS Current cù transducer clamp
| Gamma | Rapportu di output | Risoluzione | Accuracy (*) (50Hz¸1kHz) | Prutezzione contra overcharge |
| 1000 mA | 1V/1A | 1 mA | ±(2.5% rg + 10dgt) | 1000 VDC/ACrms |
| 10A | 100mV / 1A | 0.01A | ||
| 30A | ||||
| 40 A (**) | 10mV / 1A | ±(3.5%rdg.+30dgt) (***) | ||
| 100A | 0.1A | ±(2.5% rg + 10dgt) | ||
| 300A | ||||
| 400 A (**) | 1mV / 1A | ±(3.5%rdg+30dgt) (***) | ||
| 1000A | 1A | ±(2.5% rg + 10dgt) | ||
| 3000A |
(*) Accuracy referred to only instrument without transducer ; Accuracy specified from 5% to 100% of the measuring range;
(**) With HT4006 transducer clamp ; (***) Accuracy instrument + clamp
For not sinusoidal waveforms accuracy is: ![]() (10.0%reading + 10dgt)
(10.0%reading + 10dgt)
Accuracy PEAK function: ±(10%rdg+30dgt) , AC+DC TRMS Current: accuracy (50Hz![]() 1 kHz):
1 kHz): ![]() (3.0%reading + 20dgt)
(3.0%reading + 20dgt)
4-20mA% reading
| Gamma | Risoluzione | Accuratezza | Corrispondenza |
| -25%¸125% | 0.1% | ± 50 dgt | 0mA=-25%, 4mA=0%, 20mA=100%, 24mA=125% |
Test di diodu
| Funzione | Pruvate currente | Max voltage cù circuitu apertu |
|
|
<1.5 mA | 3.2 VDC |
Frequenza (circuiti elettronichi)
| Gamma | Risoluzione | Accuratezza | Prutezzione contru overcharge |
| 40.00 Hz ¸ 10 kHz | 0.01 Hz ¸ 0.001 kHz | ± (0.5% lettura) | 1000 VDC/ACrms |
Sensibilità: 2 Vrms
Frequenza (circuiti elettronichi)
| Gamma | Risoluzione | Accuratezza | Prutezzione contra overcharge |
| 6.000 Hz | 0.001 Hz | ± (0.09% rdg + 5 cifre) | 1000 VDC/ACrms |
| 60.00 Hz | 0.01 Hz | ||
| 600.0 Hz | 0.1 Hz | ||
| 6.000 kHz | 0.001 kHz | ||
| 60.00 kHz | 0.01 kHz | ||
| 600.0 kHz | 0.1 kHz | ||
| 1.000 MHz | 0.001 MHz | ||
| 10.00 MHz | 0.01 MHz |
Sensitivity: >2Vrms (@ 20% +80% duty cycle) and f<100kHz; >5Vrms (@ 20% + 80% duty cycle) and f>100kHz
Test di resistenza è continuità
| Gamma | Risoluzione | Accuratezza | Buzzer | Prutezzione contra overcharge |
| 600.0 W | 0.1 W | ±(0.8% lettura + 10dgt) | <50 W | 1000 VDC/ACrms |
| 6.000 kW | 0.001 kW | ± (0.8% lettura + 5 cifre) | ||
| 60.00 kW | 0.01 kW | |||
| 600.0 kW | 0.1 kW | |||
| 6.000 MW | 0.001 MW | |||
| 60.00 MW | 0.01 MW | ±(2.5% lettura + 10dgt) |
Duty Cycle
| Gamma | Risoluzione | Accuratezza |
| 0.1% ¸ 99.9% | 0.1% | ± (1.2% lettura + 2 cifre) |
Pulse frequency range: 40Hz + 10kHz, Pulse amplitude: ±5V (100+s + 100ms)
Capacità
| Gamma | Risoluzione | Accuratezza | Prutezzione contru overcharge |
| 60.00 nF | 0.01 nF | ±(1.5% lettura + 20dgt) | 1000 VDC/ACrms |
| 600.0 nF | 0.1 nF | ± (1.2% lettura + 8 cifre) | |
| 6.000 mF | 0.001 mF | ± (1.5% lettura + 8 cifre) | |
| 60.00 mF | 0.01 mF | ± (1.2% lettura + 8 cifre) | |
| 600.0 mF | 0.1 mF | ± (1.5% lettura + 8 cifre) | |
| 6000 mF | 1 mF | ±(2.5% lettura + 20dgt) |
Temperature cun sonda di tipu K
| Gamma | Risoluzione | precisione (*) | Prutezzione contra overcharge |
| -40.0 °C ÷ 600.0 °C | 0.1 ° C | ± (1.5% lettura + 3 ° C) | 1000 VDC/ACrms |
| 600 °C ÷ 1350 °C | 1 ° C | ||
| -40.0 °F ÷ 600.0 °F | 0.1 ° F | ±(1.5% di lettura + 5.4 °F) | |
| 600 °F ÷ 2462 °F | 1 ° F |
(*) Precisione di u strumentu senza sonda; Precisione specificata cù una temperatura ambiente stabile à ±1 °C
Per e misurazioni di longa durata, a lettura aumenta di 2 °C
7.1.1. Norme di riferimentu
Sicurezza: IEC/EN61010-1
EMC: IEC/EN 61326-1
Isulamentu: doppia isolamentu
Livellu di contaminazione: 2
Overvoltage categuria: CAT IV 600V, CAT III 1000V
7.1.2. caratteristiche generale
caratteristiche meccanica
Dimensioni (L x W x H): 175 x 85 x 55 mm (7 x 3 x 2 in)
Peso (batterie incluse): 400 g (14 once)
Prutezzione meccanica: IP40
Alimentazione elettrica
Tipu di batteria: 1 × 7.4V batteria ricaricabile Li-ION, 1300mAh
Battery charger power supply: 100/240VAC, 50/60Hz, 10VDC, 1A
Indicazione di batteria bassa: simbulu "![]() »Nantu à u screnu
»Nantu à u screnu
Durata di a batteria: ca. 15 ore
Auto Power OFF: after 5 60min minutes’ idling (may be disabled)
Fuses: F10A/1000V, 10 x 38mm (input 10A)
F800mA/1000V, 6 x 32mm (input mAuA)
Mostra
Cunversione: TRMS
Characteristics: colour TFT, 6000 dots with bargraph
Sampling frequency: 3 times/s
Memoria MEASURES → max 2000, GRAPHS → max 50 RECORDINGS → 128 of max 20000 points
7.1.3. Cundizioni ambientali per l'usu
Temperature de référence : 18°C ![]() 28 ° C (64 ° F
28 ° C (64 ° F ![]() 82 ° F)
82 ° F)
Operating temperature: 5°C ÷ 40°C (41°F ![]() 104 ° F)
104 ° F)
Umidità relativa permessa: <80% RH
Storage temperature: -20°C ÷ 60°C (-4°F ![]() 140 ° F)
140 ° F)
Umidità di almacenamiento: <80% RH
Altitudine operativa massima: 2000 m (6562 ft)
Stu strumentu risponde à i bisogni di Low Voltage Direttiva 2014/35/UE (LVD) è di a Direttiva EMC 2014/30/UE
Stu strumentu risponde à i requisiti di a Direttiva Europea 2011/65/UE (RoHS) è 2012/19/UE (WEEE)
7.2. ACCESSORI
7.2.1. Accessori furniti
- Coppia di cavi di prova cù punte 2/4 mm
- Adattatore + sonda filu di tipu K
- Li-ION rechargeable battery Code BAT64
- Battery charger power supply multiplug + interface Code A64
- Carrying bag and user manual
7.2.2. Accessori opzionali
- Sonda di tipu K per a temperatura di l'aria è u gasu Codice TK107
- Sonda di tipu K per a temperatura di a sostanza semisolida Codice TK108
- Sonda di tipu K per a temperatura di u liquidu Codice TK109
- Sonda di tipu K per a temperatura di a superficia Codice TK110
- Sonda di tipu K per a temperatura di a superficia cù punta à 90 ° Codice TK111
- Trasduttore flessibile clamp AC 30/300/3000A Cod. F3000U
- Transducer standard clamp DC/AC 40-400A/1V Cod. HT4006
- Transducer standard clamp AC 1-100-1000A/1V Cod. HT96U
- Transducer standard clamp AC 10-100-1000A/1V Cod. HT97U
- Transducer standard clamp DC 1000A/1V Cod. HT98U
- Adapter for standard transducer clamp with HT connector Cod. NOCANBA
ASSISTENZA
8.1. CONDIZIONI DI GARANTIA
This instrument is warranted against any material or manufacturing defect, in compliance with the general sales conditions. During the warranty period, defective parts may be replaced. However, the manufacturer reserves the right to repair or replace the product. Should the instrument be returned to the After-sales Service or to a Dealer, transport will be at the Customer’s charge. However, shipment will be agreed in advance. A report will always be enclosed to a shipment, stating the reasons for the product’s return. Only use original packaging for shipment. Any damage due to the use of non-original packaging material will be charged to the Customer. The manufacturer declines any esponsibility for injury to people or damage to property.
A garanzia ùn hè micca applicata in i seguenti casi:
- Riparazione è / o sustituzione di l'accessori è a bateria (micca coperta da a garanzia).
- Riparazioni chì ponu esse necessarie in cunseguenza di un usu incorrectu di l'instrumentu o per u so usu inseme cù l'apparecchi non cumpatibili.
- Riparazioni chì ponu esse necessarie in cunseguenza di imballaggio impropriu.
- Riparazioni chì ponu esse necessarie in cunsequenza di intervenzioni realizate da persunali micca autorizati.
- Modifiche à l'instrumentu realizate senza l'autorizazione esplicita di u fabricatore.
- L'usu ùn hè micca previstu in e specificazioni di l'instrumentu o in u manuale d'istruzzioni.
U cuntenutu di stu manuale ùn pò esse riprodottu in alcuna forma senza l'autorizazione di u fabricatore.
I nostri prudutti sò patentati è i nostri marchi sò registrati. U fabricatore si riserva u dirittu di fà cambiamenti in e specificazioni è i prezzi, s'ellu hè dovutu à migliurà in a tecnulugia.
8.2. ASSISTENZA
Se l'instrumentu ùn funziona micca bè, prima di cuntattà u Serviziu Post-vendita, verificate e cundizioni di a batteria è i cavi è rimpiazzà, se ne necessariu. Se l'instrumentu ùn funziona ancu micca bè, verificate chì u pruduttu hè operatu secondu l'istruzzioni date in stu manuale. En cas de restitution de l'instrument au Service Après-vente ou à un Revendeur, le transport sera à la charge du Client. Tuttavia, u trasportu serà accunsentutu in anticipu. Un rapportu serà sempre chjusu à una spedizione, indicà i motivi di u ritornu di u pruduttu. Aduprate solu l'imballu originale per a spedizione; ogni dannu dovutu à l'usu di materiale di imballaggio non originale serà incaricatu di u Cliente.
HT ITALIA SRL
Via della Boaria, 40
48018 – Faenza (RA) – Italie
T + 39 0546 621002
F +39 0546 621144
M info@ht-instruments.com
www.ht-instruments.it
HT INSTRUMENTS SL
C/ Legalitat, 89
08024 Barcelona - Spagna
T +34 93 408 17 77
F +34 93 408 36 30
M info@htinstruments.es
www.ht-instruments.com/es-es/
HT INSTRUMENTS GmbH
Am Waldfriedhof 1b
D-41352 Korschenbroich - Germania
T +49 (0) 2161 564 581
F +49 (0) 2161 564 583
M info@htinstruments.de
www.ht-instruments.de
INDUNI simu
 https://l.ead.me/bcsxjF
© Copyright HT ITALIA 2024
Liberazione 3.01 - 04/12/2024
Documenti / Risorse
 |
HT Instruments HT64 TRMS/AC+DC Digital Multimeter With Colour LCD Display [pdfManuale d'usu HT64, HT64 TRMS AC DC Digital Multimeter With Colour LCD Display, HT64, TRMS AC DC Digital Multimeter With Colour LCD Display, Digital Multimeter With Colour LCD Display, Multimeter With Colour LCD Display, Colour LCD Display, LCD Display, Display |